The ability to provide a quick feedback to your users is a nice feature. Nonetheless, you want to instruct your form to know what to do in case the user clicks the Submit button.
To build this feature, you need to attach a handler to the submit event triggered by the form. Your handler’s aim is to perform an Ajax request to contact.php, sending all the values inserted. As soon as the server returns the result, you need to analyze it. If it contains errors, you need to show each error message in the respective field’s span. Then you need to show the dialog box containing the general message of the request, which will indicate either success or failure. The code for this feature is shown in the listing that follows.
Listing 11.4. The handler to manage the submit request via an Ajax request
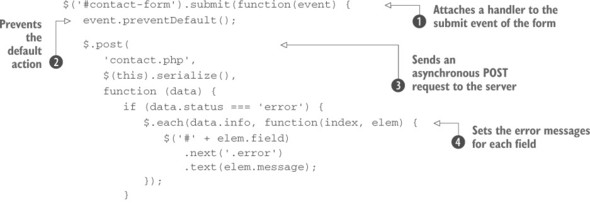
This code isn’t very different from that shown in the previous section. Here you establish a listener for the submit event of the form ![]() . In it you prevent the default action—that is, sending a synchronous POST request—using the preventDefault() method. You use it because you don’t want the POST request to be sent anyway after executing your code
. In it you prevent the default action—that is, sending a synchronous POST request—using the preventDefault() method. You use it because you don’t want the POST request to be sent anyway after executing your code ![]() .
.
The next operation you must perform is to send the request to the server. Once again, you need it to be a POST request. This time you don’t need to specify a callback for the error status, so you can use the $.post() utility function because its arguments are enough for your needs ![]() . The first argument passed is the page that will receive the data, contact.php. Then you serialize the form so that the values contained in its fields will be sent in the body of the request. The third parameter is the success callback. Finally, specify the type of data expected (json).
. The first argument passed is the page that will receive the data, contact.php. Then you serialize the form so that the values contained in its fields will be sent in the body of the request. The third parameter is the success callback. Finally, specify the type of data expected (json).
Inside the success handler of $.post(), check the value of the status property of the object returned. If it’s error, iterate over the info property to set the error message for each field containing errors ![]() .
.
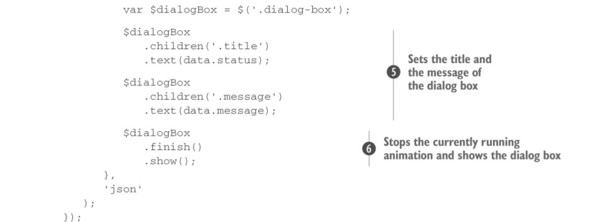
Regardless of the validity of the fields, you have to show general feedback to your users using the dialog box you created. To do so, set the title and the message of the dialog box ![]() and then show it
and then show it ![]() . Before showing the dialog box, also ensure that any previous animation is stopped by calling jQuery’s finish() method.
. Before showing the dialog box, also ensure that any previous animation is stopped by calling jQuery’s finish() method.
With this code in place, when the user clicks the Submit button, the handler we just discussed is executed. Then the dialog box is shown, reporting the success or failure message. At this point the interaction will hang. Can you image why? Take a few seconds to think about it.
The reason is that you haven’t instructed the button of the dialog to close (hide) the dialog once the user clicks it. Let’s fix this issue.
Hiding the dialog box
Closing the dialog box shouldn’t be hard at this point of your path. But before delving into the code, let’s make a small optimization.
In the handler of the Ajax request shown in listing 11.4, you defined the variable $dialogBox:
var $dialogBox = $('.dialog-box');Because you need to operate again on this element of the page, you can save some keystrokes and slightly optimize the performance of your code by moving that statement to the beginning of your code (at the top of the script element).
To hide the dialog box when the button inside it is clicked, you need to attach a listener for the click event of the button itself. This can be done with the following snippet:
$dialogBox.children('button').click(function() {
   $(this)
      .parent()
      .hide();
});
With this addition your demo does everything you planned. If you’re excited about what you did so simply and you want to use this contact form in your next project, go ahead.
For those of you who want to go further, let’s see how you can improve the project using some effects.
Leave a Reply