The load() method makes either a GET or a POST request, depending on how the request parameter data (if any) is provided, but sometimes you want to have a bit more control over which HTTP method gets used. Why should you care? Because your server may care.
Web authors have traditionally played fast and loose with the GET and POST methods, using one or the other without heeding how HTTP intends for these methods to be used. The intentions for each method are as follows:
- GET requests —Intended to be idempotent; the same GET operation, made again and again and again, should return exactly the same results (assuming no other force is at work changing the server state).
- POST requests —Can be non-idempotent; the data they send to the server can be used to change the model state of the application—for example, adding or updating records in a database or removing information from the server.
A GET request should, therefore, be used whenever the purpose of the request is to merely get data, as its name implies. It may be required to send some parameter data to the server for the GET, for example, to identify a style number to retrieve color information. But when data is being sent to the server in order to effect a change, POST should be used.
Warning
This is more than theoretical. Browsers make decisions about caching based on the HTTP method used, and GET requests are highly subject to caching. Using the proper HTTP method ensures that you don’t get crossways with the browser’s or server’s expectations regarding the intentions of the requests. This is just a glimpse into the realm of RESTful principles, where other HTTP methods such as PUT and DELETE also come into play. But for our purposes, we’ll limit our discussion to the GET and POST methods.
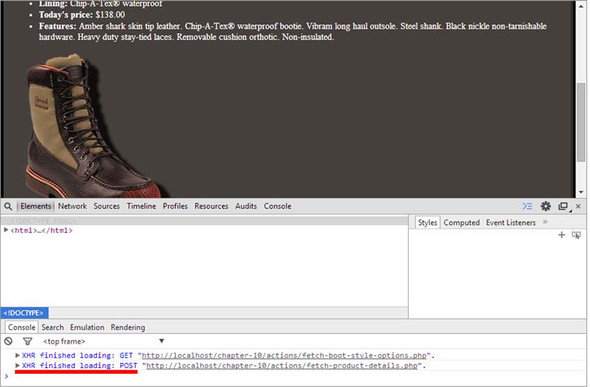
With that in mind, if you look back to our phase-one implementation of The Boot Closet (in listing 10.4), you’ll discover that you’re doing it wrong! Because jQuery initiates a POST request when you supply an object hash for the data parameter, you’re making a POST when you really should be making a GET request. If you glance at Chrome’s Developer Tools log (as shown in figure 10.4), when you display your page in Chrome, you can see that your second request, submitted when you make a selection from the style dropdown, is indeed a POST.
Figure 10.4. An inspection of the Chrome console shows that you’re making a POST request when you should be making a GET.
Note
The result you’ll see on your console is the same as the figure only if you enable the option Log XMLHttpRequests. If you don’t want to enable this option, you can take a look at the Network tab.
Does it really matter? That’s up to you, but if you want to use HTTP in the manner in which it was intended, your request to fetch the boot detail should be a GET rather than a POST.
Developer tools
Trying to develop a DOM-scripted application without the aid of a debugging tool is like trying to play concert piano while wearing welding gloves. Why would you do that to yourself?
Depending on the browser you’re using, there are different options you can choose to inspect your code. All modern major browsers have a set of built-in tools for this purpose, each with a different name, that you can adopt. For example, in Chrome these tools are called Developer Tools, whereas in Internet Explorer they’re called F12 developer tools. Firefox has its own built-in tools as well, but developers usually tend to use a plugin called Firebug. These tools not only let you inspect the JavaScript console, but they also allow you to inspect the live DOM, the CSS, the script, and many other aspects of your page as you work through its development.
One feature most relevant for your current purposes is the ability to log Ajax requests along with both the request and response information.
You could make the parameter that specifies the request information a string rather than an object (and we’ll revisit that a little later), but for now, let’s take advantage of another way that jQuery lets you initiate Ajax requests.
Getting data with GET
jQuery gives you a few means to send GET requests, which, unlike load(), are implemented not as jQuery methods but as utility functions. These are the functions we mentioned but didn’t cover in the previous lesson.
When you want to fetch some data from the server and decide what to do with it by yourself (rather than letting the load() method set it as the content of one or more elements), you can use the $.get() utility function.
| Function syntax: $.get | |
|---|---|
| $.get(url[, data][, callback][, dataType]) | |
| Sends a GET request to the server using the specified URL with any passed parameters as the query string. | |
| Parameters | |
| url | (String) The URL of the server-side resource to contact via the GET method. If an empty string is passed, the request is sent to the current URL at the time the method is invoked. |
| data | (String|Object) Specifies any data that’s to be passed as request parameters in the query string. This parameter is optional and can be a string or an object whose properties are serialized into properly encoded parameters to be passed to the request. |
| callback | (Function) An optional function invoked when the request completes successfully. The response body is passed as the first parameter to this callback, interpreted according to the setting of the dataType parameter, and the status string is passed as the second parameter. A third parameter contains a reference to the jqXHR instance. Inside the callback, the context (this) is set to an object that represents the Ajax settings used in the call. This parameter becomes required if dataType is provided. In case you don’t need a function, you can pass null or $.noop() as a placeholder. |
| dataType | (String) Optionally specifies how the response body is to be interpreted, and it can be one of the following values: html, text, xml, json, script, or jsonp. The default value is determined by jQuery depending on the response obtained and will be one among xml, json, script, or html. See the description of $.ajax() later in this lesson for more details. |
| Returns | |
| The jqXHR instance. | |
jQuery 3: Signature added
jQuery 3 adds a new signature for the $.get() utility function:
$.get([options])options is an object that can possess many properties. To learn more about it, please refer to the description of the $.ajax() utility function discussed later in this lesson. It’s worth noting that the method property that the options object can contain will automatically be set to "GET".
The $.get() utility function allows you to perform GET requests in a more versatile way. In addition to the request parameters and the callback to be invoked upon a successful response, you can now even direct how the response is to be interpreted and passed to the callback. If even that’s not enough versatility, you’ll be see a more general function, $.ajax(), where you’ll also examine the dataType parameter in greater detail. For now you’ll let it default to html or xml depending on the content type of the response. By using $.get() in your Boot Closet page, you can replace the use of the load() method, as shown in the next listing.
Listing 10.5. Changing The Boot Closet to use a GET when fetching style details
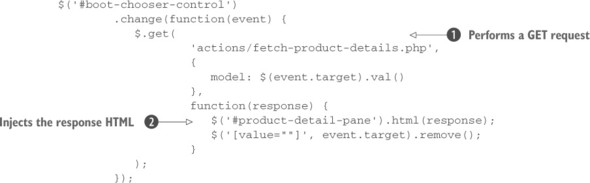
The changes for this second phase of our page are subtle but significant. You call $.get() ![]() in place of load(), passing the same URL and the same request parameters. Because you’re using the $.get() utility function in this case, you can be assured that a GET request will be performed even if you pass an object. $.get() doesn’t automatically inject the response anywhere within the DOM, so you need to do that yourself by using jQuery’s html() method
in place of load(), passing the same URL and the same request parameters. Because you’re using the $.get() utility function in this case, you can be assured that a GET request will be performed even if you pass an object. $.get() doesn’t automatically inject the response anywhere within the DOM, so you need to do that yourself by using jQuery’s html() method ![]() .
.
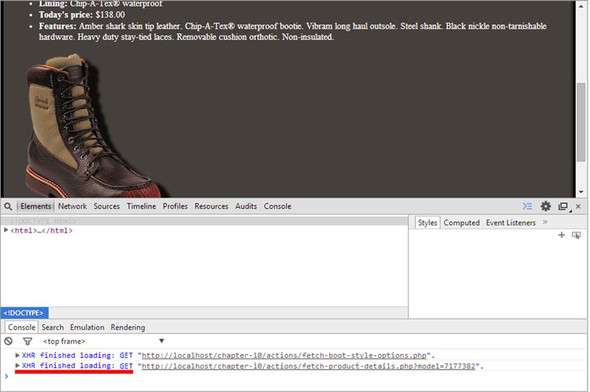
The code for this version of our page can be found at http://localhost[:8080]/ lesson-10/phase.2.html. Loading the page and selecting a style dropdown, you can see that a GET request has been made, as shown in figure 10.5.
Figure 10.5. Now you can see that the second request is a GET rather than a POST, as befitting the operation.
In this example you returned HTML code from the server and inserted it into the DOM, but as you can see from the values available for the dataType parameter of $.get(), there are many possibilities other than HTML.
Let’s look at another jQuery utility function that’s quite useful when your data needs suggest that you should employ the JSON format.
Getting JSON data
When XML is overkill or otherwise unsuitable as a data-transfer mechanism, JSON is often used in its place. One reason for this choice is that JSON is astoundingly easy to digest in client-side scripts, and jQuery makes it even easier.
For times when you know that the response will be JSON, the $.getJSON() utility function automatically parses the returned JSON string and makes the resulting JavaScript value available to its callback. The syntax of $.getJSON(), shown next, has parameters with the same meaning described for $.get(), so we won’t repeat them.
As you can see from the description, this function is simply a convenience function for calling $.get() with a dataType of "json".
$.getJSON() isn’t the only one, as you’ll discover in the next section.
Dynamically loading script
Most of the time, you’ll load the external scripts that your page needs from script files when the page loads via <script> tags at the bottom of your page. But every now and then you might want to load a script under script control. You might do this because you don’t know if the script will be needed until after some specific user activity has taken place, and you don’t want to include the script unless it’s absolutely needed. Or perhaps you need to use some information not available at load time to make a conditional choice between various scripts.
Regardless of why you might want to dynamically load new scripts into the page, jQuery provides the $.getScript() utility function to make it easy. This utility function also has parameters with the same meaning described for $.get(), so we won’t repeat them.
| Function syntax: $.getScript |
|---|
| $.getScript(url[, callback]) |
| Fetches the script specified by the url parameter performing a GET request to the specified server, optionally invoking a callback upon success. The URL isn’t restricted to the same domain as the containing page. |
| Returns |
| The jqXHR instance. |
Under the covers, this function invokes $.get() by setting the data parameter to undefined and the dataType parameter to "script". In the source of jQuery the $.getScript() utility function is defined as follows:
getScript: function( url, callback ) {
   return jQuery.get( url, undefined, callback, "script" );
}
When this function is executed, the script in the file is evaluated, any inline script is executed, and any defined variables or functions become available.
Let’s see this in action. Consider the following script file (available in lesson-10/external.js):
alert('I am inline!');
var someVariable = 'Value of someVariable';
function someFunction(value) {
   alert(value);
}
This trivial script file contains an inline statement (which issues an alert that leaves no doubt as to when the statement gets executed), a variable declaration, and a declaration for a function that issues an alert containing whatever value is passed to it when executed. Now let’s write a page to include this script file dynamically. The page is shown in the next listing and can be found in the file lesson-10/$.getScript.html.
Listing 10.6. Dynamically loading a script file and examining the results
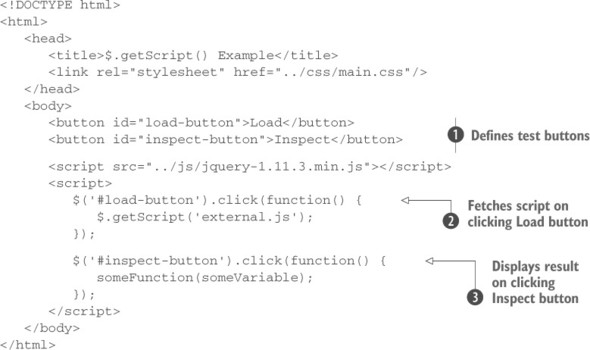
This page defines two buttons ![]() that you use to trigger two different actions. The Load button causes the “external.js” file to be dynamically loaded through the use of the $.getScript() utility function
that you use to trigger two different actions. The Load button causes the “external.js” file to be dynamically loaded through the use of the $.getScript() utility function ![]() . Click this button and, as expected, the inline statement within the file triggers an alert message, as shown in figure 10.6.
. Click this button and, as expected, the inline statement within the file triggers an alert message, as shown in figure 10.6.
Figure 10.6. The dynamic loading and evaluation of the script file results in the inline alert statement being executed.
Clicking the Inspect button executes its click handler ![]() , which executes the dynamically loaded someFunction() function, passing the value of the dynamically loaded someVariable variable. If the alert appears as shown in figure 10.7, you know that both the variable and function are loaded correctly.
, which executes the dynamically loaded someFunction() function, passing the value of the dynamically loaded someVariable variable. If the alert appears as shown in figure 10.7, you know that both the variable and function are loaded correctly.
Figure 10.7. The appearance of the alert shows that the dynamic function is loaded correctly, and the correctly displayed value shows that the variable was dynamically loaded.
In addition to providing these utility functions to perform GET requests, jQuery also lets you make POST requests. Let’s see how.
Making POST requests
There are a number of reasons why you might choose a POST over a GET. First, the intention of HTTP is that POST will be used for any non-idempotent requests. Therefore, if your request has the potential to cause a change in the server-side state, resulting in varying responses, it should be a POST. Moreover, accepted practices and conventions aside, a POST operation must sometimes be used when the data to be passed to the server exceeds the small amount that can be passed by a URL in a query string—a limit that’s a browser-dependent value. And sometimes the server-side resource you contact might perform different functions depending on whether your request uses the GET or POST method. These are just a few of the many reasons why you might want to choose a POST request over a GET request.
For those occasions when a POST is needed, jQuery offers the $.post() utility function. This utility function is identical to $.get() except for employing the POST HTTP method. For this reason, in the description of the syntax of the method, we won’t repeat the meaning of the parameters. The syntax of $.post() is as follows.
| Function syntax: $.post |
|---|
| $.post(url[, data][, callback][, dataType]) |
| Sends a POST request to the server using the specified URL, with any parameters passed within the body of the request |
| Returns |
| The jqXHR instance |
jQuery 3: Signature added
jQuery 3 adds a new signature for the $.post() utility function:
$.post([options])options is an object that can possess many properties. To learn more about it, please refer to the description of the $.ajax() utility function discussed later in this lesson. It’s worth noting that the method property that the options object can contain will automatically be set to "POST".
jQuery takes care of the details of passing the request data in the request body (as opposed to the query string) and sets the HTTP method appropriately.
Now, getting back to the Boot Closet project, you’ve made a really good start, but there’s more to buying a pair of boots than selecting a style; customers are sure to want to pick which color they like, and certainly they’ll need to specify their size. We’ll use these additional requirements to show how to solve one of the most-asked questions on the web, that of…
Implementing cascading dropdowns
The implementation of cascading dropdowns—where subsequent dropdown options depend on the selections of previous dropdowns—is one of the most used patterns on the web. In this section we’re going to implement a solution on the Boot Closet page that demonstrates how ridiculously simple jQuery makes it.
You’ve already seen how easy it is to load a dropdown dynamically with server-powered option data, but now you’ll see that tying multiple dropdowns together in a cascading relationship is only slightly more work.
Let’s dig in by listing the changes you need to make in the next phase of your page:
- Add dropdowns for color and size.
- When a style is selected, add options to the color dropdown that show the colors available for that style.
- When a color is selected, add options to the size dropdown that show the sizes available for the selected combination of style and color.
- Make sure things remain consistent. This includes removing the “- please make a selection -” options from newly created dropdowns once they’ve been used and making sure that the three dropdowns never show an invalid combination.
You’re also going to revert to using load() again, this time coercing it to initiate a GET rather than a POST. The reason is that load() seems more natural when you’re using Ajax to load HTML fragments.
To start off, let’s examine the new HTML markup that defines the additional dropdowns. A new container for the select elements is defined to contain three labeled elements:
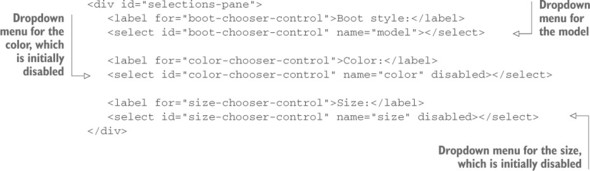
The previous model’s select element remains, but it has been joined by two more: one for color and one for size, each of which is initially empty and disabled (by using the disabled attribute).
The style selection dropdown must now perform double duty. Not only must it continue to fetch and display the boot details when a selection is made, but its change handler must now also populate and enable the color-selection dropdown with the colors available for whatever style was chosen.
Let’s refactor the fetching of the details first. You want to use load(), but you also want to force a GET, as opposed to the POST that you were initiating earlier. In order to have load() induce a GET, you need to pass a string rather than an object to specify the request parameter data. Luckily, with jQuery’s help, you won’t have to build that string yourself. The first part of the change handler for the style dropdown gets refactored like this:
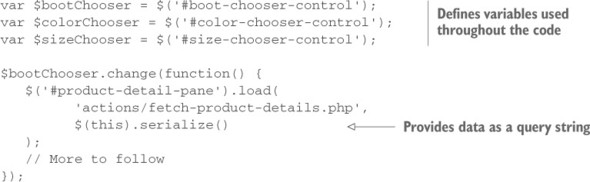
By using jQuery’s serialize() method, you create a string representation of the value of the style dropdown, thereby coercing the load() method to initiate a GET, just as you wanted.
The second duty that the change handler needs to perform is to load the color-choice dropdown with appropriate values for the chosen style and then enable it. Take a look at the rest of the code to be added to the handler:
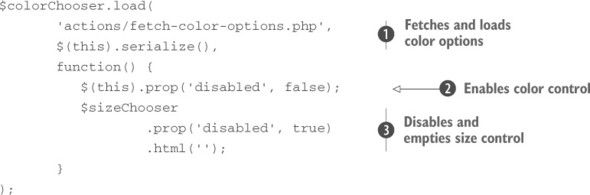
This code should look familiar. It’s another use of load(), this time loading data from a page named actions/fetch-color-options.php, which is designed to return a set of formatted <option>s representing the colors available for the chosen style passed ![]() .
.
You also specify a callback to be executed when the GET request successfully returns a response. In this callback, you perform two important tasks. First, you enable the color-chooser control ![]() . The call to load() injects the <option> tags, but once populated, it would still be disabled if you didn’t enable it. Second, the callback disables and empties the size-chooser control
. The call to load() injects the <option> tags, but once populated, it would still be disabled if you didn’t enable it. Second, the callback disables and empties the size-chooser control ![]() . Why? (Pause a moment and think about it.)
. Why? (Pause a moment and think about it.)
Even though the size control will already be disabled and empty the first time the style chooser’s value is changed, what about later on? What if, after the customer chooses a style and a color (which you’ll soon see results of in the population of the size control), they change the selected style? The sizes displayed depend on the combination of style and color, so the sizes previously displayed are no longer applicable and don’t reflect a consistent view of what’s chosen. Therefore, whenever the style changes, you need to blow the size options away and reset the size control to initial conditions.
Before you sit back and enjoy a lovely beverage, you have more work to do. You still have to instrument the color-chooser dropdown to use the selected style and color values to fetch and load the size-chooser dropdown. The code to do this follows a familiar pattern:
$colorChooser.change(function() {
   $sizeChooser.load(
           'actions/fetch-size-options.php',
           $colorChooser
                   .add($bootChooser)
                   .serialize(),
           function() {
              $(this).prop('disabled', false);
           }
   );
});
Upon a change event in the color control, the size information is obtained via the actions/fetch-size-options.php page, passing both the boot style and color selections, and the size control is enabled.
There’s one more thing that you need to do. When each dropdown is initially populated, it’s seeded with an option element with a blank value and display text along the lines of “- choose a something -”. You may recall that in the previous phases of this page, you added code to remove that option from the style dropdown upon selection.
Well, you could add such code to the change handlers for the style and color dropdowns and add instrumentation for the size dropdown (which currently has none) to add that. But let’s be a bit more suave about it.
One capability of the event model that often gets ignored by many a web developer is event bubbling. Page authors frequently focus only on the targets of events and forget that events will bubble up the DOM tree, where handlers can deal with those events in more general ways than at the target level.
If you recognize that removing the option with a blank value from any of the three dropdowns can be handled in the exact same fashion regardless of which dropdown is the target of the event, you can avoid repeating the same code in three places by establishing a single handler, higher in the DOM, that will recognize and handle the change events. This trick should remind you of our discussion about event delegation in lesson 6.
Recalling the structure of the document, the three dropdowns are contained within a <div> element with an ID of selections-pane. You can handle the removal of the temporary option for all three dropdowns with the following single listener:
$('#selections-pane').change(function(event){
   $('[value=""]', event.target).remove();
});
This listener will be triggered whenever a change event happens on any of the enclosed dropdowns, and it will remove the option with the blank value within the context of the target of the event (which will be the changed dropdown).
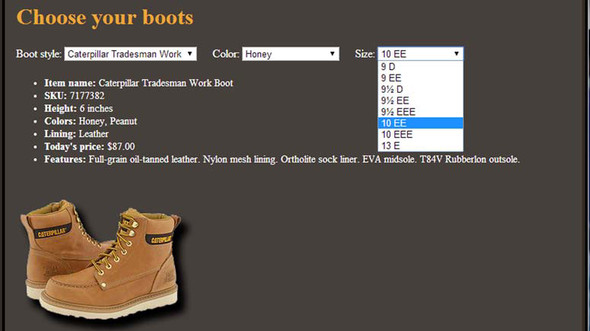
With that, you’ve completed phase three of The Boot Closet, adding cascading dropdowns into the mix, as shown in figure 10.8. You can use the same techniques in any pages where dropdown values depend on previous selections. The page for this phase can be found at http://localhost[:8080]/lesson-10/phase.3.html.
Figure 10.8. The third phase of The Boot Closet shows how easy it is to implement cascading dropdowns.
The full code of the page is now as shown in the following listing.
Listing 10.7. The Boot Closet, now with cascading dropdowns!
<!DOCTYPE html>
<html>
   <head>
      <title>The Boot Closet - Phase 3</title>
      <link rel="stylesheet" href="../css/main.css" />
      <link rel="stylesheet" href="../css/bootcloset.css" />
   </head>
   <body>
      <div id="banner"></div>

      <h1>Choose your boots</h1>
      <div>
      <div id="selections-pane">
         <label for="boot-chooser-control">Boot style:</label>
         <select id="boot-chooser-control" name="model"></select>
         <label for="color-chooser-control">Color:</label>
         <select id="color-chooser-control" name="color" disabled></select>
         <label for="size-chooser-control">Size:</label>
         <select id="size-chooser-control" name="size" disabled></select>
      </div>
      <div id="product-detail-pane"></div>

      <script src="../js/jquery-1.11.3.min.js"></script>
      <script>
         var $bootChooser = $('#boot-chooser-control');
         var $colorChooser = $('#color-chooser-control');
         var $sizeChooser = $('#size-chooser-control');

         $bootChooser
                 .load('actions/fetch-boot-style-options.php')
                 .change(function() {
                    $('#product-detail-pane').load(
                       'actions/fetch-product-details.php',
                       $(this).serialize()
                    );

                    $colorChooser.load(
                            'actions/fetch-color-options.php',
                            $(this).serialize(),
                            function() {
                               $(this).prop('disabled', false);
                               $sizeChooser
                                       .prop('disabled', true)
                                       .html('');
                            }
                    );
                 });

         $colorChooser.change(function() {
            $sizeChooser.load(
                    'actions/fetch-size-options.php',
                    $colorChooser
                            .add($bootChooser)

                            .serialize(),
                    function() {
                       $(this).prop('disabled', false);
                    }
            );
         });

         $('#selections-pane').change(function(event){
            $('[value=""]', event.target).remove();
         });
      </script>
   </body>
</html>
As you’ve seen, with the load() method and the various GET and POST jQuery Ajax functions at your disposal, you can exert some measure of control over how your request is initiated and how you’re notified of its completion. But for those times when you need full control over an Ajax request, jQuery has a means for you to get as picky as you want.
Leave a Reply