Let’s pretend that you’re a videophile whose collection of DVDs, numbering in the thousands, has become a huge problem. Not only has organization become an issue, making it hard to find a DVD quickly, but all those DVDs in their cases have become a storage problem. They’ve taken over way too much space and will get you thrown out of the house if the problem isn’t solved.
We’ll posit that you solved the storage side of the problem by buying DVD binders that hold one hundred DVDs each in much less space than the comparable number of DVDs in their cases. But although that saved you from having to sleep on a park bench, organizing the DVD discs is still an issue. How will you find a DVD that you’re looking for without having to manually flip through each binder until you find the one you’re seeking?
You can’t do something like sort the DVDs in alphabetical order to help quickly locate a specific disc. That would mean that every time you bought a new DVD, you’d need to shift all the discs in perhaps dozens of binders to keep the collection sorted. Imagine the job ahead of you if you bought Armageddon!
Well, you have a computer, you have the know-how to write web applications, and you have jQuery! You’ll solve the problem by writing a DVD database program to help keep track of what DVDs you have and where they are. The code for this example can be found in the file lesson-7/dvds.html.
Note
This demo has been heavily changed compared to the one presented in the second edition of this app. If you bought it (thank you!), we really encourage you not to skip this lesson. You’ll find a lot of new stuff, and this time the filters really work (in the old version you had always the same, static results)!
The project you’re going to build uses a few Ajax calls to perform some tasks. We haven’t covered this topic yet, but we assure you that this lack won’t make it harder for you to see all the other concepts in action. Due to the security restrictions of some browsers, the demo can raise an error. We already advised you about this issue in lesson 3, but for your convenience we’re repeating the same note here.
Note
Due to security restrictions of some browsers, you may fail in playing with this demo. To avoid this issue, you can either execute the page under a web server like Apache, Tomcat, or IIS or search for a specific solution for your browser. For example, in WebKit-based browsers, you can run it through the command-line interface (CLI) using the flag --allow-file-access-from-files. It’s important that the command creates a new process, so it must open not a new tab but a new window.
Let’s get to work!
Filtering large data sets
Our DVD database program is faced with the same problem of many other applications, web-delivered or otherwise. How do you allow your users (in this case yourself) to quickly find the information they seek?
You could be all low-tech about it and display a sorted list of all the titles, but that would still be painful to scroll through if there’s anything more than a handful of entries. Besides, you want to learn how to do it right so that you can apply what you learn to real, customer-facing applications. So no shortcuts!
Obviously, designing a complex application would be well beyond the scope of this lesson. Therefore, we’ll concentrate on developing a control panel that allows you to specify filters with which you can tune the list of titles returned when you perform a database search.
You’ll want the ability to filter on the DVD title, of course. But you’ll also add the ability to filter the search based on the year that the movie was released, the binder in which you placed the disc, and even whether you’ve viewed the movie yet or not. (This will help answer the commonly asked question, “What should I watch tonight?”)
Your initial reaction may be to wonder what the big deal is. After all, you can put up a number of fields and be done with it, right? Well, not so fast.
A single field for something like the title is fine if, for example, you want to find all movies with the word creature in their title. But what if you want to search for creature only if the movie was released between 1987 and 1999?
In order to provide a robust interface for specifying filters, you’ll need to specify multiple filters for different properties of the DVD. But in this project you won’t allow specifying the same filter multiple times. In addition, rather than trying to guess how many filters will be needed, you’ll create them on demand.
Each filter is identified by a drop-down (single-selection select element) that specifies the field that’s to be filtered. Based on the type of that field (string, date, number, and even Boolean), the appropriate controls are displayed on the line to capture information about the filter. The users are given the ability to add as many of these filters as they like but, once again, one of the same type, or to remove previously specified filters.
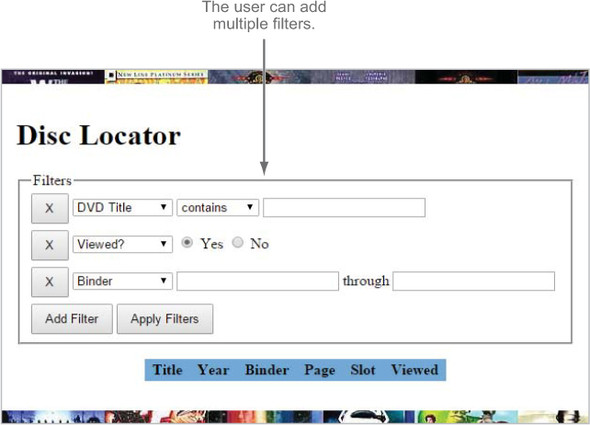
A picture being worth a thousand words, study the time-progression display of figures 7.1a through 7.1c. They show the filter panel that you’ll build (a) when initially displayed, (b) after a filter has been specified, and (c) after a number of filters have been specified.
Figure 7.1a. The display initially shows a single, unconfigured filter.

Figure 7.1b. After a filter type is selected, its qualifier controls are added.
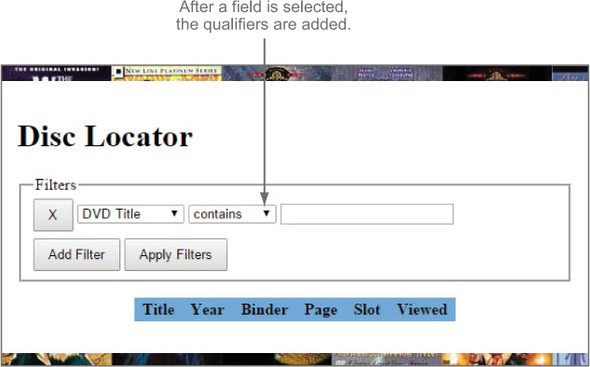
Figure 7.1c. The user can add multiple filters.
As you can see by inspecting the interactions shown in figures 7.1a through 7.1c, there’s going to be a lot of element creation on the fly. Let’s take a few moments to discuss how you’re going to go about that.
Element creation by template replication
You can readily see that to implement this filtering control panel, you’re going to need to create a fair number of elements in response to various events. For example, you’ll need to create a new filter entry whenever the user clicks the Add Filter button and new controls specific for that filter whenever a specific field is selected.
No problem! As you’ve learned, jQuery allows you to dynamically create elements using the $() function. Although you’ll do some of that in this example, you’re also going to explore some higher-level alternatives.
When you’re dynamically creating lots of elements, all the code necessary to create those elements and stitch together their relationships can get a bit unwieldy and difficult to maintain, even with jQuery’s assistance. (Without jQuery’s help, it can be a complete nightmare!) It would be great if you could create a “blueprint” of the complex markup using HTML and then replicate it whenever you needed an instance of the blueprint.
Yearn no more! The jQuery clone() method gives you just that ability.
The approach that you’re going to take is to create sets of template markup that represent the HTML fragments you’d like to replicate and use the clone() method whenever you need to create an instance of that template. You don’t want these templates to be visible to the end user, so you’ll wrap them in a div element that’s hidden from view using CSS.
As an example, consider the combination of the X button and drop-down that identifies the filterable fields. You’ll need to create an instance of this combination every time the user clicks the Add Filter button. The jQuery code to create such a button and the select element, along with its child option elements, could be considered a tad long, although it wouldn’t be too onerous to write or maintain. But it’s easy to envision that anything more complex would get unwieldy quickly.
Using our template technique, and placing the template markup for that button and drop-down in a parent <div> used to hide all the templates, create the markup as follows:
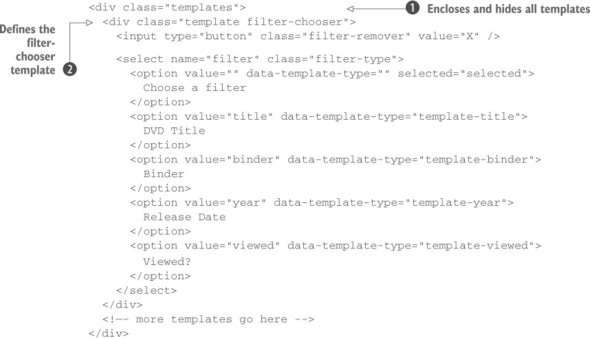
The outer <div> with class of templates serves as a container for all your templates and will be given a CSS declaration display: none; to prevent it from being displayed ![]() . Within this container, you define another <div> that you give the classes template and filter-chooser
. Within this container, you define another <div> that you give the classes template and filter-chooser ![]() . You’ll use the template class to identify (single) templates in general and the filter-chooser class to identify this particular template type. You’ll see how these classes are used as JavaScript hooks shortly.
. You’ll use the template class to identify (single) templates in general and the filter-chooser class to identify this particular template type. You’ll see how these classes are used as JavaScript hooks shortly.
Also note that each <option> in the <select> has been given a custom attribute: data-template-type. You’ll use this value to determine what type of filter controls need to be used for the selected filter field.
Based on which filter type is identified, you’ll populate the remainder of the filter entry line with controls that are appropriate for the filter type. For example, if the template type is template-title, you’ll want to display a text field into which the user can type a title (or part of it) to search and a drop-down giving them options for how that term is to be applied (contains, equal to, and so on).
You’ll set up the template for this set of controls as follows:
<div class="template template-title">
   <select name="title-condition">
      <option value="contains">contains</option>
      <option value="starts-with">starts with</option>
      <option value="ends-with">ends with</option>
      <option value="equal">is exactly</option>
   </select>
   <input type="text" name="title" />
</div>
Again, you use the template class to identify the element as a template, and flag the specific template with the class template-title. We’ve purposely made it such that this class matches the data-template-type value on the field chooser drop-down.
Replicating these templates whenever and wherever you want is easy using the jQuery knowledge you have under your belt. Let’s say that you want to append a template instance to the end of an element that you have a reference to in a variable named whatever. You could write
$('div.template.template-title')
   .clone()
   .appendTo(whatever);
In this statement, you select the template container to be replicated (in this case, the one having class template-title) using those convenient classes you placed on the template markup. Then you clone the element using the clone() method, and finally you attach the template to the end of the contents of the element identified by whatever. See why we keep emphasizing the power of jQuery method chains?
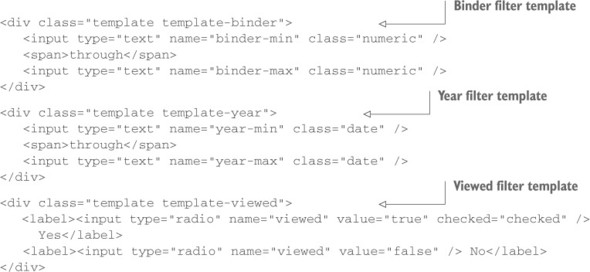
Inspecting the options of the filter-chooser drop-down, you see that you have a number of other template types defined: template-binder, template-year, and template-viewed. You’ll define controls templates for those filter types as well with this code:
Okay. Now that you have your replication strategy defined, let’s take a look at the primary markup.
Leave a Reply