If you refer back to figure 7.1a, you can see that the initial display of your DVD search page is pretty simple: a header, a first filter instance, a few buttons, and a preset table where you’ll display the results. Take a look at the HTML markup that achieves that:
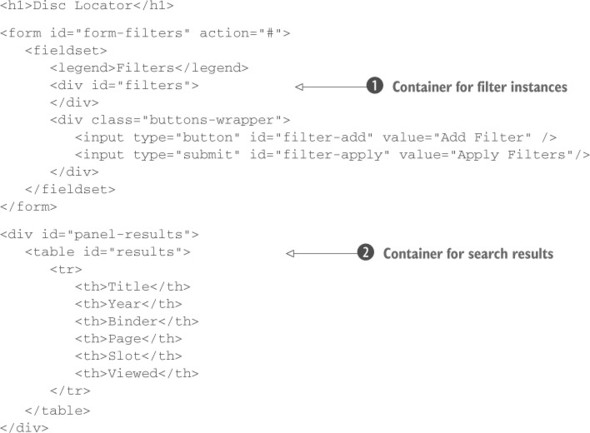
There’s nothing too surprising in that markup—or is there? Where, for example, is the markup for the initial filter drop-down? You’ve set up a container in which the filters will be placed ![]() , but it’s initially empty. Why?
, but it’s initially empty. Why?
Well, you’re going to need to be able to populate new filters dynamically—which we’ll get to in just a moment—so why do the work in two places? As you’ll see, you’ll be able to use the dynamic code to initially populate the first filter, so you don’t need to explicitly create it in the static markup. One other thing that we should point out is that you’ve set aside a table to receive the results ![]() .
.
You have your simple, mainline HTML laid out, and you have a handful of hidden templates that you can use to quickly generate new elements via replication. Finally you can start writing the code that will apply the behavior to your page!
Adding new filters
Upon a click of the Add Filter button, you need to add a new filter to the <div> that you’ve set up to receive it, which you’ve identified with the ID of filters. If you recall how easy it is to establish event handlers using jQuery, it should be an easy matter to add a click handler to the Add Filter button. But there’s something else to consider!
You’ve already seen how you’re going to replicate form controls when the user adds filters, and you have a good strategy for easily creating multiple instances of these controls. But eventually you’re going to have to submit these values to the server so it can look up the filtered results in the database. Writing the backend is outside the scope of this lesson, but this doesn’t mean that your application won’t work. You’ll simulate a database with a file called movies.json, which contains a JSON array. The movies.json file is bundled with the source of this app, and you’ll find it in the folder called lesson-7. Each element of the array is an object having the following properties: title, year, binder, page, slot, and viewed.
To avoid loading the JSON object every time you interact with the application, you’ll load it once when the page is loaded and store it in a global variable called movies. To perform this task, you need to employ a jQuery utility function called getJSON(). We haven’t covered it yet (we’ll discuss it in section 10.3.2), but what it does is access a resource (URL or file) containing a JSON object (an array or any other type of valid JSON format is allowed) and execute a handler once it has been retrieved. This method passes the JSON that was retrieved, converted into a JavaScript type, to the handler. Inside the latter, you’ll do nothing but assign this JavaScript object to your global movies variable and fire a custom event, called moviesLoaded, to inform your application that you’re ready to work.
“Global variable? I thought those were evil,” I hear you say. Global variables can be a problem when used incorrectly. In this case, this is truly a global value that represents a page-wide concept, and it will never cause any conflicts because all aspects of the page will want to access this single value in a consistent fashion. Nonetheless, ideally an application should have only one global variable for its application-specific concerns in a similar fashion to jQuery, where you can find all the methods, utility functions, and properties of the library under the jQuery property. Rather than assigning the data to a global variable called movies, you can create one global variable—for example, dvdApp—retaining the movie data and the application’s methods.
In this demo, you’ll ignore the risks of using a global variable in order to make everything as simple as possible. The final code that implements what we’ve described so far is shown here:
var movies;
$.getJSON('movies.json', function(data) {
   movies = data;
   $(document).trigger('moviesLoaded');
});

$(document).on('moviesLoaded', function() {
   // Business logic here
});
Inside the handler for your custom event, moviesLoaded, you’re ready to establish another handler that will be executed when the Add Filter button is clicked. Before writing the necessary code, you need to write the following two statements at the beginning of your code:
var $filters = $('#filters');
var templatesAvailable = $('.template', '.templates')
  .not('.filter-chooser')
  .length;
The first is needed because you’ll use the element having filters as its ID several times. The second is needed because you need to verify that not all the templates defined in the page are already in use. Once you’ve done this, you’re ready to write the body of the callback:
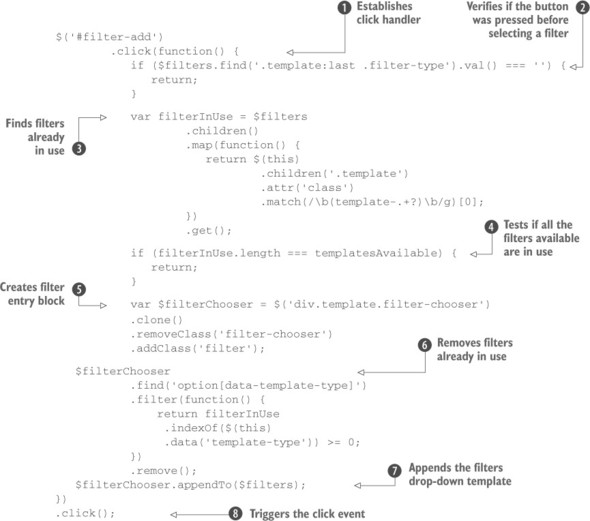
Although this snippet may look complicated at first glance, it accomplishes a great deal without a lot of code. Let’s break it down one step at a time.
The first thing that you do in this code is to establish a click handler on the Add Filter button ![]() by using the jQuery click() method. It’s within the function passed to this method, which will get invoked when the button is clicked, that all the interesting stuff happens.
by using the jQuery click() method. It’s within the function passed to this method, which will get invoked when the button is clicked, that all the interesting stuff happens.
Before performing any action, you need to verify if the Add Filter button was pressed before the user selected a filter, in which case you need to terminate the function prematurely ![]() . If a filter was selected because a click of the Add Filter button is going to, well, add a filter, you need to create a new container for the filter to reside within. As we said, you don’t allow multiple filters of the same type, so you have to retrieve all the types of filters in use
. If a filter was selected because a click of the Add Filter button is going to, well, add a filter, you need to create a new container for the filter to reside within. As we said, you don’t allow multiple filters of the same type, so you have to retrieve all the types of filters in use ![]() to exclude them. To retrieve the filters in use you rely on the class name you used for each template (template-title, template-year, and so on) and two methods we introduced in the previous lessons of this app: map() and get(). When finished, you test if all the filters available are in use; if so, prematurely terminate the handler
to exclude them. To retrieve the filters in use you rely on the class name you used for each template (template-title, template-year, and so on) and two methods we introduced in the previous lessons of this app: map() and get(). When finished, you test if all the filters available are in use; if so, prematurely terminate the handler ![]() . If not, continue the process.
. If not, continue the process.
You clone the template, using the jQuery clone() method, that you set up containing the filter drop-down using the replication approach that we discussed in the previous section. Then give it the class filter not only for CSS styling but also to be able to locate these elements later in the code ![]() . After the element is created, it’s time to exclude the filters already in use by using the filter() method
. After the element is created, it’s time to exclude the filters already in use by using the filter() method ![]() . Then append the cloned template to the master filter container that you created with the ID value of filters
. Then append the cloned template to the master filter container that you created with the ID value of filters ![]() .
.
The previous operation was the last one defined inside the handler. After you attach the latter, but before closing the statement, trigger the click event on the same element using the click() method ![]() . We discussed this version of the shortcuts in the section “Shortcut methods” of lesson 6. This is a well-known and often used technique to execute a handler you’ve just attached.
. We discussed this version of the shortcuts in the section “Shortcut methods” of lesson 6. This is a well-known and often used technique to execute a handler you’ve just attached.
Why do this? Do you remember when you guessed where the markup is for the initial filter drop-down? Yes, you got it! You execute the handler so that as soon as the page is loaded, the first select element is appended in the panel to allow you to perform the first choice.
Load this page into your browser and test the action of the Add Filter button. Note how every time you click the Add Filter button, a new filter is added to the page. If you inspect the DOM with a JavaScript debugger (Firebug in Firefox and the Chrome Developer Tool are great for this), you’ll see how the template has been copied in the container.
In one function (the handler) you’ve used a lot of the knowledge you’ve gained so far. This should prove to you, once again, how jQuery allows you to perform complex operations in a few lines of code.
But your job isn’t over yet. The drop-downs don’t yet specify which field is to be filtered. When the user makes a selection, you need to populate the filter container, adding the appropriate controls for that filter type.
Leave a Reply