For our more complex plugin example, you’re going to develop a jQuery method that allows a web developer to whip up a quick slideshow page. You’ll create a jQuery plugin, which you’ll name Jqia Photomatic, and then you’ll whip up a test page to put it through its paces. When complete, this test page will appear as shown in figure 12.2.
Figure 12.2. The test page that you’ll use to put the Jqia Photomatic plugin through its paces
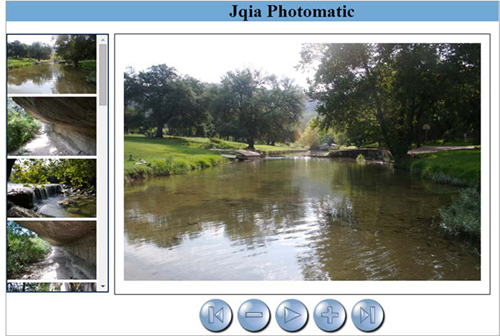
This page sports the following components:
- A set of thumbnail images
- A full-size photo of one of the images available in the thumbnail list
- A set of buttons for moving through the slideshow manually and for starting and stopping the automatic slideshow
The behaviors of the page are as follows:
- Clicking any thumbnail displays the corresponding full-size image.
- Clicking the full-size image displays the next image.
- Clicking any button performs the following operations:
- First—Displays the first image
- Previous—Displays the previous image
- Next—Displays the next image
- Last—Displays the last image
- Play—Commences moving through the photos automatically until clicked again
- Any operation that moves past the end of the list of images wraps back to the beginning and any operation that moves past the beginning of the list wraps to the end. Clicking Next while on the last image displays the first image, and clicking Previous while on the first image displays the last.
You’ll define your plugin so that developers can set up the elements in any manner they like and then tell you which page element should be used for each purpose. Furthermore, in order to give web developers as much leeway as possible, you’ll define your plugin so that they can provide any jQuery collection containing images to serve as thumbnails as long as they’re gathered together as in our test page.
To start, here’s the syntax for the Jqia Photomatic plugin.
| Method syntax: jqiaPhotomatic | |
|---|---|
| jqiaPhotomatic(options) | |
| Instruments the set of thumbnails, as well as page elements identified in the options object hash, to operate as Jqia Photomatic controls. | |
| Parameters | |
| options | (Object) An object hash that specifies the options for Jqia Photomatic. See table 12.1 for details. |
| Returns | |
| The jQuery collection. | |
Because you have a nontrivial number of parameters for controlling the operation of Jqia Photomatic (some of which can be omitted), you utilize an object hash to pass them as discussed in section 12.3.3. The possible options that you can specify are shown in table 12.1.
Table 12.1. The options for the Jqia Photomatic custom plugin method
| Option name | Description |
|---|---|
| firstControl | (Selector) A jQuery selector that identifies the DOM element(s) to serve as a First control. If omitted, no control is instrumented. |
| lastControl | (Selector) A jQuery selector that identifies the DOM element(s) to serve as a Last control. If omitted, no control is instrumented. |
| nextControl | (Selector) A jQuery selector that identifies the DOM element(s) to serve as a Next control. If omitted, no control is instrumented. |
| photoElement | (Selector) A jQuery selector that identifies the img element that’s to serve as the full-size photo display. If omitted, defaults to the jQuery selector img.photomatic-photo. |
| playControl | (Selector) A jQuery selector that identifies the DOM element(s) to serve as a Play control. If omitted, no control is instrumented. |
| previousControl | (Selector) A jQuery selector that identifies the DOM element(s) to serve as a Previous control. If omitted, no control is instrumented. |
| transformer | (Function) A function used to transform the URL of a thumbnail image into the URL of its corresponding full-size photo image. If omitted, the default transformation substitutes all instances of thumbnail with photo in the URL. |
| delay | (Number) The interval between transitions for an automatic slideshow, in milliseconds. Defaults to 3000. |
You’ll now create the test page for this plugin before you dive into creating the Jqia Photomatic plugin itself.
Setting up the markup
The first step to perform to create your plugin is to build the page that will use it. The code for this page, available in the file lesson-12/jqia.photomatic.html, is shown in the listing that follows.
Listing 12.4. The test page that creates the Photomatic display in figure 12.2
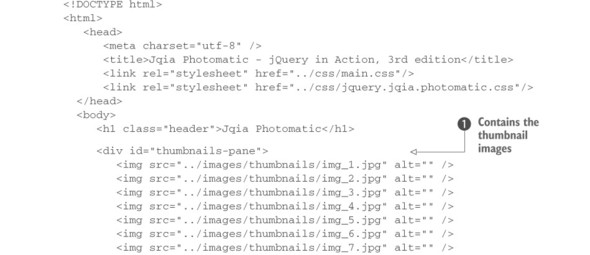
By applying the principles of unobtrusive JavaScript and keeping all style information in an external style sheet, your markup is tidy and simple.
The HTML markup consists of a container that holds the thumbnail images ![]() , an image element (initially sourceless) to hold the full-size photo
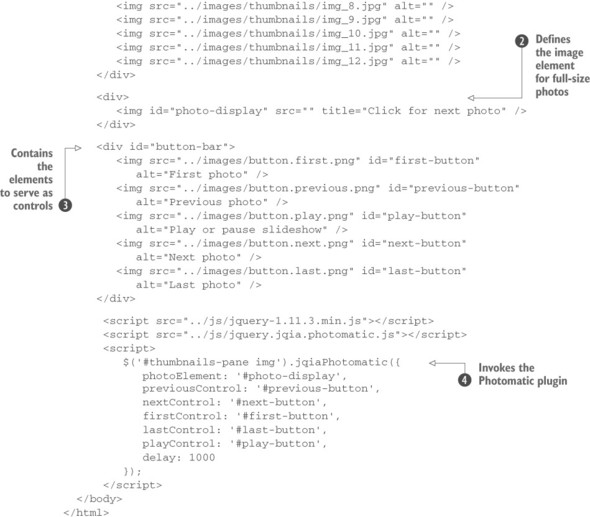
, an image element (initially sourceless) to hold the full-size photo ![]() , and a collection of images
, and a collection of images ![]() that will control the slideshow. Everything else is handled by your new plugin. The on-page script has a tiny footprint, consisting of a single statement that invokes your plugin, passing a few options
that will control the slideshow. Everything else is handled by your new plugin. The on-page script has a tiny footprint, consisting of a single statement that invokes your plugin, passing a few options ![]() .
.
With this markup in place, it’s time to dive into the plugin itself.
Developing Jqia Photomatic
To start the development of this plugin you’ll use the same skeleton that you used for Jqia Context Menu but with a different namespace:
(function($){
   var methods = {
      init: function() {
      }
   };

   $.fn.jqiaPhotomatic = function(method) {
      if (methods[method]) {
         return methods[method].apply(
            this,
            Array.prototype.slice.call(arguments, 1)
        );
      } else if ($.type(method) === 'object') {
         return methods.init.apply(this, arguments);
      } else {
         $.error('Method ' + method +
            ' does not exist on jQuery.jqiaPhotomatic'
         );
      }
   };
})(jQuery);
This plugin only needs the initialization function, but to adopt a future-proof approach in case you want to extend it, you’ll use a methods variable as you did in the previous project.
Inside the init() function, you merge the caller settings with the default ones described in table 12.1. The result is stored in a single options object that you can refer to throughout the remainder of the function.
A caller of your plugin may have interest in overriding some of the default values (for example, the delay property), so you’ll expose them to the external world as shown here:
$.fn.jqiaPhotomatic.defaults = {
      photoElement: 'img.photomatic-photo',
      transformer: function(name) {
         return name.replace('thumbnail', 'photo');
      },
      nextControl: null,
      previousControl: null,
      firstControl: null,
      lastControl: null,
      playControl: null,
      delay: 3000
};
In the same way you did for the Jqia Context Menu plugin, the merge is performed using jQuery’s $.extend() method:
options = $.extend(true, {}, $.fn.jqiaPhotomatic.defaults, options);After the execution of this statement, the options variable will contain the defaults supplied by the inline hash object overridden with any values supplied by the caller.
You also need to keep track of a few other things. In order for your plugin to know what concepts like next relative image and previous relative image mean, you need not only a list of the thumbnail images but also an indicator that identifies the current image being displayed.
The list of thumbnail images is the jQuery collection that this method is operating on—or, at least, it should be. You don’t know what the developers collected in the jQuery collection, so you want to filter it down to only image elements. This operation can be done with a selector and jQuery’s filter() method. But where should you store these two pieces of information?
You could easily create another variable to hold it, but to keep settings together, you’ll store them as additional properties of options. To do that, you have to slightly modify the call to extend() as follows:
options = $.extend(
   true,
   {},
   $.fn.jqiaPhotomatic.defaults,
   options,
   {
      current: 0,
      $thumbnails: this.filter('img')
   }
);
Note how you place the object containing the current image shown and the list of the thumbnails as the last argument of the extend() method because of how the latter prioritizes the properties to merge. You name the property containing the list as $thumbnails because its value is a jQuery collection.
Now that your initial state is set up, you’re ready to move on to the meat of the plugin—adding appropriate features to the controls, thumbnails, and photo display.
Note
You’re able to keep the state of things because of closure. You’ve seen closures before, but if you’re still shaky on them, please review the appendix. You must understand closures not only for completing the implementation of the Jqia Photomatic plugin but also when creating anything but the most trivial of plugins.
Now you need to attach a number of event listeners to the controls and elements that you’ve identified up to this point. Because the options variable is in scope when you declare the functions that represent those listeners, each listener will be part of a closure that includes the options variable. You can rest assured that even though the latter may appear to be temporary, the state that it represents will stick around and be available to all the listeners that you define.
Speaking of those listeners, here’s a list of click event listeners that you’ll need to attach to the various elements:
- Clicking a thumbnail photo will cause its full-size version to be displayed.
- Clicking the full-size photo will cause the next photo to be displayed.
- Clicking the element defined as the Previous control will cause the previous image to be displayed. If the first image of the set was displayed, after clicking the Previous control the last image will be displayed.
- Clicking the Next control will cause the next image to be displayed. If the last image of the set was displayed, after clicking the Next control the first image will be displayed.
- Clicking the First control will cause the first image in the list to be displayed.
- Clicking the Last control will cause the last image in the list to be displayed.
- Clicking the Play control will cause the slideshow to automatically proceed, progressing through the photos using a delay specified in the settings. A subsequent click on the control will stop the slideshow.
Looking over this list, you immediately note that all of these listeners have something in common: they all need to cause the full-size photo of one of the thumbnail images to be displayed. And being the good and clever coder that you are, you want to factor out that common processing into a function so that you don’t need to repeat the same code over and over again.
You don’t want to infringe on either the global namespace or the $ namespace for a function that should only be called internally from your plugin code. The power of JavaScript as a functional language comes to your aid once again and allows you to define this new function within the plugin function. By doing so, you limit its scope to within the plugin function itself (one of your goals).
For this reason you define the function needed, named showPhoto(), inside the plugin but outside init(). The function will define two parameters. The first is the actual options for this call of the plugin, whereas the second is the index of the thumbnail that’s to be shown full size. The code of the function is shown here:
function showPhoto(options, index) {
   $(options.photoElement).attr(
      'src',
      options.transformer(options.$thumbnails[index].src)
   );
   options.current = index;
}
This new function, when passed the index of the thumbnail whose full-size photo has to be displayed, uses the values in the options object to do the following:
1. Look up the src attribute of the thumbnail identified by index.
2. Pass that value through the transformer function to convert it from a thumbnail URL to a full-size photo URL.
3. Assign the result of the transformation to the src attribute of the full-size image element.
4. Record the index of the displayed photo as the new current index.
With that handy function available, you’re ready to define the listeners that we listed earlier. You’ll start by adding functionality to the thumbnails themselves, which simply need to cause their corresponding full-size photo to be displayed, as follows:
options.$thumbnails.click(function() {
   showPhoto(options, options.$thumbnails.index(this));
});
In this handler, you obtain the value of the thumbnail’s index by passing the clicked element (referenced by this) to jQuery’s index() method.
Instrumenting the photo display element to show the next photo in the list is just as simple:
$(options.photoElement + ', ' + options.nextControl).click(function() {
   showPhoto(options, (options.current + 1) % options.$thumbnails.length);
});
You establish a click handler, in which you call the showPhoto() function with the options object and the next index value. Note how you use the JavaScript modulo operator (%) to wrap around to the front of the list when you fall off the end.
The most observant of you may have spotted that you actually include another selector in the statement. The reason is that the behavior of the Next button is exactly the same. You optimize the instruction by using the comma to create a single selector.
The handlers for the First, Previous, and Last controls all follow a similar pattern: figure out the appropriate index of the thumbnail whose full-size photo is to be shown and call showPhoto() with that index:
$(options.previousControl).click(function() {
   showPhoto(
      options,
      options.current === 0 ?
         options.$thumbnails.length - 1 :
         options.current - 1
   );
});

$(options.firstControl).click(function() {
   showPhoto(options, 0);
}).triggerHandler('click');

$(options.lastControl).click(function() {
   showPhoto(options, options.$thumbnails.length - 1);
});
The only line worth a mention in this code is the use of triggerHandler(). You call this method to load the initial photo into the image container when the plugin is executed.
The instrumentation of the Play control is somewhat more complicated. Rather than showing a particular photo, this control must start a progression through the entire photo set. Then it has to stop that progression on a subsequent click. Let’s take a look at the code you use to accomplish that:
var tick;
$(options.playControl).click(function() {
   var $this = $(this);
   if ($this.attr('src').indexOf('play') !== -1) {
      tick = window.setInterval(
         function() {
            $(options.nextControl).triggerHandler('click');
         },
         options.delay
      );
      $this.attr(
         'src',
         $this.attr('src').replace('play', 'pause')
      );
   } else {
      window.clearInterval(tick);
      $this.attr(
         'src',
         $this.attr('src').replace('pause', 'play')
      );
   }
});
First you use the image’s src to decide what operation to perform. If src attribute has the string “play” in it, you need to start the slideshow; otherwise you need to stop it.
In the body of the if, you employ the JavaScript setInterval() method to cause a function to continually fire off using the delay value. You store the handle of that interval timer in a varible called tick for later reference. Inside the anonymous function passed to setInterval(), you emulate a click on the Next control to progress to the next photo; this happens each time the function in setInterval() is called.
The last statement inside the if updates the src attribute of the element to show the pause image. This change allows you to reach the else part of the code at the second interaction with the Play button.
In the else part you want to stop the slideshow. To do that, you clear the interval timeout using clearInterval(), passing tick, and restore the play image.
As the final task, and in order to fulfill the wisdom of maintaining chainability, you need to return the original set of matched elements. You achieve this with
return this;Take a moment to do a short victory dance; you’re finally finished! Bet you didn’t think it would be that easy. The completed plugin code, which you’ll find in the file js/jquery.jqia.photomatic.js, is shown in the following listing.
Listing 12.5. The complete implementation of the Jqia Photomatic plugin
(function($) {
   function showPhoto(options, index) {
      $(options.photoElement).attr(
         'src',
         options.transformer(options.$thumbnails[index].src)
      );
      options.current = index;
   }

   var methods = {
      init: function(options) {
         options = $.extend(
            true,
            {},
            $.fn.jqiaPhotomatic.defaults,
            options,
            {
               current: 0,
               $thumbnails: this.filter('img')
            }
         );

         options.$thumbnails.click(function() {
            showPhoto(options, options.$thumbnails.index(this));
         });

         $(options.photoElement + ', ' + options.nextControl).click(
            function() {
               showPhoto(
                  options,
                  (options.current + 1) % options.$thumbnails.length

               );
            }
         );

         $(options.previousControl).click(function() {
            showPhoto(
               options,
               options.current === 0 ?
                  options.$thumbnails.length - 1 :
                  options.current – 1
            );
         });

         $(options.firstControl).click(function() {
            showPhoto(options, 0);
         }).triggerHandler('click');

         $(options.lastControl).click(function() {
            showPhoto(options, options.$thumbnails.length - 1);
         });

         var tick;
         $(options.playControl).click(function() {
            var $this = $(this);
            if ($this.attr('src').indexOf('play') !== -1) {
               tick = window.setInterval(
                  function() {
                     $(options.nextControl).triggerHandler('click');
                  },
                  options.delay
               );
               $this.attr(
                  'src',
                  $this.attr('src').replace('play', 'pause')
               );
            } else {
               window.clearInterval(tick);
               $this.attr(
                  'src',
                  $this.attr('src').replace('pause', 'play')
               );
            }
         });

         return this;
      }
   };

   $.fn.jqiaPhotomatic = function(method) {
      if (methods[method]) {
         return methods[method].apply(
            this,
            Array.prototype.slice.call(arguments, 1)
         );
      } else if ($.type(method) === 'object') {
         return methods.init.apply(this, arguments);
      } else {

         $.error(
            'Method ' + method +
            ' does not exist on jQuery.jqiaPhotomatic'
         );
      }
   };

   $.fn.jqiaPhotomatic.defaults = {
      photoElement: 'img.photomatic-photo',
      transformer: function(name) {
         return name.replace('thumbnail', 'photo');
      },
      nextControl: null,
      previousControl: null,
      firstControl: null,
      lastControl: null,
      playControl: null,
      delay: 3000
   };
})(jQuery);
This plugin is typical of jQuery-enabled code; it packs a big wallop in some compact code. But it serves to demonstrate an important set of techniques—using closures to maintain state across the scope of a jQuery plugin and to enable the creation of private implementation functions that plugins can define and use without resorting to any namespace infringements.
Also note that because you took such care to not let state leak out of the plugin, you’re free to add as many Jqia Photomatic widgets to a page as you like, without fear that they’ll interfere with one another (taking care, of course, to make sure you don’t use duplicate ID values in the markup).
But is it complete? You be the judge and consider the following exercises:

- The transition from photo to photo is instantaneous. Using your knowledge from the animation and effect lesson, change the plugin so that photos cross-fade into one another.
- Going one step further, how would you go about allowing the developer to use a custom animation of choice?
- For maximum flexibility, you coded this plugin to take advantage of HTML elements already created by the user. How would you create an analogous plugin, but with less display freedom, that generated all the required HTML elements on the fly?
Now that you know all about implementing a new jQuery method, it’s time to learn more about creating custom utility functions.
Leave a Reply