Let’s say that you want to conspicuously animate the removal of an element from the display. The animation you’ll use to accomplish this will make the element appear to drop off the page, disappearing from the display as it does so.
If you think about it for a moment, you can figure out that by adjusting the top position of the element, you can make it move down the page to simulate the drop; adjusting the opacity will make it seem to vanish as it does so. And finally, when all that’s done, you can remove the element from the display. You can accomplish this drop effect with the code in the following listing.
Listing 8.5. A custom drop animation
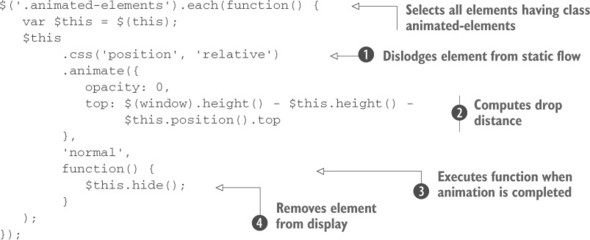
There’s a bit more going on here than in the previous custom effect. You once again iterate over the elements in the set, but this time adjusting the position and the opacity of the elements. To adjust the top value of an element relative to its original position, you first need to change its CSS position style property value to relative ![]() .
.
Then you specify a target opacity of 0 and a computed top value. You don’t want to move an element so far down the page that it moves below the window’s bottom; this could cause scroll bars to be displayed where none may have been before, possibly distracting users. You don’t want to draw their attention away from the animation—grabbing their attention is why you’re animating in the first place! Use the height and vertical position of the element, as well as the height of the window, to compute how far down the page the element should drop ![]() . Of course, this consideration makes sense only if the space between the elements and the bottom of the page is large enough.
. Of course, this consideration makes sense only if the space between the elements and the bottom of the page is large enough.
When the animation is completed, you want to remove the element from the display, so specify a callback function ![]() that applies the non-animated hide() method to the element
that applies the non-animated hide() method to the element ![]() .
.
Note
We did a little more work than we needed to in this animation so we could demonstrate doing something that needs to wait until the animation is completed in the callback function. If we were to specify the value of the opacity property as "hide" rather than 0, the removal of the element(s) at the end of the animation would be automatic, and we could dispense with the callback.
Now let’s try one more type of “make it go away” effect for good measure.
A custom puff animation
Rather than dropping elements off the page, let’s say you want an effect that makes it appear as if the element dissipates into thin air like a puff of smoke. To animate such an effect, you can combine a scale effect with an opacity effect, growing the element while fading it away. One issue you need to deal with for this effect is that this dissipation would not fool the eye if you let the element grow in place with its upper-left corner anchored. You want the center of the element to stay in the same place as it grows. Hence, in addition to its size, you need to adjust the position of the element as part of the animation. The code for the puff effect is shown in the next listing.
Listing 8.6. A custom puff animation
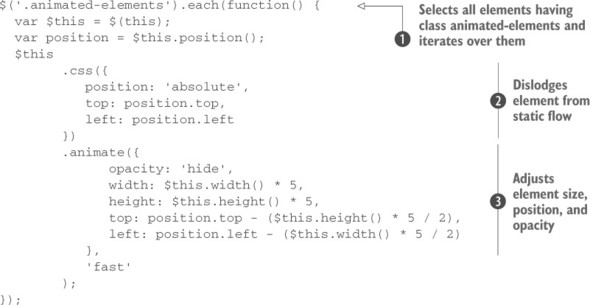
In this animation, you select all the elements having a class of animated-elements and iterate over them ![]() . Then you decrease the opacity to 0 while growing the element to five times its original size and adjusting its position by half that new size, resulting in the center of the element remaining in the same position
. Then you decrease the opacity to 0 while growing the element to five times its original size and adjusting its position by half that new size, resulting in the center of the element remaining in the same position ![]() . You don’t want the elements surrounding the animated element to be pushed out while the target element is growing, so you take it out of the layout flow completely by changing its position to absolute and explicitly setting its position coordinates
. You don’t want the elements surrounding the animated element to be pushed out while the target element is growing, so you take it out of the layout flow completely by changing its position to absolute and explicitly setting its position coordinates ![]() . Because you specified hide for the opacity value, the elements are automatically hidden (removed from the display) once the animation is completed.
. Because you specified hide for the opacity value, the elements are automatically hidden (removed from the display) once the animation is completed.
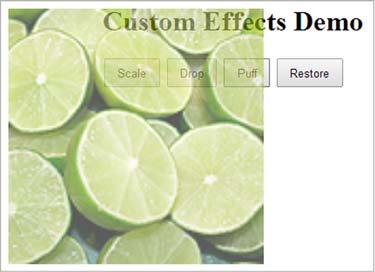
Each of these three custom effects can be observed by loading the page found in the file lesson-8/custom.effects.html, whose display is shown in figure 8.5.
Figure 8.5. The custom effects you developed (scale, drop, and puff) can be observed in action using the buttons provided on this example page.

Although we’d love to show you how these effects behave, screenshots have obvious limitations, which we’re sure you understand. But figure 8.6 shows a frame of the puff effect in progress. We’ll leave it to you to try out the various effects on this page and observe their behavior.
Figure 8.6. The puff effect expands and moves the image while simultaneously reducing its opacity.
Up to this point, all of the examples we’ve examined have used a single animation method. Let’s discuss how things work when you use more than one.
Leave a Reply