In the previous section you learned about the easing parameter and the easing functions available in jQuery: linear and swing. The number of core effects supplied with jQuery is purposely kept small, in order to keep jQuery’s core footprint to a minimum. But this doesn’t mean you can’t employ third-party libraries to gain access to more easings (once again you need to remember that easing functions are often referred as easings). The jQuery Easing plugin and the jQuery UI library provide additional transitions and effects. The term plugin should be familiar to you, but if it isn’t, a plugin is a component that adds a specific feature to an existing software, framework, or library. We’ll cover plugins and how to create your own jQuery plugin extensively in lesson 12.
Note
The jQuery UI is a curated set of user interface interactions, effects, widgets, and themes built on top of jQuery. It’s an amazing library and you should really consider taking a look at it (after reading this app, of course). Apart from the official website, an excellent resource is jQuery UI in Action by T.J. VanToll (Manning, 2014). A good read!
When there’s more than one alternative, people usually start asking what the best solution is. As often happens, there’s no best solution in general, but the choice should be based on the specific use case. To help you choose what library to adopt, we can say that you should use jQuery UI to add the effects only if you’re already using the library in your project for other reasons (for example, the widgets it provides); otherwise, you should stick with the plugin. The reason is that both offer the same easing functions, but the jQuery Easing plugin is more lightweight (only 3.7 KB in its compressed version) because it’s focused on one feature, whereas the jQuery UI has more than just easings. For the sake of completeness, we should also mention that the download page of the jQuery UI offers the possibility of customizing the build of the library, including only the modules you need, which leads to a reduction of the weight.
Both the jQuery Easing plugin and the jQuery UI library add 30 (yes, 30; you read it right) new easing functions, listed in table 8.2.
Table 8.2. The easing functions added by both the jQuery Easing plugin and the jQuery UIEasing functions
| easeInQuad easeOutQuad easeInOutQuad easeInCubic easeOutCubic easeInOutCubic easeInQuart easeOutQuart easeInOutQuart easeInQuint | easeOutQuint easeInOutQuint easeInExpo easeOutExpo easeInOutExpo easeInSine easeOutSine easeInOutSine easeInCirc easeOutCirc | easeInOutCirc easeInElastic easeOutElastic easeInOutElastic easeInBack easeOutBack easeInOutBack easeInBounce easeOutBounce easeInOutBounce |
The jQuery Easing plugin has a peculiarity worth discussing. It stores jQuery’s core swing easing, which is the default, under the name jswing. In addition, it redefines swing to behave in the same way as the easeOutQuad easing. Because of this change, the latter becomes the default easing.
To use the jQuery Easing plugin in your pages., you have two possibilities. The first and easier one is to include it using a CDN. Most of you will remember that we introduced CDNs in lesson 1 of this app when discussing those to include jQuery.
The second method is to download the plugin from the repository and save it in a folder that your pages can access. For example, if you save the library in a folder called js, you can include it by writing
<script src="js/jquery.easing.min.js"></script>To add the jQuery UI to your pages, you can employ the same methods: CDN or hosting it locally. To include the library via the jQuery CDN, assuming you want to use version 1.11.4, you have to write
<script src="http://code.jquery.com/ui/1.11.4/jquery-ui.min.js"></script>If you host it locally instead, assuming that you saved the library in a folder called js, you have to write
<script src="js/jquery-ui-1.11.4.min.js"></script>Now that you know how to include the jQuery Easing plugin and jQuery UI in your pages, you can employ the additional easing functions provided. Using them is simple because all you have to do is pass the name of the transition you want to use as the easing parameter.
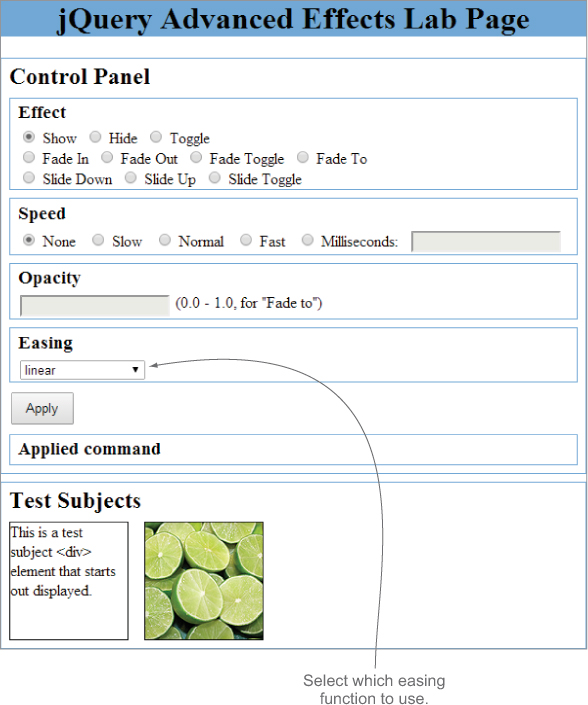
To get a quick glimpse of the evolution in the time of the easing functions listed in table 8.2,. But taking a quick look at the easing functions isn’t enough in our opinion; you deserve more. For this reason, we created a new lab page to allow you to see these effects applied to the methods covered in this lesson.

This new lab page, shown in figure 8.3, is called jQuery Advanced Effects Lab Page and can be found in the file lesson-8/lab.advanced.effects.html of the source code provided with the app.
Figure 8.3. The initial state of the jQuery Advanced Effects Lab Page

Play with this new lab page until you have a clear idea of how different easing functions change the way the elements of a page can be animated at different paces.
Up to this point you’ve seen only the precreated animations at your disposal, but sometimes you’ll want to create your own animations. Let’s see how you can do this.
Leave a Reply