Whenever a selection is made from a filter drop-down, you need to populate the filter with the controls that are appropriate for that filter. You’ve made it easy for yourself by creating markup templates to copy when you determine which one is appropriate. But there are also a few other housekeeping tasks that you need to do whenever the value of the drop-down is changed.
Take a look at what you’ll do when establishing the change handler for the dropdown. Remember that the following code, like that of the previous section, is written inside the handler for the custom event called moviesLoaded:
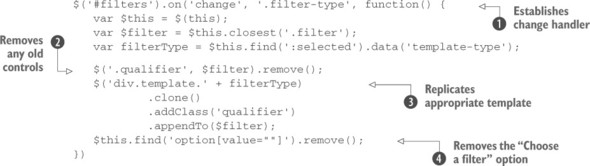
You take advantage of jQuery’s on() method to establish a handler up front that will automatically be established at the appropriate points without further action on your part. This time, you proactively establish a change handler, employing event delegation, for any filter drop-down that comes into being ![]() . This is needed because at the time you attach the handler, the filters don’t exist inside the div having the ID of filters.
. This is needed because at the time you attach the handler, the filters don’t exist inside the div having the ID of filters.
When the change handler fires, cache the jQuery object that contains the current element (this) because you’ll use it several times. Then, collect a couple pieces of information: the parent filter container and the filter type recorded in the custom data-template-type attribute.
When you have those values in hand, you need to remove any filter controls that might already be in the container ![]() . After all, the user can change the value of the selected field many times, and you don’t want to keep adding more and more controls as you go along! You’ll add the qualifier class to all the appropriate elements as they’re created (in the next statement) so it’s easy to select and remove them.
. After all, the user can change the value of the selected field many times, and you don’t want to keep adding more and more controls as you go along! You’ll add the qualifier class to all the appropriate elements as they’re created (in the next statement) so it’s easy to select and remove them.
Once you’re sure you have a clean slate, replicate the template for the correct set of qualifiers ![]() by using the value you obtained from the data-template-type attribute. The qualifier class name is added to each created element for easy selection (as you saw in the previous statement) and the element is appended to the parent filter container.
by using the value you obtained from the data-template-type attribute. The qualifier class name is added to each created element for easy selection (as you saw in the previous statement) and the element is appended to the parent filter container.
Finally, remove the “Choose a filter” <option> from the filter drop-down ![]() , because when the user has selected a specific field, it doesn’t make any sense to choose that entry again. You could just ignore the change event that triggers when the user selects this option, but the best way to prevent a user from doing something that doesn’t make sense is to not let them do it in the first place!
, because when the user has selected a specific field, it doesn’t make any sense to choose that entry again. You could just ignore the change event that triggers when the user selects this option, but the best way to prevent a user from doing something that doesn’t make sense is to not let them do it in the first place!
Refer again to the example page in your browser. Try adding multiple filters and change their selections. Note how the qualifiers always match the field selection.
Now for those remove buttons…
Removing unwanted filters and other tasks
You’ve given the user the ability to change the field that any filter will be applied to, but you’ve also given them a remove button (labeled X) that they can use to remove a filter completely.
By this time, you should already have realized that this task will be almost trivial with the tools at your disposal. When the button is clicked, all you need to do is find the closest parent filter container and blow it away! Note that in the source the handler is attached by chaining this code with the previous segment. But for the sake of clarity we’ll repeat the selection in the following code:
$('#filters').on('click', '.filter-remover', function() {
  $(this).closest('.filter').remove();
});
Here you employ event delegation again because at the time the page is loaded there aren’t elements having class filter-remover inside the main panel.
Now that all the handlers for the filters have been set, there’s only one thing left: applying the filters and showing the results.
Showing the results
In the previous section, we said that writing the backend of the application was outside the scope of this lesson, but we didn’t want to leave you without a working application. As pointed out previously, you’ll emulate a database using a JSON array stored in a file called movies.json bundled with the source. In this section you’ll discover the logic of the function that you need to attach as a handler for the submit event of the form. Let’s see what this handler is all about:
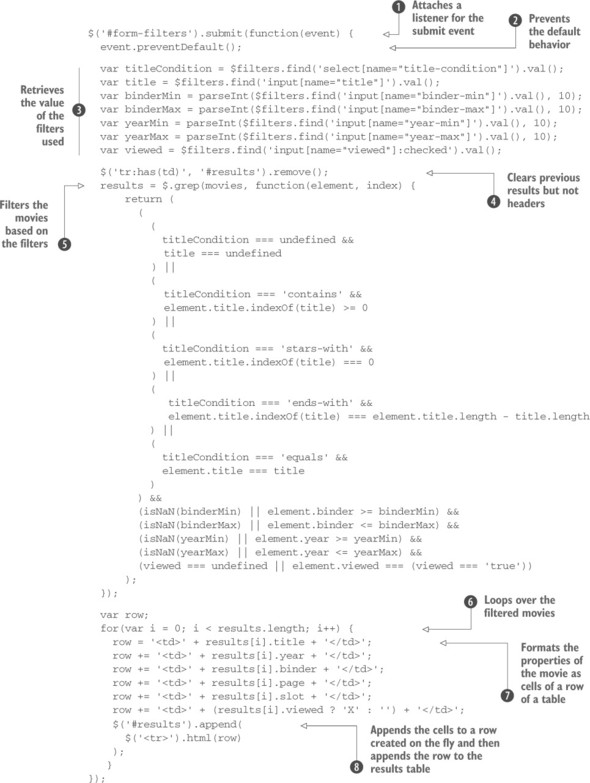
To start you attach a function as a handler for the submit event of the form ![]() . Because you don’t want your browser to perform an HTTP request (remember, you don’t have a backend) inside the handler, you prevent the default behavior
. Because you don’t want your browser to perform an HTTP request (remember, you don’t have a backend) inside the handler, you prevent the default behavior ![]() . Then execute a set of assignments to retrieve the values of the filters filled by the user
. Then execute a set of assignments to retrieve the values of the filters filled by the user ![]() . Even if the user won’t use all of them, try to retrieve all the possible values. For those that haven’t been added, the value will result in an undefined value that you’ll deal with later.
. Even if the user won’t use all of them, try to retrieve all the possible values. For those that haven’t been added, the value will result in an undefined value that you’ll deal with later.
In the next statement you clear the table from any previous result, keeping in place its headers ![]() . Then, using $.grep(), create a new array containing only the movies that match the filters filled
. Then, using $.grep(), create a new array containing only the movies that match the filters filled ![]() . We haven’t yet covered this method (we’ll discuss it in section 9.3.3), but it’s similar to the filter() method.
. We haven’t yet covered this method (we’ll discuss it in section 9.3.3), but it’s similar to the filter() method.
As soon as you have the results of the query, you must show them. To achieve this goal, loop over the filtered movies ![]() . Inside the loop, format the properties of each movie as cells of a row of the table
. Inside the loop, format the properties of each movie as cells of a row of the table ![]() . The actual row element (tr) is created on the fly using the ability of the jQuery() method to create elements based on a string. Once it’s created, append the row to the table
. The actual row element (tr) is created on the fly using the ability of the jQuery() method to create elements based on a string. Once it’s created, append the row to the table ![]() .
.
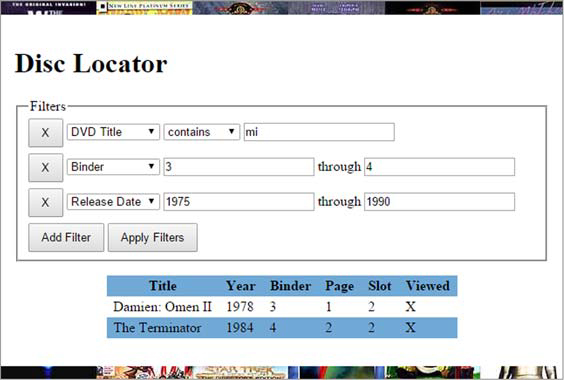
Now that you’ve analyzed the handler, go ahead and click the Apply Filters button. There you go! The set of movies that match the filters has been displayed on the screen. An example of the results shown by this project is illustrated in figure 7.2.
Figure 7.2. An example of the results returned by the DVD Disc Locator
With this last step you’ve completed the page, at least as far as we wanted to take it for the purposes of this lesson, but as you know…
There’s always room for improvement
For your filter form to be considered production-quality, there’s still lots of room for improvement.
The following list describes some additional functionality either that this form requires before being deemed complete or that would be just plain nice to have. Can you implement these additional features with the knowledge you’ve gained up to this point?

- Data validation is poor in your form. For example, inside the handler of the form’s Submit button you convert strings into numbers where it makes sense, but better controls may be of help, especially for the date fields. Ideally, with a backend on the server, you could punt and let the server-side code handle it—after all, it has to validate the data regardless. But that makes for a less-than-pleasant user experience, and as we’ve already pointed out, the best way to deal with errors is to prevent them from happening in the first place. Because the solution involves inspecting the Event instance—something that wasn’t included in the example up to this point—we’re going to give you the code to disallow the entry of any characters but digits into the numeric fields. The operation of the code should be evident to you with the knowledge you’ve gained in this lesson, but if not, now would be a good time to go back and review the key points:$(‘input.numeric’).on(‘keypress’, function(event) { // Character with code 48 is “0”. Character with code 57 is “9”. if (event.which < 48 || event.which > 57) return false; });For browsers that support HTML5, a simpler solution exists. You could force the user to use only numbers by using the new <input> type called number.
- Date fields aren’t well validated. How would you go about ensuring that only valid date ranges are entered? What if the user fills a start date greater than the end date? You can’t do it on a character-by-character basis as you did with the numeric fields.
- When qualifying fields are added to a filter, the user must click in one of the fields to give it focus. Not all that friendly! Add code to the example to give focus to the new controls as they’re added.
- One of the requirements was to not allow a user to have the same filter more than once. In its current version, there’s a way to have the same filter twice, which also uncovers a defect of the demo. Can you find out how and fix this behavior?
- Your form allows the user to specify more than one filter but only one per type. How would you change the form to allow the user to specify multiple filters of the same type?
- The types of the filters could be updated when deleting one of the filters in use. If you add all four types of filters (DVD Title, Binder, Release Date, and Viewed?) and then delete the first (DVD Title), you won’t be able to change one of the remaining filters in order to have DVD Title again. This happens because the list is created at the time you click the Add Filter button and is never updated. How can you update the demo to address this issue? (Hint: Listen to the click event of the buttons having class filter-remover.)
- What other improvements would you make, either to the robustness of the code or the usability of the interface? How does jQuery help?
If you come up with ideas that you’re proud of, be sure to visit the Manning web page for this app, which contains a link to the discussion forum. You’re encouraged to post your solutions for all to see and discuss!
Leave a Reply