For applying styles to page elements, web developers have become familiar with a small but useful group of selection expressions that work across all browsers. Those expressions can select by an element’s ID, by CSS class names, and by tag names. A special case of selecting elements by tag name is the Universal selector, which allows you to select all the page elements within the DOM. The selection expressions enable you to perform basic searches in the DOM, and we’ll provide the details in the following sections. When combined, these selectors allow you to achieve slightly more complicated selections. Table 2.1 provides a quick refresher of these selectors and how you can combine them.
Table 2.1. Some simple CSS selector examples
| Example | Description | In CSS? |
|---|---|---|
| * | Matches all the elements in the page | ✓ |
| #special-id | Matches the element with the ID value of special-id | ✓ |
| .special-class | Matches all elements with the class special-class | ✓ |
| a | Matches all anchor (a) elements | ✓ |
| a.special-class | Matches all anchor (a) elements that have the class special-class | ✓ |
| .class.special-class | Matches all elements with the class class and class special-class | ✓ |
In JavaScript, you have a set of functions, such as getElementById() and get-ElementsByClassName(), that are designed to work with a specific type of selector to retrieve DOM elements to act upon. Unfortunately, you might have some problems using even such simple functions. For example, getElementsByClassName() isn’t supported in versions of Internet Explorer prior to 9. If you want to use only native methods, you should pay attention to cross-browser compatibilities.
jQuery to the rescue! If the browser supports the selector or the function natively, jQuery will rely on it to be more efficient; otherwise it’ll use its methods to return the expected result. The good news is that you don’t have to worry about this difference. jQuery will do its work for you behind the scenes, so you can focus on other aspects of your code.
The jQuery library is fully CSS3 compliant, so selecting elements will present no surprises; the same elements that would be selected in a style sheet by a standards-compliant browser will be selected by jQuery’s selector engine. The library does not depend on the CSS implementation of the browser it’s running within. Even if the browser doesn’t implement a standard CSS selector correctly, jQuery will correctly select elements according to the rules of the World Wide Web Consortium (W3C) standard.
For some practice, play with the Selectors Lab and run some experiments with some basic CSS selectors until you feel comfortable with them.

Happy to know that jQuery will solve all the cross-browser compatibilities (for the supported browsers) for us, we can now delve into the plethora of selectors available.
The All (or Universal) selector
The first selector available is the All (or Universal) selector, which is represented by an asterisk (*). As the name suggests, it allows you to retrieve all of the DOM elements of a web page, even the head element and its children. To reinforce this concept, let’s say you have the following HTML page:
<!DOCTYPE html>
<html>
  <head>
     <title>jQuery in Action, 3rd edition</title>
  </head>
  <body>

    <p>I'm a paragraph</p>
  </body>
</html>
To retrieve all the elements of the page you need to use the Universal selector and pass it to the jQuery() function (or its alias $()) in a statement like the following:
var allElements = $('*');Before moving on, there’s an established convention we want to mention. When saving the result of a selection made with jQuery in a variable, a widely adopted convention is to prepend or (less commonly) append a dollar sign to the name of the variable. It doesn’t have a special meaning; it’s used as a reminder of what the variable is storing. Another reason to adopt one of these conventions is to be sure not to invoke $() on a set of DOM elements on which we’ve already called this method. For example, you may erroneously write the following:
var allElements = $('*');
// Other code here...
$(allElements);
Using the aforementioned conventions, you can rewrite the previous statement prepending the dollar sign to the variable name, as shown here:
var $allElements = $('*');Alternatively, you also can write it this way:
var allElements$ = $('*');We recommend adopting one of these conventions and sticking with it. Throughout the rest of the app, we’ll use the first one: the dollar sign prepended.
Let’s now see the first complete example of using jQuery in a web page. In this example, shown in listing 2.1, we’ll use a CDN to include jQuery using the fallback technique learned in lesson 1, and the Universal selector to select all the elements of the page. You can find the code for this listing in the file lesson-2/listing-2.1.html in the source provided with the app. In the remainder of the app, the examples will only include a reference to a local version of the jQuery library, avoiding the use of any CDN. There are two main reasons for this choice: brevity (that is, writing less code) and avoiding an additional HTTP request (that fails if you’re running the examples while offline).
Listing 2.1. Using the Universal selector with jQuery
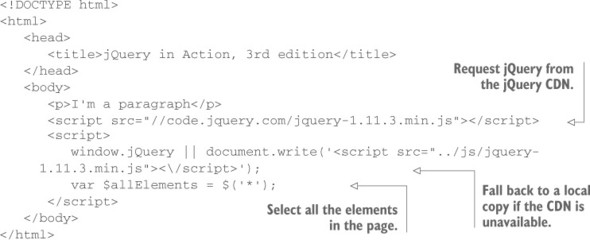
We told you that the previous listing was created to select all the elements of the page, but what are these elements? If you inspect the variable using a debugger or with the help of the console (where available), you’ll see that they are html, head, title, body, p, script (the first in the page), and script (the second in the page).
Warning
We want to point out that the console.log() method is not supported by old versions of Internet Explorer (IE 6–7). In the examples in this app we’ll ignore this issue and we’ll use this method heavily to avoid resorting to the very annoying window.alert() method. But you should keep in mind this lack of support in case your code needs to work in these browsers.
Remember, the elements are retrieved and stored in the same order in which they appear on the page.
Developer tools
Trying to develop a DOM-scripted application without the aid of a debugging tool is like trying to play concert piano while wearing welding gloves. Why would you do that to yourself?
Depending on the browser you’re using, there are different options you can choose to inspect your code. All major modern browsers have a set of built-in tools for this purpose, although with a different name, that you can adopt. For example, in Chrome these tools are called the Chrome Developer Tools, whereas in Internet Explorer they’re called the F12 developer tools. Firefox has its own built-in tools as well, but developers usually use a plugin called Firebug. These tools not only let you inspect the JavaScript console, but they also allow you to inspect the live DOM, the CSS, the scripts, and many other aspects of your page as you work through its development.
As you’ve seen, the use of the All selector forces jQuery to traverse all of the DOM’s nodes. With a lot of elements in the DOM, the process might be very slow; therefore its use is discouraged. In addition, it’s unlikely that you’ll need to retrieve all the elements of a page, although you could need to collect those belonging to a specific subtree of the DOM, as you’ll see later.
If you’ve ever played with JavaScript and a browser, you know that one of the most-used selections is performed using the ID of a given element. Let’s discover more about this topic.
The ID selector
The ID selector is one of the most used selectors, not only in jQuery but also in plain JavaScript. In JavaScript, to select an element by its ID, you pass the ID to the native document.getElementById() function. If you have some knowledge of CSS, you’ll recall that the ID selector is characterized by a sharp (#) sign (in some countries this symbol is known with a different name like number sign or pound sign) prepended to the element’s ID. If you have this paragraph in your page
<p id="description">jQuery in Action is a app about jQuery</p>you can retrieve it using the ID selector and jQuery by writing
$('#description');When used with the ID selector, jQuery returns a collection of either zero or one DOM element. In case you have more than one element on a page with the same ID, the library retrieves only the first matched element encountered. Although you can have more than one element with the same ID, it’s invalid and you should not do that.
Note
The W3C specifications of HTML5 assert that the value of an ID “must not contain any space characters. There are no other restrictions on what form an ID can take; in particular, IDs can consist of just digits, start with a digit, start with an underscore, consist of just punctuation, etc.” It’s possible to use characters such as the period (.) that have a special meaning in CSS and jQuery (because it follows the CSS conventions). Because of this, they must be escaped by prepending two backslashes to the special character. Thus, if you want to select an element with ID of .description, you have to write $('#\\.description').
It isn’t accidental that we compared how to select elements by their ID in jQuery and in JavaScript at the beginning of this section, using the getElementById() function. In jQuery the selection by ID is the fastest one, regardless of the browser used, because behind the scenes the library uses getElementById(), which is very fast.
Using the ID selector you’re able to quickly retrieve one element in the DOM. Often, you need to retrieve elements based on the class names used. How can you select elements that share the same style?
The Class selector
The Class selector is used to retrieve elements by the CSS class names used. As a JavaScript developer, you should be familiar with this kind of selection through the use of the native getElementsByClassName() function. jQuery follows the CSS conventions, so you have to prepend a dot before the chosen class name. For example, if you have the following HTML code inside the <body> of a page
<div>
  <h1 class="green">A title</h1>
  <p class="description">I'm a paragraph</p>

</div>
<div>
  <h1 class="green">Another title</h1>
  <p class="description blue">I'm yet another paragraph</p>
</div>
and you want to select the elements that have the class description, you need to pass .description to the $() function by writing the following statement:
var $descriptions = $('.description');The result of this statement is an object, often referred to by the documentation as a jQuery object or a jQuery collection (other names you can find in the wild are set of matched elements, or simply set or collection) containing the two paragraphs of the HTML snippet. The library will also select the nodes having multiple classes where one of them matches the given name (like the second paragraph).
In jQuery, like in CSS, it’s also possible to combine more class name selectors. If you want to select all the elements having the classes description and blue, you can concatenate them, resulting in $('.description.blue').
The Class selector is surely one of the most used among JavaScript and CSS, but there’s another basic selector we still need to discuss.
The Element selector
The Element selector allows you to pick up elements based on their tag name. Because of its support in almost any browser (including IE6), jQuery uses get-ElementsByTagName() to select elements by tag name behind the scenes. To understand what kind of selection you can perform with the Element selector, let’s say you want all the <div>s in a page. To achieve this task, you have to write
var $divs = $('div');It’s common to use it in conjunction with other selectors because you’ll usually have a lot of elements of the same type in your pages. In such cases, it must be written before the other selectors. Hence, if you want all <div>s having class clearfix, you have to write the following statement:
var $clearfixDivs = $('div.clearfix');You can also combine it with the ID selector, but we strongly encourage you to not do that for two reasons: performance and usefulness. Using a complex selector, jQuery will perform a search using its own methods, usually avoiding the use of native functions, and this leads to slower execution. In addition, as we pointed out in the section on the ID selector, jQuery will retrieve the first (if any) element having the searched ID. Therefore, if you’re searching for just one element, there’s no need to add complexity to your selector by mixing two types.
jQuery also enables you to use different types in a single selection, providing a performance gain because the DOM is traversed only once. To use it, you have to add a comma after each selector but the last one (spaces after the comma are ignored, so their use is a matter of code style). To select all the <div>s and the <span>s in a page, you can write
$('div, span');In case a given element matches more than one of the comma-separated selectors (which is not possible when you use only Element selectors because, for example, an element is a div or a span), the library will retrieve it only once, removing all the duplicates for you.
Thanks to the selectors discussed in these sections, you’re able to perform basic searches in the DOM. But you often need to select elements using more complex criteria. You may need to retrieve DOM nodes based on their relation with other nodes like “all the links inside an unordered list.” What you’re doing here is specifying a selection based on the hierarchy of the elements. How to perform such a search is the topic of the next section.
Leave a Reply