Although we’ll take a quick look at Ajax in this section, this isn’t intended as a complete Ajax tutorial or an Ajax primer. If you’re completely unfamiliar with Ajax (or worse, think that we’re talking about a dishwashing liquid or a mythological Greek hero), we encourage you to familiarize yourself with the technology through resources that are geared toward teaching you all about Ajax.
Some people may argue that the term Ajax applies to any method of making server requests without the need to refresh the user-facing page (such as by submitting a request to a hidden iframe element), but most people associate the term with the use of XMLHttpRequest (XHR) or the Microsoft XMLHTTP ActiveX control. A diagram of the overall process, which we’ll examine one step at a time, is shown in figure 10.1.
Figure 10.1. The lifecycle of an Ajax request as it makes its way from the client to the server and back again
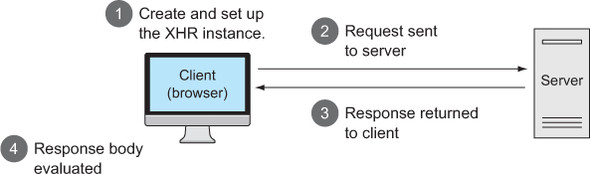
Let’s take a look at how those objects are used to generate requests to the server, beginning with creating an XHR instance.
Creating an XHR instance
In a perfect world, computer code would work in all commonly used browsers, but, as you’ve already learned, we don’t live in such a world. Things are no different when it comes to Ajax. There’s a standard way to make asynchronous requests via the JavaScript XHR object, and there’s an (old) Internet Explorer proprietary way that uses an ActiveX control. With Internet Explorer 7, a wrapper that emulates the standard interface is available, but IE 6 requires divergent code.
Note
jQuery’s Ajax implementation—which we’ll address throughout the remainder of this lesson—uses the ActiveX object when available. This is good news for us! By using jQuery for our Ajax needs, we know that the best approaches have been researched and will be utilized. If you don’t need to support old versions of Internet Explorer, your job will be much easier.
Once created, the code to set up, initiate, and respond to the request is relatively browser-independent, and creating an instance of XHR is easy for any particular browser. The problem is that different browsers implement XHR in different ways, and we need to create the instance in the manner appropriate for the current browser.
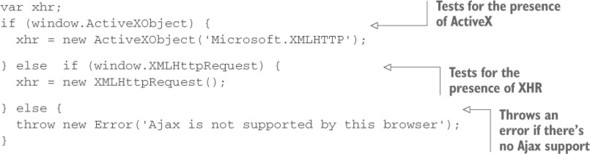
But rather than relying on detecting which browser a user is running to determine which path to take, we’ll use the preferred technique of feature detection that we introduced in the previous lesson. The code in the following listing shows a typical idiom used to instantiate an instance of XHR using this technique.
Listing 10.1. Capability detection resulting in code that can use Ajax in many browsers
Once created, the XHR instance sports a conveniently consistent set of properties and methods across all supporting browser instances. These properties and methods are shown in table 10.1, and the most commonly used of these will be discussed in the sections that follow.
Table 10.1. XMLHttpRequest (XHR) methods and properties
| Methods | Description |
|---|---|
| abort() | Causes the currently executing request to be cancelled. |
| getAllResponseHeaders() | Returns a single string containing the names and values of all response headers, or null if no response has been received. |
| getResponseHeader(name) | Returns the string containing the text of the specified header, or null if either the response has not yet been received or the header doesn’t exist in the response. |
| open(method, url[, async[, username[, password]]]) | Sets the HTTP method (such as GET or POST) and the destination URL of the request. Optionally, the request can be declared synchronous and a username and password can be supplied for requests requiring container-based authentication. |
| overrideMimeType(mime) | Sets the Content-Type header for the response to mime. |
| send([content]) | Initiates the request. The optional content parameter provides the request body. content is ignored if request method is GET or HEAD. |
| setRequestHeader(name, value) | Sets a request header using the specified name and value. |
| onreadystatechange | The event handler to be invoked when the state of the request changes. |
| readyState | An integer value that indicates the current state of the request as follows: 0 = UNSENT 1 = OPENED 2 = HEADERS_RECEIVED 3 = LOADING 4 = DONE |
| response | The response entity body according to responseType. |
| responseText | The body content returned in the response. |
| responseType | Can be set to change the response type. Its value can be one of “” (empty string), arraybuffer, blob, document, json, or text. |
| responseXML | If the body content is identified as XML, the XML DOM is created from the body content. |
| status | The response status code returned from the server. For example: 200 for success or 404 for not found. See the HTTP specification[a] for the full set of codes. |
| statusText | The status text message returned by the response. |
| timeout | The number of milliseconds a request can take before being forced to terminate. The default value is 0, which means there is no timeout. |
| ontimeout | The event handler to be called when the request times out. |
| upload | The upload process can be tracked by adding an event listener to upload. |
| withCredentials | Indicates whether or not cross-site Access-Control requests should be made using credentials such as cookies or authorization headers. The default is false. |
HTTP 1.1 status code definitions from RFC 2616:
Note
Want to get it from the horse’s mouth? You can find the XHR specification.
Now that you have an XHR instance created, let’s look at what it takes to set up and fire off the request to the server.
Initiating the request
Before you can send a request to the server, you need to perform the following steps:
1. Specify the HTTP method (such as POST or GET).
2. Provide the URL of the server-side resource to be contacted.
3. Let the XHR instance know how it can inform you of its progress.
4. Provide any body content for requests such as POST.
You set up the first two items by calling the open() method of an XHR object as follows:
xhr.open('GET', '/some/resource/url');Note that this method doesn’t cause the request to be sent to the server. It merely sets up the URL and HTTP method to be used. The open() method can also be passed a third Boolean parameter that specifies whether the request is to be asynchronous (true, which is the default) or synchronous (false). There’s seldom a good reason to make the request synchronous (even if doing so means you don’t have to deal with callback functions); after all, the asynchronous nature of the request is usually the whole point of making a request in this fashion.
In the third step, you must provide a means for the XHR instance to tap you on the shoulder to let you know what’s going on. You accomplish this by assigning a callback function to the onreadystatechange property of the XHR object. This function, known as the ready state handler, is invoked by the XHR instance at various stages of its processing. By looking at the settings of the other properties of XHR, you can find out exactly what’s going on with the request. We’ll take a look at how a typical ready state handler operates in the next section.
The final steps to initiate the request are providing any body content for requests such as POST and sending it off to the server. Both of these steps are accomplished via the send() method. For GET or HEAD requests, which typically have no body, no body content parameter is passed, as follows:
xhr.send();
When request parameters are passed to the other requests type, the string passed to the send() method must be in the proper format (which you might think of as query string format) in which the names and values are properly URI-encoded. URI encoding is beyond the scope of this section (and, as it turns out, jQuery is going to handle all of that for you), but if you’re curious, in JavaScript you can use encodeURIComponent().
An example of such a call is as follows:
xhr.send('a=1&b=2&c=3');Now let’s see what the ready state handler is all about.
Leave a Reply