In the previous section you saw how to easily integrate new easing functions by using third-party libraries. Creating your own animations is also a surprisingly simple matter.
jQuery exposes the animate() method, which allows you to apply your own custom animated effects to a set of elements. Let’s take a look at its syntax, including the parameters’ descriptions. It’s been a few pages since we reminded you of the meaning of the parameters, so even if they have the same meaning, we’ll repeat their description here. This way you don’t have to turn back a lot of pages.
| Method syntax: animate | |
|---|---|
| animate(properties[[, duration][, easing]][, callback]) animate(properties[, options]) | |
| Animate the properties specified by properties of all the elements in the jQuery collection. An optional duration, easing function, and callback function can be specified. The callback function is invoked when the animation is complete. An alternative format specifies a set of options in addition to the properties. | |
| Parameters | |
| properties | (Object) An object of CSS properties and values that the animation will move toward. The animation takes place by adjusting the values of the style properties from the current value for an element to the value specified in this object. When specifying multiword properties you can write them either using camel case notation (i.e., backgroundColor) or quoting the name without the camel case notation (‘background-color’). |
| duration | (Number|String) Optionally specifies the duration of the effect as a number of milliseconds or as one of the predefined value strings: “slow” (same as passing 600), “normal” (same as passing 400), or “fast” (same as passing 200). If this parameter is omitted and a callback function is specified as the first parameter, the speed “normal” is assumed. |
| easing | (String) Specifies an optional easing function name to use when performing the transition. These functions specify the pace of the animation at different points while in execution. If an animation takes place but this parameter isn’t specified, it defaults to “swing”. More about these functions in section 8.3. |
| callback | (Function) An optional function invoked when the animation completes. No parameters are passed to this function, but the function context (this) is set to the element that was animated. The callback is fired for each element that undergoes animation. |
| options | (Object) An optional set of options to pass to the method. The options available are shown in table 8.1. |
| Returns | |
| The jQuery collection. | |
You can create custom animations by supplying a set of CSS style properties and target values that those properties will converge toward as the animation progresses. Animations start with an element’s original style value and proceed by adjusting that style value in the direction of the target value. The intermediate values that the style achieves during the effect (automatically handled by the animation engine) are determined by the duration of the animation and the easing function.
The specified target values can be absolute values or relative values from the starting point. To specify relative values, prefix the value with += or -= to indicate relative target values in the positive or negative direction, respectively.
By default, animations are added to a queue for execution; applying multiple animations to an object will cause them to run serially. If you’d like to run animations in parallel, set the queue option to false.
The list of CSS style properties that can be animated is limited to those that accept numeric values for which there’s a logical progression from a start value to a target value. This numeric restriction is completely understandable—how would you envision the logical progress from a source value to an end value for a non-numeric property such as background-image? For values that represent dimensions, jQuery assumes the default unit of pixels, but you can also specify em units or percentages by including the em or % suffixes.
Note
In CSS it’s possible to animate the color property of an element, but you can’t achieve this effect using jQuery’s animate() method unless you employ the jQuery.Color plugin.
Frequently animated style properties include top, left, width, height, and opacity. But if it makes sense for the effect you want to achieve, you can also animate numeric style properties such as font-size, margin, padding, and border.
In addition to specific values for the target properties, you can also specify one of the strings "hide", "show", or "toggle"; jQuery will compute the end value as appropriate to the specification of the string. Using "hide" for the opacity property, for example, will result in the opacity of an element being reduced to 0. Using any of these special strings has the added effect of automatically revealing or removing the element from the display (like the hide() and show() methods), and it should be noted that "toggle" remembers the initial state so that it can be restored on a subsequent "toggle".
Before moving ahead, we thought we should give you a better idea of how the easing functions can change an animation. For this reason, we created a page that you can find in the file lesson-8/easings.html that shows how the animate() method can be used with the jQuery Easing plugin. With this page you can move an image from the left to the right according to a given easing function. The initial state of the page is shown in figure 8.4.
Figure 8.4. The initial state of the easings.html page

Play with this page until you are sure you understand how the easing functions work. In case you want to test more easings, you don’t have to reload the page. Once an animation is completed, clicking the Apply button will reset the position of the image and start the animation selected.
Now try your hand at writing a few more custom animations.
A custom scale animation
Consider a simple scale animation in which you want to adjust the size of the elements to twice their original dimensions. Such an animation is shown in listing 8.4.
Note
This specific animation can be easily performed via CSS in modern browsers using transform: scale(2). As pointed out in the introduction to this lesson, modern browsers support a lot of new standards, but you should be aware of the issues that come from targeting only modern browsers.
Listing 8.4. A custom scale animation
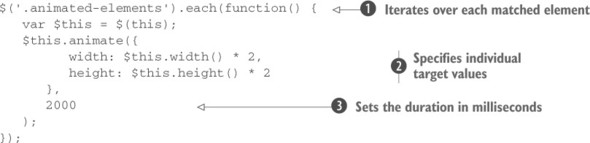
To implement this animation, you iterate over all the elements having animated-elements as their class, via jQuery’s each() method ![]() . By doing so, you can apply the animation individually to each element. This is important because the property values that you need to specify for each element are based on the individual dimensions for that element
. By doing so, you can apply the animation individually to each element. This is important because the property values that you need to specify for each element are based on the individual dimensions for that element ![]() . If you knew that you’d be animating a single element (such as if you were using an ID selector) or applying the exact same set of values to each element, you could dispense with each() and animate the set directly.
. If you knew that you’d be animating a single element (such as if you were using an ID selector) or applying the exact same set of values to each element, you could dispense with each() and animate the set directly.
Within the callback passed to each(), the animate() method is applied to each element, one at a time. You access the element by using this and set the style property values for width and height to double the element’s original dimensions. The result is that over the course of 2 seconds (as specified by the duration parameter set to 2000 ![]() ), each element in the jQuery object will grow from its original size to twice that size.
), each element in the jQuery object will grow from its original size to twice that size.
We’ll provide you with a demo to play with the code created in this section, but for the moment let’s try something a bit more extravagant.
Leave a Reply