When it comes to DOM elements, some of the most basic components you can manipulate are the properties and the attributes assigned to those elements. These properties and attributes are initially assigned to the JavaScript object instances that represent the DOM elements as a result of parsing the HTML markup, and they can be changed dynamically under script control. Let’s make sure that you have the terminology and concepts straight.
Properties are intrinsic to JavaScript objects, and each has a name and a value. The dynamic nature of JavaScript allows you to create properties on JavaScript objects under script control. (The appendix goes into great detail on this concept if you’re new to JavaScript.)
When referring to attributes, we mean the values that are specified on the markup of DOM elements, not the properties of an object instance. Consider the following HTML markup for an image element:
<img id="my-image" src="image.gif" alt="An image" class="some-class"
     title="This is an image"/>
In this element’s markup, the tag name is img, and the markup for id, src, alt, class, and title represents the element’s attributes, each of which consists of a name and a value. The browser reads and interprets this element markup to create the JavaScript object instance of type HTMLElement that represents this element in the DOM.
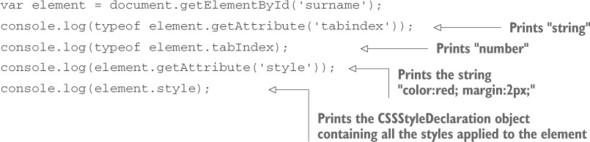
The first difference between these two concepts is that the properties’ values may be different from their related attributes’ values. Whereas the latter are always strings, the corresponding properties’ values may be strings, Booleans, numbers, or even objects. For example, trying to retrieve tabindex as an HTML attribute gives you a string (composed of all digits, but still a string). But retrieving its related property gives you a number. Another example is style, which if retrieved as an attribute is a string but if retrieved as a property is an object (of type CSSStyleDeclaration). To see this difference in action, let’s say that you have the following HTML element in a web page:
<input id="surname" tabindex="1" style="color:red; margin:2px;" />Now create a script in the same page made of the following statements or type them directly in a browser’s console:
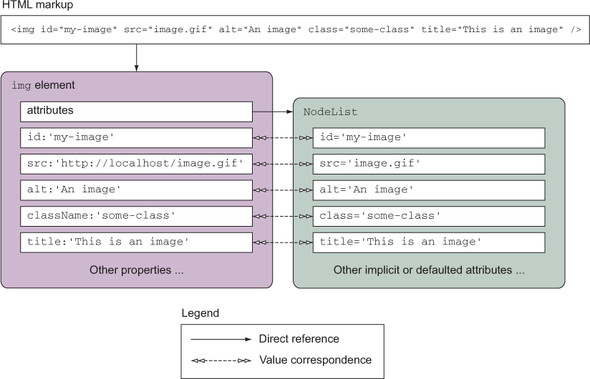
All the attributes of an element are gathered into an object, which is stored as a property named, reasonably enough, attributes on the DOM element instance. In addition, the object representing the element is given a number of properties, including some that represent the attributes of the element’s markup.
As such, the attribute values are stored not only in the attributes property but also in a handful of other properties. Figure 4.1 shows a simplified overview of this process.
Figure 4.1. HTML markup is translated into DOM elements, including the attributes of the tag and properties created from them. The browser creates a correspondence between the attributes and properties of the elements.
An active connection remains between the attribute values stored in the attributes object and the corresponding properties. Changing an attribute value usually results in a change in the corresponding property value and vice versa. To be more specific, consider the following input element (a checkbox, to be precise) with an additional, nonstandard attribute (in bold):
<input type="checkbox" id="app" name="app" title="Check this!"
app="jQuery in Action" />- If the attribute exists as a built-in (native) property of the corresponding DOM object, the value is synchronized. For example, title is a standard attribute and exists in the DOM element representing an image. Therefore, any change of its value will result in an update in the related property and vice versa.
- If the attribute exists as a built-in property but it’s a Boolean, the value isn’t synchronized. For example, checked retrieved as an attribute gives you the initial state of the check box element (null if not defined, as in our element). If retrieved as a property, regardless of whether it was defined or not, you obtain a Boolean (true if checked, false otherwise) of the current state of the element.
- If the attribute doesn’t exist as a built-in property, it won’t be created and the value won’t be synchronized. For example, the app attribute won’t be created as a property of the DOM element.
To test this synchronization idea, consider the previous checkbox element and the following statements:
var checkbox = document.getElementById('app');
console.log(checkbox.getAttribute('title') === checkbox.title);

checkbox.title = 'New title!';
console.log(checkbox.getAttribute('title') === checkbox.title);

checkbox.setAttribute('title', 'Another title!');
console.log(checkbox.getAttribute('title') === checkbox.title);

console.log(checkbox.getAttribute('checked') === checkbox.checked);
All of the console.log() calls but the last one print true on the console, confirming what we asserted.
Warning
Once again we want to highlight that the console.log() method isn’t supported by old versions of Internet Explorer (IE 6–7). In the examples of this app we’ll ignore this issue and we’ll use it heavily to avoid resorting to the annoying window.alert() method. But you should keep in mind this lack of support in case your code needs to support these browsers.
The previous example can be found in the file name lesson-4/attributes.and.properties.html of the source provided with this app and as a JS Bin.
For the most part, the name of a JavaScript property matches that of any corresponding attribute, but there are some cases where they differ. For example, the class attribute is represented by the className property, and the tabindex attribute is represented by a tabIndex property.
Detecting support for an attribute
HTML5 introduced several new attributes that you can add into your page’s elements. The difference between attributes defined in the markup but not present in the DOM element generated by the browser comes in handy when you need to detect the support for these attributes. Take as an example the new HTML5 required attribute. When the user adds it to a form field, the browser requires the user to enter some data into that field before the form can be submitted. You can detect if the browser supports this attribute by writing
if ("required" in document.createElement("input")) {
   // Attribute supported
}
This test will return true if the browser supports the feature; false otherwise.
If you need to detect the support for many features, we suggest you use Modernizr, the library that we mentioned in lesson 1.
jQuery gives you the means to easily manipulate an element’s attributes and provides access to the element instance so that you can also change its properties. Which of these you choose to manipulate depends on what you want to do. Let’s start by looking at getting and setting element attributes.
Leave a Reply