Your form is in place and you have a PHP page able to process the incoming requests. In an old-fashioned, synchronous world this would be enough. The user fills the form and clicks the Submit button to send the data to the server; the latter uses a server-side language to process the data, validate them, and eventually produce an output page. Today, users expect websites to be highly interactive, and you can meet this expectation using Ajax.
The first feature you’ll develop is the ability to give feedback to the user about the validity of a field, without the need to submit the form. This is a nice enhancement; it saves your users’ bandwidth because there’s no need to reload all the assets.
The idea is to offer a quick response to the user as soon as a given field loses the focus. To implement it, you have to perform an Ajax request to the server containing the value of the field that has just lost the focus. Then, if it isn’t valid, you have to show the error returned by the server. In case an issue with the request occurs, you want to log it on the console so that you can eventually debug the project. The code implementing the described behavior is shown in the following listing.
Listing 11.3. Validating the data as the user fills the form
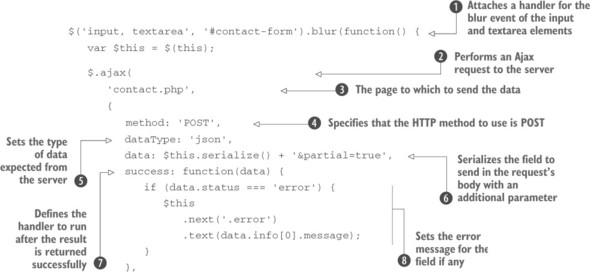

The first thing you do in this snippet is to listen for the blur event triggered by either an input or a textarea element of your form ![]() . Inside the handler for this event you send the request to the server employing the $.ajax() utility function because you want to have more control over the request
. Inside the handler for this event you send the request to the server employing the $.ajax() utility function because you want to have more control over the request ![]() .
.
The first parameter you pass to this function is the page that will receive the data, which is contact.php ![]() . In addition to the page, you pass an object as the second parameter to refine your request. Based on what you learned in the previous lesson, if you want to use the HTTP request methods correctly, you have to use a POST request. You’ll set the method property to POST
. In addition to the page, you pass an object as the second parameter to refine your request. Based on what you learned in the previous lesson, if you want to use the HTTP request methods correctly, you have to use a POST request. You’ll set the method property to POST ![]() . The second property you’ll define is dataType. You know that your PHP page will return a JSON object; hence you assign the type of the data expected to the appropriate value (json)
. The second property you’ll define is dataType. You know that your PHP page will return a JSON object; hence you assign the type of the data expected to the appropriate value (json) ![]() . You also serialize the field and its value, adding your special parameter (partial=true) to mark the request as partial
. You also serialize the field and its value, adding your special parameter (partial=true) to mark the request as partial ![]() . Once you’ve set all these properties, it’s time to establish the callback for the two main statuses: success and error.
. Once you’ve set all these properties, it’s time to establish the callback for the two main statuses: success and error.
In the success callback ![]() , you check the value of the status property of the object returned. If it’s error, you set the next span element (described in Lesson 11.2) to the value of the message property of the first item of the info property
, you check the value of the status property of the object returned. If it’s error, you set the next span element (described in Lesson 11.2) to the value of the message property of the first item of the info property ![]() . Inside the callback of the error status, which indicates an error in the request itself, you log on the console the message obtained
. Inside the callback of the error status, which indicates an error in the request itself, you log on the console the message obtained ![]() .
.
With this code you’re able to inform your users about the validity of their input. Once an error has been shown beneath a field, the user may want to return to that field to correct the error. As the field regains the focus, you have to hide the error. By doing so, you prevent your users from feeling that even the new value they’re writing is incorrect. Implementing this functionality is easy. All you have to do is attach a handler on the focus event for the same set of elements selected in previous code. Inside the handler, you hide the span element. Because you have to operate on the same set of elements, you can save some lines by chaining the code to implement this feature (in bold) with the one from listing 11.3. The relevant code for this change is as follows:
$('input, textarea', '#contact-form').blur(function() {
   // Code omitted here...
})
.focus(function() {
   $(this)
      .next('.error')
      .text('');
});
In this snippet and in listing 11.3, you use a few methods you learned throughout the app. You use the blur() shortcut method to attach a handler to the blur event. You employ the $.ajax() utility function to send an asynchronous request to the server. The serialize() method allows you to obtain the name and the value of a field as a string. The next() method lets you retrieve the span right after the field that lost the focus. Finally, using the text() method, you set the text of the span element. These are just examples of how using a few of jQuery’s methods and utility functions enables you to create nice features for your web pages.
Regardless of the validity of the values inserted, the user may still click the Submit button. At the moment, this action triggers the classic synchronous request that you want to avoid. Let’s see how you can change this default behavior.
Leave a Reply