On many occasions, you’ll want to generate new fragments of HTML to insert into a page. Such dynamic elements could be as simple as extra text you want to display or as complicated as creating a table of database results you’ve obtained from a server. A typical situation where this feature comes in handy is when you need to fetch external data, usually served as JSON or XML, using Ajax.
With jQuery, creating dynamic elements is a simple matter. You can create a jQuery object containing DOM elements on the fly by passing to the $() function a string that contains the HTML markup for those elements. Consider this line:
$('<div>Hello</div>');This expression creates a new jQuery object containing a div element that’s ready to be added to the page (at this point it isn’t injected in the DOM). Any jQuery method that you could run on a set of existing elements can be run on the newly created HTML fragment. This may not seem impressive at first glance, but when you throw event handlers, Ajax, and effects into the mix (as you will in the upcoming lessons), you’ll discover how powerful it is.
Note that if you want to create an empty div element, you can get away with this shortcut:
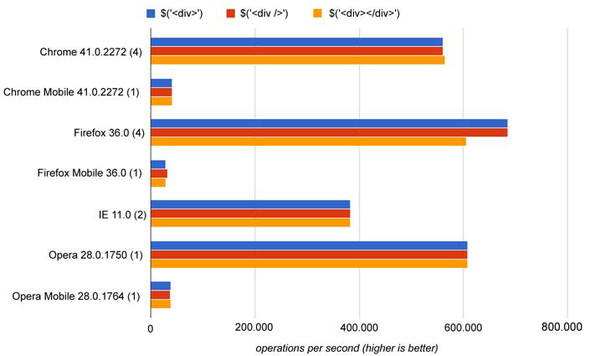
$('<div>');This is identical to $('<div></div>') and $('<div />'), although it’s highly recommended that you use well-formed markup and include the opening and closing tags for any element types that can contain other elements. From a performance perspective these three alternatives are equivalent, as you can see from the benchmark.
Figure 3.1. A benchmark comparing the three ways of creating a new element using jQuery(). It proves that they are equivalent from a performance point of view in almost every browser.
It’s easy to create such simple HTML elements, and thanks to the chainability of jQuery methods, creating more complex elements isn’t much harder. You can apply any jQuery method to the jQuery collection containing the newly created element. You could also create attributes on the element with jQuery’s attr() method (we’ll cover that in a later lesson), but jQuery provides an even better means to do so.
In the previous lesson we introduced you to the context parameter of the $() function. When creating a new element with the $() function, you use the context parameter to specify the attributes and their values for the element you’re creating in the form of a JavaScript object. The properties of such an object serve as the name of the attributes to be applied to the element, whereas the values serve as the values of the attributes.
Let’s say that you want to create an img element complete with multiple attributes and make it clickable to boot. Take a look at the code in the following listing.
Listing 3.1. Dynamically creating a full-featured img element
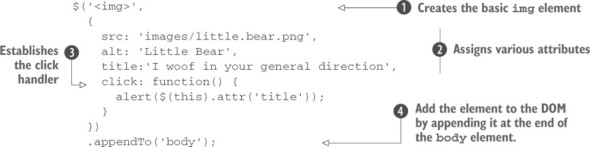
The single jQuery statement in the listing creates the basic img element ![]() ; gives it important attributes using the second parameter, such as its source, alternate text, and flyout title
; gives it important attributes using the second parameter, such as its source, alternate text, and flyout title ![]() ; and attaches it to the DOM tree (as a child of the body element)
; and attaches it to the DOM tree (as a child of the body element) ![]() . In the example shown, you append the element to the DOM using jQuery’s appendTo() method. We haven’t covered this method yet but it appends the elements in the jQuery collection—in this case only the newly created image—to the element specified in the argument, which in our example is the body element.
. In the example shown, you append the element to the DOM using jQuery’s appendTo() method. We haven’t covered this method yet but it appends the elements in the jQuery collection—in this case only the newly created image—to the element specified in the argument, which in our example is the body element.
We’re also throwing a bit of a curve ball at you here. In this example you also use the second parameter to establish an event handler that issues an alert (garnered from the image’s title attribute) when the image is clicked ![]() .
.
Regardless of how you arrange the code, that’s a pretty hefty statement—which is spread across multiple lines and with logical indentation for readability—but it also does a heck of a lot. Such statements aren’t uncommon in jQuery-enabled pages, and if you find it a bit overwhelming, don’t worry. We’ll cover every method used in this statement over the next few lessons. Writing such compound statements will be second nature before too long.
Figure 3.2 shows the result of this code, both when the page is first loaded (3.2a) and after the image has been clicked (3.2b). The full code for this example can be found in the app’s project code at lesson-3/listing-3.1.html.
Figure 3.2a. Creating complex elements on the fly(including this image, which generates an alert when it’s clicked) is easy as pie.

Figure 3.2b. The dynamically generated image possesses all expected styles and attributes, including the mouse click behavior of issuing an alert.

Up until now, you’ve applied methods to the entire set of matched elements, but there may be times when you want to further manipulate that set before acting upon it.
Leave a Reply