One of the best features of QUnit is its ease of use. Getting started with this framework is a matter of performing three simple steps.
The first thing to do is to download the framework. QUnit can be downloaded in several different ways. The first method is to access its website and download the JavaScript and the CSS file in the latest version available.
Note
At the time of this writing the latest version is 1.18.0, but all the examples provided in this lesson were developed to work seamlessly in QUnit 2.0.
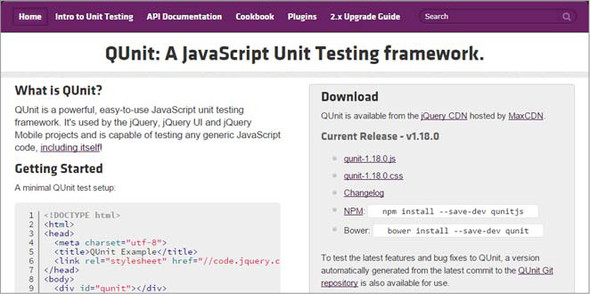
The JavaScript file contains the test runner (the code responsible for executing the tests) and the actual testing framework (the set of methods used to test the code); the CSS file styles the test suite page used to display the test results. You can find the links to these files on the right-hand side of the homepage, as shown in figure 14.1.
Figure 14.1. The homepage of the QUnit framework
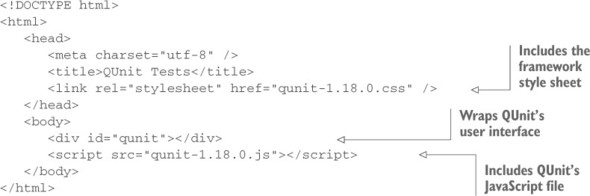
The second step is to move them into a folder where you’ll also create an HTML file. This file must contain a reference to the CSS file and the JavaScript file, as well as a mandatory element (usually a <div>) having an ID of qunit. Inside it, the framework will create the elements that make up the user interface used to group the tests and show the results. The resulting HTML code should resemble that shown in the following listing.
Listing 14.1. A minimal setup of the QUnit framework
The last step to perform is to open the HTML file in the browser of your choice. Once it’s open you’ll be presented with a page similar to the one illustrated in figure 14.2.
Figure 14.2. The user interface of the QUnit framework
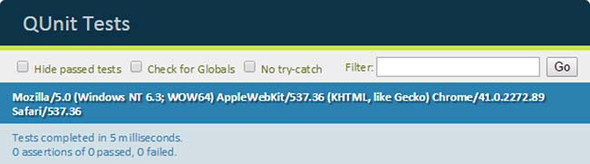
Pretty easy, isn’t it? Let’s now analyze the components of this user interface.
The top part of the interface is nothing but the content of the title element placed in the head of the page (“QUnit Tests”). Below this title, you can see a green bar. It’s green because all the tests passed (no tests at all means everything is working fine). This bar will turn red if one or more tests you defined fail.
In the second section you can see three check boxes: Hide passed tests, Check for Globals (sometimes referred as noglobals), and No try-catch. When the first option is checked, QUnit will hide the passed tests (those returning the expected result). The second check box allows you to verify if a property has been added to the window object by comparing it before and after each test, in which case the test will fail, listing the differences. The last flag can be used to verify if your code throws an exception when you instruct QUnit to run your test outside of its surrounding try-catch block. In addition to the check boxes, there’s an input element that you can use to filter the tests run to search a specific test.
In the third section you can read the value of the window.navigator.userAgent property. This property returns the user agent string for the browser that’s accessing the page.
The bottom section shows the time QUnit spent processing the defined tests. Underneath that you can read the number of assertions defined, the number of those that passed, and the number that failed.
What’s an assertion?
An assertion verifies that a statement is equal to true. This is useful for testing that your code returns the expected result. It’s important to note that an assertion should only be used to test meaningful code. We mean that you should verify only your code base and nothing more. For example, if your code uses a native JavaScript function, it’s completely useless to test it. You have to assume that a JavaScript function (for example, getElementById()) doesn’t have issues, even if sometimes it does.
As you can see, these numbers are all zero. The reason is that we haven’t defined any test yet. There are no assertions at all, either passed or failed. When you write some tests and assertions, QUnit will list here the assertions grouped by test.
If you looked at the official documentation while downloading the files, you may have noticed that it specifies another element as mandatory in the minimal setup of the framework. This is an element (usually a <div>) having an ID of qunit-fixture. Its aim is to prevent some tests failing or succeeding as a side effect of previously executed tests, such as deleting or inserting elements in the DOM. This element is useful because the framework resets the elements inside it after each test. Thus, it isn’t mandatory, but you should include it in any real project.
Other ways to obtain QUnit
QUnit can be obtained in different ways. A first possible method is to include the files needed using the jQuery CDN. To do that using version 1.18.0, you should include in your page the following code:
<link rel="stylesheet" href="//code.jquery.com/qunit/qunit-1.18.0.css"/>
<script src="//code.jquery.com/qunit/qunit-1.18.0.js"></script>
Another method is to download QUnit via Bower by running the following command:
bower install --save-dev qunitFinally, you can obtain the framework via npm:
npm install --save-dev qunitjsWith the framework set up, you’re ready to test your code. But before learning how to do that, you need to make a few changes. The first is to include in your page the JavaScript code or file that you want to test (for example, code.js). You can place it wherever you want as long as it comes before the code you’ll write to test it. The second change is to include the code or file containing the tests. They’re usually placed in a different JavaScript file, often called tests.js. This file must be included after the script element you used to include the QUnit’s JavaScript file. You should have code that looks like the following:
<script src="code.js"></script>
<script src="qunit-1.18.0.js"></script>
<script src="tests.js"></script>
The content of these files can also be inlined (putting the content inside the script element). In the examples of this lesson we’ll always inline the test code and sometimes even the code to test because of its simplicity, but we strongly suggest adopting an external file when you employ QUnit in a real project.
With this last note in mind, you’re ready to discover what this framework has to offer.
Leave a Reply