The jQuery repository, hosted on GitHub, is a perfect example of how front-end development has changed over the past years. Although not strictly related to the use of the library itself, it’s always important to know how expert developers organize their workflow and the tools they employ.
If you’re an experienced front-end developer, chances are you’re already aware of some, if not all, of these tools, but a refresher is always worthwhile. The development team adopted the latest and coolest technologies in today’s front-end panorama for the development of jQuery, specifically these:
- Node.js —A platform built on Chrome’s JavaScript runtime that enables you to run JavaScript as a server-side language.
- npm —The official package manager for Node.js used to install packages like Grunt and its tasks.
- Grunt —A task runner to automate common and repetitive tasks such as building, testing, and minification.
- Git —A free, distributed version control system to keep track of changes in the code. It allows easy collaboration between developers.
On the other hand, jQuery’s source code follows the asynchronous module definition (AMD) format. The AMD format is a proposal for defining modules where both the module and its dependencies can be asynchronously loaded. In practice, this means that although you use jQuery as a unique, single block, its source is split into several files (modules), as shown in figure 1.4. The dependencies relative to these files are managed through the use of a dependencies manager—in this case, RequireJS.
Figure 1.4. A schema representing jQuery’s modules: ajax, ajax/xhr, ajax/script, ajax/jsonp, css, deprecated, dimensions, effects, event, event/alias, offset, wrap, core/ready, deferred, exports/global, exports/amd, and Sizzle
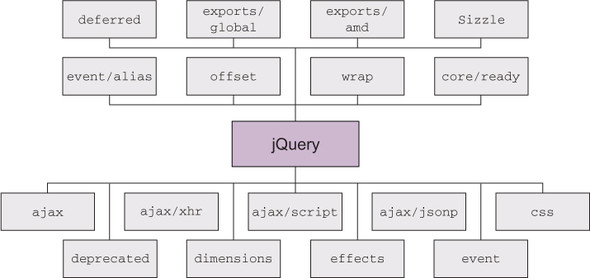
To give you an idea of what’s inside the modules, here are some examples:
- ajax —Contains all the Ajax functions like ajax(), get(), and post().
- deprecated —Contains all the currently deprecated methods that haven’t been removed. What’s inside this module depends on the jQuery version.
- effects —Contains the methods that allow animations like animate() and slideUp().
- event —Contains the methods to attach event handlers to browser events like on() and off().
The organization into modules of the source leads to another advantage: the possibility of building a custom version of jQuery containing only the modules you need.
Save space creating your own custom build
jQuery offers you the possibility of building your own custom version of the library, containing only the functionalities you need. This allows you to reduce the weight of your library, which will lead to a performance improvement because the end user has fewer KBs to download.
The ability to eliminate the modules you don’t need is important. Although you might think that you’ll need all the power that jQuery brings to the table, it’s doubtful that you’ll use all of its functions in the same website. Why not remove those useless lines of code to improve the performance of your website?
You can use Grunt to create a custom version. Imagine that you need a minified version of jQuery 1.11.3 with all the functionalities (except the deprecated methods and properties) and the effects. To perform this task, you need to install Node.js, Git, and Grunt on your local machine. After installing them, you have to clone jQuery’s repository by running the following command using the command-line interface (CLI):
git clone git://github.com/jquery/jquery.gitOnce the cloning process is complete, enter these last two commands:
npm install
grunt custom:-deprecated,-effects
You’re finished! Inside the folder named dist you’ll find your custom jQuery build in both minified and non-minified versions.
This approach doesn’t come without drawbacks, though. The first issue arises when a new version of jQuery is released. The second arises when a new functionality of your website requires a feature contained in a module that wasn’t previously included. In these cases, you need to again perform the steps described previously (usually only the commands) to create a new custom version that includes the new methods, bug fixes, or the missing module.
Now that you know how to put the library in place and how to create a custom build, it’s time to delve into jQuery’s fundamentals.
Leave a Reply