Back in lesson 2, we introduced the concept of lab pages to help you experiment with using jQuery selectors. For this lesson, we’ve set up a jQuery Effects Lab Page for exploring the operation of the jQuery effects in the file lesson-8/lab.effects.html. Loading this page into your browser results in the display shown in figure 8.2.
Figure 8.2. The initial state of the jQuery Effects Lab Page, which will help you examine the operation of the jQuery effects methods
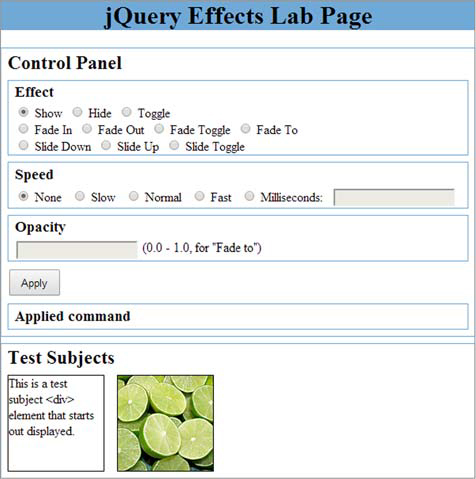
This lab consists of two main panels: a control panel in which you’ll specify which effect will be applied and another panel that contains four test subject elements upon which the effects will act.

“Are they daft?” you might be thinking. “There are only two test subjects.”
No, your authors haven’t lost it yet. There are four elements, but two of them (another <div> with text and another image) are initially hidden.

Let’s use this page to demonstrate the operations of the methods we’ve discussed to this point. Load the page in your browser, and follow along with the ensuing experiments:
- Experiment 1 —With the controls left as-is after the initial page load, click the Apply button. This will execute a show() method with no parameters. The expression that was applied is displayed below the Apply button for your information. Note that the two initially hidden test subject elements appear instantly. If you’re wondering why the belt image on the far right appears a bit faded, it’s because its opacity has been purposefully set to 50% (the actual value in CSS is 0.5).
- Experiment 2 —Select the Hide radio button and click Apply to execute the hide() method without arguments passed to it. All of the test subjects immediately vanish. Take special notice that the pane in which they resided has tightened up. This indicates that the elements have been completely removed from the display rather than merely made invisible.NoteWhen we say that an element has been removed from the display (here, and in the remainder of our discussion about effects), we mean that the element is no longer being taken into account by the browser’s layout manager by setting its CSS display style property to none. It doesn’t mean that the element has been removed from the DOM tree; none of the effects will ever cause an element to be removed from the DOM.
- Experiment 3 —Select the Toggle radio button and click Apply. Click Apply again. And again. You’ll note that each subsequent execution of toggle() flips the presence of the test subjects.
- Experiment 4 —Reload the page to reset everything to the initial conditions (in Firefox set focus to the address bar and press the Enter key—simply clicking the reload button won’t reset the form elements). Select Toggle and click Apply. Note that the two initially visible subjects vanish and the two that were hidden appear. This demonstrates that the toggle() method applies individually to each element, revealing the ones that are hidden and hiding those that aren’t.
- Experiment 5 —In this experiment, we’ll move into the realm of animation. Reload the page, leave Show selected, and select Slow for the Speed setting. Click Apply, and carefully watch the test subjects. The two hidden elements, rather than popping into existence, gradually grow from their top-left corner. If you want to really see what’s going on, reload the page again, select Milliseconds for the Speed setting and enter 5000 for the value. This will extend the duration of the effect to five (excruciating) seconds and give you plenty of time to observe the behavior of the effect.
- Experiment 6 —Choosing various combinations of Show, Hide, and Toggle, as well as various speeds, experiment with these effects until you feel you have a good handle on how they operate.
Armed with the jQuery Effects Lab Page and the knowledge of how this first set of effects operates, let’s take a look at the next set of effects.
Fading elements into and out of existence
If you watched the operation of the show()and hide() effects carefully, you will have noted that they scaled the size of the elements (either up or down as appropriate) and adjusted the opacity of the elements as they grew or shrank. The next set of effects, fadeIn() and fadeOut(), affect only the opacity of the elements; once they reach 0 (totally transparent) or 1 (totally visible) depending on the method called, they set the display property to either none or whatever it was (we covered this mechanism in section 8.1).
Other than the lack of scaling, these methods work in a fashion similar to the animated forms of show() and hide(). The syntaxes of these methods are similar to show() and hide() and the meaning of the parameters is the same, so we won’t repeat the parameters. The only difference between fadeIn(), fadeOut(), and all the other animation-related methods and the previously described methods (show(), hide(), and toggle()) is that because the former when called without parameters perform a transition, the change from one state to another doesn’t happen immediately.
With this in mind, their syntaxes are as follows.
| Method syntax: fadeIn |
|---|
| fadeIn(duration[, easing][, callback]) fadeIn(options) fadeIn() |
| Causes the matched elements that are hidden to be shown by gradually changing their opacity to their natural value. This value is either the opacity originally applied to the element or 1 (totally visible). The duration of the change in opacity is determined by the duration parameter. If the duration parameter is omitted, the default is 400 milliseconds (“normal”). Only hidden elements are affected. |
| Returns |
| The jQuery collection. |
| Method syntax: fadeOut |
|---|
| fadeOut(duration[, easing][, callback]) fadeOut(options) fadeOut() |
| Causes the matched elements that aren’t hidden to be removed from the display by gradually changing their opacity to 0. The duration of the change in opacity is determined by the duration parameter. If the duration parameter is omitted, the default is 400 milliseconds (“normal”). Only displayed elements are affected. Once opacity has been reduced to 0, the element is removed from the display. |
| Returns |
| The jQuery collection. |
In the same way a convenient method named toggle() is used to hide() and show() elements based on their current state, fadeIn() and fadeOut() have fadeToggle(). The syntax of this method is the following.
| Method syntax: fadeToggle |
|---|
| fadeToggle(duration[, easing][, callback]) fadeToggle(options) fadeToggle() |
| Performs fadeOut() on any non-hidden elements and fadeIn() on any hidden elements. See the syntax description of those methods for their semantics. |
| Returns |
| The jQuery collection. |
Let’s have some more fun with the jQuery Effects Lab Page. Load the lab page, and run through a set of experiments similar to those in the previous section but using the Fade In, Fade Out, and Fade Toggle selections (don’t worry about Fade To for now; we’ll attend to that soon enough).
It’s important to note that when the opacity of an element is adjusted, the jQuery hide(), show(), toggle(), fadeIn(), fadeOut(), and fadeToggle() effects remember the original opacity of an element and honor its value. In the lab, we purposely set the initial opacity of the belt image at the far right to 50% before hiding it. Throughout all the opacity changes that take place when applying the jQuery effects, this original value is never stomped on.
Another effect that jQuery provides is via the fadeTo() method. This effect adjusts the opacity of the elements like the previously examined fade effects, but it never removes the elements from the display. Before you start playing with fadeTo() in the lab, here’s its syntax (we’ll describe only the new parameters).
| Method syntax: fadeTo | |
|---|---|
| fadeTo(duration, opacity[, easing][, callback]) | |
| Gradually adjusts the opacity of the elements in the jQuery object from their current settings to the new setting specified by opacity | |
| Parameters | |
| opacity | (Number) The target opacity to which the elements will be adjusted, specified as a value from 0 to 1 |
| Returns | |
| The jQuery collection | |
Unlike the other effects that adjust opacity while hiding or revealing elements, fadeTo() doesn’t remember the original opacity of an element. This makes sense because the whole purpose of this effect is to explicitly change the opacity to a specific value.
Bring up the lab page and cause all elements to be revealed (you should know how by now). Then work through the following experiments:
- Experiment 1 —Select Fade To and a speed value slow enough for you to observe the behavior; 4000 milliseconds is a good choice. Now set the Opacity field (which expects a value between 0 and 1) to 0.1 and click Apply. The test subjects will fade to 0.1 opacity over the course of 4 seconds.
- Experiment 2 —Set the opacity to 1 and click Apply. All elements, including the initially semitransparent belt image, are adjusted to full opaqueness.
- Experiment 3 —Set the opacity to 0 and click Apply. All elements fade away to invisibility, but note that once they’ve vanished, the enclosing module doesn’t tighten up. Unlike the fadeOut() effect, fadeTo() never removes the elements from the display, even when they’re fully invisible.
Continue experimenting with the Fade To effect until you’ve mastered its behavior. Then you’ll be ready to move on to the next set of effects.
Leave a Reply