At its core, jQuery focuses on retrieving elements from HTML pages and performing operations on them. If you’re familiar with CSS, you’re already well aware of the power of selectors, which describe groups of elements by their type, attributes, placement within the document, and much more. With jQuery, you can employ that knowledge and that degree of power to vastly simplify your JavaScript.
jQuery places a high priority on ensuring that code will work consistently across all major browsers; many of the harder JavaScript problems have been silently solved for you. Should you find that the library needs a bit more juice, jQuery has a simple but powerful way for extending its functionality via plugins, which we’ll discuss in detail in Lesson 12.
Let’s start by taking a look at the jQuery object itself and how you can use your CSS knowledge to produce powerful yet terse code.
1.5.1. Properties, utilities, and methods
As we said before, the jQuery library is exposed through a property called jQuery and a shortcut called $. Using them gives you access to the properties, methods, and functions that jQuery provides.
One of the properties exposed by the jQuery property is fx.off. It allows enabling or disabling effects executed using jQuery’s methods. We’ll discuss this and other properties in detail in Lesson 9.
Much more exciting are the utilities, also referred to as utility functions. You can think of them as a handful of commonly used, general-purpose functions that are included in the library. You could say that jQuery acts as a namespace for them.
To give you a basic idea of what they are, let’s look at an example. One of the utilities available is the function for trimming strings. Its aim is to remove whitespaces from the beginning and the end of a string. A call to it could look like this:
var trimmed = $.trim(someString);If the value of someString is “ hello ”, the result of the $.trim() call will be “hello”. As you can see, in this example we used the jQuery shortcut ($). Remember that it’s an identifier like any other in JavaScript. Writing a call to the same function using the jQuery identifier, rather than its alias, will result in this code:
var trimmed = jQuery.trim(someString);Another example of a utility function is $.isArray(), which, as you may guess, tests if a given argument is an array.
In addition to properties and functions, the library also exposes methods that are available once you call the jQuery() function. Let’s learn more.
The jQuery object
The first function you’ll use in your path to learn jQuery is jQuery(). It accepts up to two arguments, and, depending on their number and type, performs different tasks. Like many other (almost all) methods in the library, it allows for chaining. Chaining is a programming technique used to call several methods in a single statement. Instead of writing
var obj = new Obj();
obj.method();
obj.anotherMethod();
obj.yetAnotherMethod();
you can write
var obj = new Obj();
obj.method().anotherMethod().yetAnotherMethod();
The most common use of jQuery() is to select elements from the DOM so you can apply some changes to them. In this case, it accepts two parameters: a selector and (optionally) a context. This function returns an object containing a collection of DOM elements that match the given criteria. But what’s a selector?
When CSS was introduced to web technologies in order to separate design from content, a way was needed to refer to groups of page elements from external style sheets. The method developed was to use selectors, which concisely represent elements based on their type, attributes, or position within the HTML document. Those familiar with XML might be familiar with XPath as a means to select elements within an XML document. CSS selectors represent an equally powerful concept but are tuned for use within HTML pages, are a bit more concise, and are generally considered easier to understand.
jQuery makes use of the same selectors as CSS. It supports not only the widely implemented ones belonging to CSS2.1 but also the more powerful selectors defined in CSS3. This is important because some of them may not be fully implemented by all browsers or may never make their appearance (for example, in older versions of Internet Explorer). As if this were not enough, jQuery also has its own selectors and allows you to create your own custom selectors.
In this app you’ll be able to use your existing knowledge of CSS to get up and running fast, and then you’ll learn about the more advanced selectors that jQuery supports. If you have little knowledge of them, don’t worry. We’ll cover jQuery selectors in great detail in Lesson 2, and you can find a full list of them on the jQuery.
Let’s say you want to select all the <p>s in the page using jQuery(). To do this, you can write
var paragraphs = jQuery('p');The library searches for matching elements within the DOM starting from the document root, so for a huge number of elements the process can be slow.
In most cases, you can speed up the search using the context parameter. It’s used to restrict the process to one or more subtrees, depending on the selector used. To understand it, you’ll modify the previous example.
Let’s say that you want to find all the <p>s contained in a <div>. Contained doesn’t mean the <div> must be the parent of the <p>; it can also be a generic ancestor. You can achieve this task as shown below:
var paragraphsInDiv = jQuery('p', 'div');Using the jQuery alias, the same statement will look like this:
var paragraphsInDiv = $('p', 'div');When you use the second argument, jQuery first collects elements based on this selector called context and then retrieves the descendants that match the first parameter, selector. We’ll discuss this topic in more detail in Lesson 2.
As we said, the jQuery() function (and its alias $()) returns a JavaScript object containing a set of DOM elements that match the selector, in the order in which they’re defined within the document. This object possesses a large number of useful predefined methods that can act on the collected group of elements. We’ll use the term jQuery collection, jQuery object, or jQuery set (or other similar expressions) to refer to this returned JavaScript object that contains the set of matched elements that can be operated on with the methods defined by jQuery. Based on this definition, the previous paragraphsInDiv variable is a jQuery object containing all the paragraphs that are descendants of a div element. You’ll use jQuery objects extensively when you need to perform operations, like running a certain animation or applying a style, on several elements in the page.
As mentioned earlier, one important feature of a large number of these methods, which we often refer to as jQuery methods, is that they allow for chaining. After a method has completed its work, it returns the same group of elements it acted on, ready for another action. As things get progressively more complicated, making use of jQuery’s chainability will continue to reduce the lines of code necessary to produce the results you want.
In the previous section, we highlighted the advantages of placing the JavaScript code at the bottom of the page. For many years now, developers have placed the scripts elements in the <head> of the page, relying on a jQuery method called ready(). This approach is now discouraged, but many developers still use it. In the next section you’ll learn more about it and also discover what the suggested approach is today.
The document ready handler
When embracing unobtrusive JavaScript, behavior is separated from structure. Applying this principle, you perform operations on the page elements outside the document markup that creates them. In order to achieve this, you need a way to wait until the DOM elements of the page are fully realized before those operations execute.
In the radio group example, the entire body has to be loaded before the behavior can be applied. Traditionally, the onload handler for the window instance is used for this purpose, executing statements after the entire page is fully loaded. The syntax is typically something like this:
window.onload = function() {
  // do stuff here
};
This causes the defined code to execute after the document has fully loaded. Unfortunately, the browser not only delays executing the onload code until after the DOM tree is created but also waits until all external resources are fully loaded and the page is displayed in the browser window. This includes resources like images as well as QuickTime and Flash videos embedded in web pages. As a result, visitors can experience a serious delay between the time that they first see the page and the time that the onload script is executed.
Even worse, if an image or other resource takes significant time to load, visitors will have to wait for the image loading to complete before the rich behaviors become available. This could make the whole unobtrusive JavaScript proposition a nonstarter for many real-life cases.
A much better approach would be to wait only until the document structure is fully parsed and the browser has converted the HTML into its resulting DOM tree before executing the script to apply the rich behaviors. Accomplishing this in a cross-browser manner that takes into account older browsers is somewhat difficult, but jQuery provides a simple means to trigger the execution of code once the DOM tree has loaded (without waiting for external resources).
The formal syntax to define such code is as follows:
jQuery(document).ready(function() {
// Your code goes here...
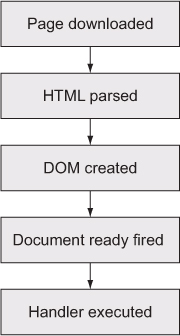
});First, you wrap the document object using the jQuery() function, and then you call the ready() method, passing a function to be executed when the document is ready to be manipulated. This means that inside the function passed to ready() you can safely access all of the elements of your page. A schema of the mechanism described is shown in figure 1.5.
Figure 1.5. A representation of the steps performed by browsers before the document-ready handler is executed
We called that the formal syntax for a reason; a shorthand form is as follows:
jQuery(function() {
  // your code hoes here...
});
By passing a function to jQuery() or its alias $(), you instruct the browser to wait until the DOM has fully loaded (but only the DOM) before executing the code. Even better, you can use this technique multiple times within the same HTML document, and the browser will execute all of the functions you specify in the order in which they’re declared within the page.
In contrast, the window’s onload technique allows for only a single function. This limitation can also result in hard-to-find bugs if any included third-party code uses the onload mechanism for its own purpose (not a best-practice approach).
Using the document-ready handler is a good way to embrace the unobtrusive JavaScript technique, but its use isn’t mandatory and can be avoided.
Because ready() takes care to execute the code after the DOM is loaded, developers used to place the script elements in the <head> of the page. As we discussed in section 1.2.2, “Segregating the script,” you can place them just before the closing body tag (</body>). By doing so, you can completely avoid the use of $(document).ready() because at that point all of the other elements are already in the DOM. Therefore, you can retrieve and use them safely. If you want to see an example of how $(document).ready() can be avoided, take a look at the source code of the file lesson-1/radio.group.html.
In the remainder of this app we’ll stick with the current best practices, so you won’t use ready().
Leave a Reply