Perhaps one of the most common uses of Ajax is to grab a chunk of content from the server and stuff it into the DOM at some strategic location. The content could be an HTML fragment that’s to become the child content of a target container element, or it could be plain text that will become the content of the target element.
Setting up for the examples
Unlike most of the example code that we’ve examined so far in this app, the code examples for this lesson require the services of a web server to receive the Ajax requests to server-side resources. Because it’s well beyond the scope of this app to discuss the operation of server-side mechanisms, we’re going to skip the setup of the server.
The code that we’ll use on the server side is developed in PHP, so your server should be able to process it. In case you’ve never done this, here’s a list of tools to start with regardless of your operating system:
If you’re used to another language, such Java or ASP .NET, you should be able to port the code in your language of choice because the pages are very simple. If you decide to convert the pages to Java or ASP.NET, you should also set up a web server that’s able to understand these languages, like Tomcat and IIS, respectively. Here’s a list of resources that will help you with this process:
Let’s imagine that you want to grab a chunk of HTML from the server using a resource named some-resource and make it the content of a <div> element with an ID of elem. For the final time in this lesson, let’s look at how you’d do this without jQuery’s assistance.
Using the patterns set out earlier in this lesson, you can write the code shown in listing 10.3. The full HTML file for this example can be found in the file lesson-10/listing.10.3.html.
Note
Again, you must run this example using a web server—you can’t just open the file in the browser—so the URL should be http://localhost:8080/lesson-10/listing.10.3.html. Omit the port specification of :8080 if you’re using Apache and leave it in if you’re using Tomcat. In future URLs in this lesson we’ll use the notation [:8080] to indicate that the port number might or might not be needed, but be sure not to include the square brackets as part of the URL.
Listing 10.3. Using native XHR to fetch and include an HTML fragment
var xhr;
if (window.ActiveXObject) {
   xhr = new ActiveXObject('Microsoft.XMLHTTP');
} else if (window.XMLHttpRequest) {
   xhr = new XMLHttpRequest();
} else {
   throw new Error('Ajax is not supported by this browser');
}
xhr.onreadystatechange = function() {
   if (this.readyState === 4) {
      if (this.status >= 200 && this.status < 300) {
         document.getElementById('elem').innerHTML = this.responseText;
      }
   }
}
xhr.open('GET', 'some-resource');
xhr.send();
Although there’s nothing tricky going on here, that’s a nontrivial amount of code (17 lines). The equivalent code you’d write using jQuery is as follows:
$('#elem').load('some-resource');We’re betting that we know which code you’d rather write and maintain!
Let’s now take a close look at the jQuery method used in this statement.
Loading content with jQuery
The simple jQuery statement at the end of the previous section loads content from a server-side resource using one of the most basic but useful jQuery Ajax methods: load(). The full syntax description of this method is as follows.
In the description of this method we’ve introduced a new object called jqXHR. This name is an abbreviation for jQuery XMLHTTPRequest, which is a superset of the XMLHTTPRequest (XHR) object. For example, it contains the responseText and responseXML properties, as well as a getResponseHeader() method. It implements the Promise interface that we’ll discuss in detail in lesson 13.
Though simple to use, this method has some important nuances. For example, when the data parameter is used to supply the request parameters and the argument passed is an object, the request is made using the POST HTTP method; otherwise, a GET request is initiated. If you want to make a GET request with parameters, you can include them as a query string on the URL. But be aware that when you do so, you’re responsible for ensuring that the query string is properly formatted and that the names and values of the request parameters are URI-encoded. The JavaScript encode-URIComponent() method is handy for this, or you can employ the services of the jQuery $.param() utility function that we covered in lesson 9.
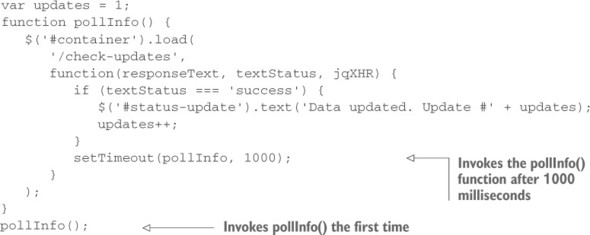
Sometimes you need to perform an action just after you’ve injected content into one or more elements. Let’s say that you’re polling the server to have updates of the status of the London underground and that you want to show a message on the web page each time an update is retrieved. For the sake of the example, you’ll repeat the request one second after the callback function has been executed. A basic implementation that satisfies this request is shown here:
Most of the time, you’ll use the load() method to inject the complete response into whatever elements are contained within the jQuery object, but sometimes you may want to filter elements coming back as the response. To do that, jQuery allows you to specify a selector that will be used to limit which response elements are injected into the elements in the set. You can specify the selector by suffixing the URL with a space followed by the selector itself.
For example, to filter response elements so that only <div> instances are injected, you have to write the following:
$('.inject-me').load('/some-resource div');The selector used can be arbitrarily complex, which means that you can also write statements like this:
$('.inject-me').load('/some-resource div .some-class a');In this case jQuery will search for all the elements that match the selector specified.
When it comes to supplying the data to be submitted with a request, sometimes you’ll wing it with ad hoc data, but frequently you’ll find yourself wanting to gather data that a user has entered into form controls.
As you might expect, jQuery has some assistance up its sleeve.
Serializing form data
If the data that you want to send as request parameters comes from form controls, a helpful jQuery method for building a query string is serialize(), whose syntax is as follows.
| Method syntax: serialize | |
|---|---|
| serialize() | |
| Creates a properly formatted and encoded query string from all form elements in the jQuery collection | |
| Parameters | |
| none | |
| Returns | |
| The formatted query string | |
The serialize() method is smart enough to collect information only from the form control elements in the set of matched elements and only from those qualifying elements that are deemed successful. A successful control is one that would be included as part of a form submission according to the rules of the HTML specification.[1] Controls such as unchecked check boxes and radio buttons, dropdowns with no selections, and disabled controls aren’t considered successful and don’t participate in form submission, so they’re also ignored by serialize().
1
HTML 4.01 Specification, section 17.13.2, “Successful controls”
The ability to serialize values to send them to the server is a nice addition to jQuery, but unfortunately our lovely library doesn’t provide a utility to perform the opposite operation: deserialize.
Deserialization is the operation of populating and changing the state of form fields based on a serialized string. It’s useful if you have a complex search form and you want to store some commonly performed searches of a given user. In this case you can save the values of the fields in a cookie or database so that the user can click a button and restore those values without filling the form over and over again.
When jQuery fails to offer a solution, the vibrant community around the project takes care of it. That’s another reason why jQuery is so awesome. For situations like the one described previously, you can employ a jQuery plugin called jQuery.deserialize.
Deserialize data with jQuery.deserialize
To use jQuery.deserialize you first need to include it in your page. The method is the same one seen many times in this app—placing a link to the library inside a <script> tag after the jQuery library, as shown here:
<script href="path/to/jquery.js"></script>
<script href="path/to/jquery.deserialize.js"></script>
With the plugin in place, let’s say that you have the following form:
<form id="my-form">
    <input name="name" />
    <input name="surname" />
</form>
<button id="btn">Auto fill</button>
You also have the following string that comes from a previous serialization:
name=Aurelio&surname=De+Rosa
With this premise in mind, if you want to autofill the form as soon as the user clicks the btn button, you can write
$('#btn').click(function() {
   $('#my-form').deserialize('name=Aurelio&surname=De+Rosa');
});
If you’d rather get the form data in a JavaScript array (as opposed to a query string), jQuery provides the serializeArray() method.
| Method syntax: serializeArray | |
|---|---|
| serializeArray() | |
| Collects the values of all successful form controls into an array of objects containing the names and values of the controls | |
| Parameters | |
| none | |
| Returns | |
| The array of form data | |
The array returned by serializeArray() is composed of object literals, each of which contains a name property and a value property that contain the name and value of each successful form control. Note that this is (not accidentally) one of the formats suitable for passing to the load() method to specify the request parameter data.
With the load() method at your disposal, let’s put it to work solving some common real-world problems that many web developers encounter.
Loading dynamic HTML fragments
In business applications, particularly for commerce websites, often you’ll want to grab real-time data from the server in order to present your users with the most up-to-date information. After all, you wouldn’t want to mislead customers into thinking that they can buy something that’s not available, would you?
In this section, you’ll begin to develop a page that you’ll add to throughout the course of the lesson. This page is part of a website for a fictitious firm named The Boot Closet, an online retailer of overstock and closeout motorcycle boots. Unlike the fixed product catalogs of other online retailers, this inventory of overstock and closeouts is fluid, depending on what deals the proprietor was able to make that day and what’s already been sold from the inventory. It will be important for you to always make sure that you’re displaying the latest info!
To begin your page (which will omit site navigation and other boilerplate to concentrate on the lessons at hand), you want to present your customers with a dropdown containing the styles that are currently available and, when a style is selected, display detailed information regarding that style. On initial display, the page will appear as shown in figure 10.2.
Figure 10.2. The initial display of your commerce page with a simple dropdown inviting customers to click it
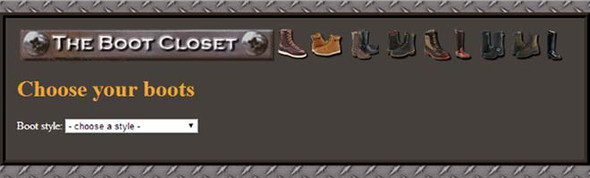
After the page first loads, a dropdown with the list of styles currently available in the inventory is displayed. When no style is selected, you’ll display a helpful message as a placeholder for the selection: “- choose a style -”. This invites the user to interact with the dropdown, and when a user selects a boot style from this dropdown, here’s what you want to do:
- Display the detailed information about that style in the area below the dropdown.
- Remove the “- choose a style -” entry; once the user picks a style, it has served its purpose and is no longer useful.
Let’s start by taking a look at the HTML markup for the body that defines this page structure:
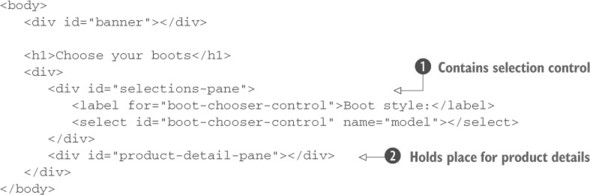
Not much to it, is there? As would be expected, you define all the visual rendition information in an external style sheet (not shown here), and adhering to the precepts of unobtrusive JavaScript, you include no behavioral aspects in the HTML markup.
The most interesting parts of this markup are a container ![]() that holds the select element that will allow customers to choose a boot style and another container
that holds the select element that will allow customers to choose a boot style and another container ![]() into which product details will be injected.
into which product details will be injected.
Note that the boot style control needs to have its option elements added before the user can interact with the page. Let’s add the necessary behavior to this page. The first thing you’ll add is an Ajax request to fetch and populate the boot style dropdown.
Note
Under most circumstances, initial values such as these would be handled on the server prior to sending the HTML to the browser. This means that even if your users have JavaScript disabled or can’t execute JavaScript code, they can still use the web page. There may be circumstances where prefetching data via Ajax may be appropriate, but we’re doing that here for instructional purposes only.
To add the options to the boot style control, you use the handy load() method:
$('#boot-chooser-control').load('actions/fetch-boot-style-options.php');How simple is that? The only complicated part of this statement is the URL, which isn’t all that long or complicated, that specifies a request to a server-side PHP page.
One of the nice things about using Ajax (with the ease of jQuery making it even nicer) is that it’s completely independent of the server-side technology. You make HTTP requests, sometimes with appropriate parameter data, and as long as the server returns the expected responses, you can ignore whether the server is powered by Java, Ruby, PHP, or even old-fashioned CGI.
In this particular case, you expect that the server-side resource will return the HTML markup representing the boot style options—supposedly from the inventory database. The faux backend code returns the following as the response:
<option value="">- choose a style -</option>
<option value="7177382">Caterpillar Tradesman Work Boot</option>
<option value="7269643">Caterpillar Logger Boot</option>
<option value="7332058">Chippewa 9" Briar Waterproof Bison Boot</option>
<option value="7141832">Chippewa 17" Engineer Boot</option>
<option value="7141833">Chippewa 17" Snakeproof Boot</option>
<option value="7173656">Chippewa 11" Engineer Boot</option>
<option value="7141922">Chippewa Harness Boot</option>
<option value="7141730">Danner Foreman Pro Work Boot</option>
<option value="7257914">Danner Grouse GTX Boot</option>
This response then gets injected into the select element, resulting in a fully functional control.
Your next act is to instrument the dropdown so that it can react to changes, carrying out the duties that we listed earlier. The code for that is only slightly more complicated:

In this code, you select the boot style dropdown and bind a change handler to it ![]() . In the event handler for the change event, which will be invoked whenever a customer changes the option of the dropdown selected, you obtain the current value of the selection by calling jQuery’s val() method on the event target after you’ve wrapped it using $(). In this case, the target element is the select element that triggered the event.
. In the event handler for the change event, which will be invoked whenever a customer changes the option of the dropdown selected, you obtain the current value of the selection by calling jQuery’s val() method on the event target after you’ve wrapped it using $(). In this case, the target element is the select element that triggered the event.
You employ the load() method ![]() on the product-detail-pane element to send a request to the page actions/fetch-product-details.php. To this page you send the boots model by using an object literal whose only property is named model. Finally, you remove the placeholder option
on the product-detail-pane element to send a request to the page actions/fetch-product-details.php. To this page you send the boots model by using an object literal whose only property is named model. Finally, you remove the placeholder option ![]() inside the callback of the load() method.
inside the callback of the load() method.
After the customer chooses an available boot style, the page will appear as shown in figure 10.3.
Figure 10.3. The server-side resource returns a preformatted fragment of HTML to display the detailed boot information.
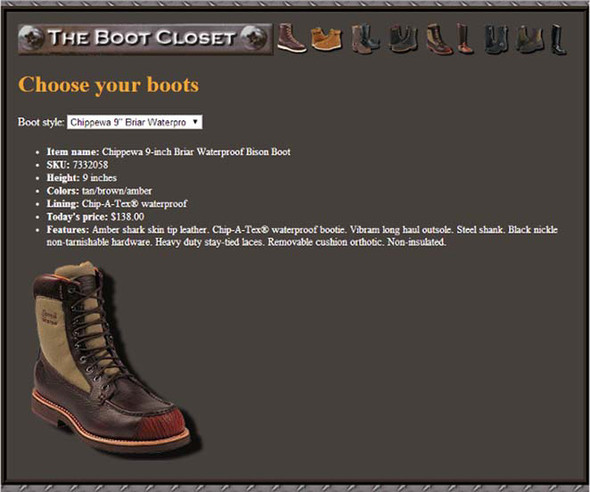
The most notable operation performed is the use of the load() method to quickly and easily fetch snippets of HTML from the server and place them within the DOM as the children of existing elements. This method is extremely handy and well suited to web applications that are powered by servers capable of server-side templating.
The following listing shows the complete code for the Boot Closet page, which can be found at http://localhost[:8080]/lesson-10/phase.1.html. You’ll revisit this page to add further capabilities to it as you progress through this lesson.
Leave a Reply