In order to remove attributes from DOM elements, jQuery provides the removeAttr() method. Its syntax is as follows.
| Method syntax: removeAttr | |
|---|---|
| removeAttr(name) | |
| Removes the specified attribute or attributes from every matched element | |
| Parameters | |
| name | (String) The name of the attribute or list of attributes’ names separated by a space to remove |
| Returns | |
| The jQuery collection | |
Let’s see an example of this method in use. The goal is to remove the title and alt attributes from all the images in a page. To perform this task, you can write the following statement:
$('img').removeAttr('title alt');The removeAttr() method internally uses the JavaScript removeAttribute() function. But it has the advantage of being called directly on every element in a jQuery object and allowing the use of chaining.
Removing an attribute doesn’t remove any corresponding property from the JavaScript DOM element, although it may cause its value to change. For example, removing a readonly attribute from an element would cause the value of the element’s readOnly property to flip from true to false, but the property itself wouldn’t be removed from the element.
Now let’s look at some examples of how you might apply this knowledge to your pages.
Fun with attributes
Let’s see how these methods can be used to fiddle with the element attributes in various ways.
Example #1—Forcing links to open in a new window
Imagine that you want to make all the links on your website that point to external domains open in new windows. This is fairly trivial if you’re in total control of the entire markup and can add a target attribute, as shown here:
That’s all well and good, but what if you’re not in control of the markup? You could be running a content management system or a wiki, where end users are able to add content, and you can’t rely on them to add the target="_blank" to all external links. First you need to determine what you want: you want all links whose href attributes begin with http:// to open in a new window, which you’ve determined can be done by setting the target attribute to _blank. In addition, you don’t want to take into account those links that already have the target attribute set with the right value. For the sake of simplicity, in this example we’re deliberately ignoring other protocols such as FTP, HTTPS, and the like.
You can use the techniques you’ve learned in this section to do this concisely:
$('a[href^="http://"]')
   .not('[target="_blank"]')
   .attr('target', '_blank');
First you select all the links with an href attribute starting with http://, which indicates that the reference is external (assuming the page isn’t using absolute URLs for internal resources). Then you exclude all those links that already have their target attribute set to _blank. Finally, you set the attribute to the remaining elements. Mission accomplished with a single line of jQuery code! You can see this code in action by opening the file lesson-4/new.window.links.html.
Example #2—Simulating the placeholder attribute
Another excellent use for jQuery’s attribute functionality is to simulate the new HTML5 placeholder attribute. In this example, we’ll show you a basic implementation to simulate it that well serves to show the use of the attr() method, but it isn’t intended for use in production. There are many reasons why you shouldn’t use this code in your projects. The first reason is that you won’t test for browser support, so running this code will perform the operation on browsers that support the placeholder attribute as well. Another reason is that the text won’t be hidden once the field is focused, so the user has to delete the value manually. What a pain!
The placeholder attribute
The placeholder attribute shows text, which ideally specifies what the field is for or an example of a possible value, inside a field. The text is shown until the field is focused or a value has been inserted by the user, depending on the browser, in which case the text is hidden. This attribute applies to <input>s and <textarea>s. On older browsers that don’t support it (Internet Explorer 6–9) this attribute is ignored and nothing happens, like you never wrote the attribute in first place.
What you’ll do in this example is copy the value of the placeholder attribute and set it as the value of the value attribute. By doing so, every browser will show the text of the placeholder even if placeholder isn’t supported. For the sake of the example, we’ll cover only the case of <input> elements. The reason is that in order to target <textarea>s too, you’d need jQuery’s text() method, which we haven’t covered yet (but will do so shortly).
Assume that you have the following form:
<form>
   <label for="username">Username:</label>
   <input id="username" name="username" placeholder="JohnDoe" />
   <label for="email">Email:</label>
   <input type="email" id="email" name="email" placeholder="[email protected]" />
   <input type="submit" value="Login" />
</form>
To satisfy the requirements, you can write this simple code:
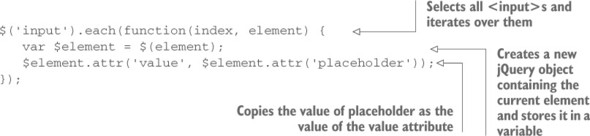
The result of this execution is shown in figure 4.2. In addition, the code can be found in the file lesson-4/placeholder.html and as a JS Bin.
Figure 4.2. The fields of the form are filled with the values specified in the placeholder attribute using the attr() method.

Now that you’ve seen the ins and the outs of dealing with attributes, let’s take a look at how to manipulate the properties of an element.
Leave a Reply