When it comes to modifying the contents of elements, there are a lot of different methods you can employ, depending on the type of the text you want to inject. If you’re interested in setting a text whose content should not be parsed as markup, you can use properties like textContent or innerText, depending on the browser.
Once again jQuery saves you from these browser incompatibilities by giving you a number of methods that you can employ.
Replacing HTML or text content
First up is the simple html() method, which allows you to retrieve the HTML content of an element when used without parameters or, as you’ve seen with other jQuery methods, to set the content of all the elements in the set when used with a parameter.
Here’s how to get the HTML content of an element.
| Method syntax: html | |
|---|---|
| html() | |
| Obtains the HTML content of the first element in the matched set, | |
| Parameters | |
| none | |
| Returns | |
| The HTML content of the first matched element. | |
And here’s how to set the HTML content of all the matched elements.
| Method syntax: html | |
|---|---|
| html(content) | |
| Sets the passed HTML fragment as the content of all matched elements. | |
| Parameters | |
| content | (String|Function) The HTML fragment to be set as the element’s content. If a function, the function is invoked for each element in the set, setting that element as the function context (this). The function is passed two values: the element index and the existing content. The function’s returned value is used as the new content. |
| Returns | |
| The jQuery collection. | |
Let’s say that in your page you have the following element:
<div id="message"></div>You’re running a function you’ve developed, and once it ends you need to show a message that contains some content to your user. You can perform this task with a statement like the following:
$('#message').html('<p>Your current balance is <b>1000$</b></p>');This statement will cause your previous element to be updated as reported here:
<div id="message"><p>Your current balance is <b>1000$</b></p></div>In this case, the tags passed to the method will be processed as HTML. The total balance, for instance, will be shown in bold.
In addition to setting the content as HTML, you can also set or get only the text contents of elements. The text() method, when used without parameters, returns a string that’s the concatenation of all the texts in the matched set. For example, let’s say you have the following HTML fragment:
<ul id="the-list">
  <li>One</li><li>Two</li><li>Three</li><li>Four</li>
</ul>
The statement
var text = $('#the-list').text();results in the variable text being set to OneTwoThreeFour. Note that if there are white spaces or new lines in between elements (for example between a closing </li> and an opening <li>) they’ll be included in the resulting string.
The syntax of this method is as follows.
| Method syntax: text | |
|---|---|
| text() | |
| Retrieves the combined text contents of each element in the set of matched elements, including their descendants. | |
| Parameters | |
| none | |
| Returns | |
| A string of all the text contents. | |
You can also use the text() method to set the text content of the elements in the jQuery object. The syntax for this format is as follows.
Changing the inner HTML or text of elements using these methods will replace the contents that were previously in the elements, so use these methods carefully. jQuery isn’t limited to these methods only, so let’s take a look at the others.
Moving elements
Manipulating the DOM of a page without the necessity of a page reload opens a world of possibilities for making your pages dynamic and interactive. You’ve already seen a glimpse of how jQuery lets you create DOM elements on the fly. These new elements can be attached to the DOM in a variety of ways, and you can also move (and copy and move) existing elements.
To add content to the end of existing content, the append() method is available.
| Method syntax: append | |
|---|---|
| append(content[, content, …, content]) | |
| Appends the passed argument(s) to the content of all matched elements. This method accepts an arbitrary number of arguments with a minimum of one. | |
| Parameters | |
| content | (String|Element|jQuery|Array|Function) A string, a DOM element, an array of DOM elements, or a jQuery object to be appended. If a function is provided, the function is invoked for each element in the set, setting that element as the function context (this). The function is passed two values: the element index and the existing contents of that element. The function’s returned value is used as the content to append. |
| Returns | |
| The jQuery collection. | |
Let’s see an example of the use of this method. Consider the following simple case:
$('p').append('<b>some text<b>');This statement appends the HTML fragment created from the passed string to the end of the existing content of all p elements on the page.
A more complex use of this method identifies existing elements of the DOM as the items to be appended. Consider the following:
$('p.append-to').append($('a.append'));This statement moves all a elements with the class append to the end of the content of all p elements having class append-to. If there are multiple targets (the elements of the jQuery object the append() method is called upon) for the operation, the original element is cloned as many times as is necessary and then appended. In all cases, the original is removed from its initial location.
This operation is semantically a move if one target is identified; the original source element is removed from its initial location and appears at the end of the target’s list of children.
Consider the following HTML code:
<a href="http://www.manning.com" class="append">Text</a>
<p class="append-to"></p>
By running the previous statement, you’ll end up with the following markup:
<p class="append-to">
   <a href="http://www.manning.com" class="append">Text</a>
</p>
The operation can also be a copy-and-move operation if multiple targets are identified, creating enough copies of the original so that each target can have one appended to its children.
In place of a full-blown set, you can also reference a specific DOM element, as shown:
$('p.appendToMe').append(someElement);Another example of use for this method is the following:
$('#message').append(
   '<p>This</p>',
   [
      '<p>is</p>',
      $('<p>').text('my')
   ],
   $('<p>text</p>')
);
In this code you can see how the append() method can manage multiple arguments and each argument can be of a different type (a string, an array, and a jQuery object). The result of running it is that you’ll have an element having an ID of message with four paragraphs that compose the sentence “This is my text.”
Although it’s a common operation to add elements to the end of an element’s content—you might be adding a list item to the end of a list, a row to the end of a table, or adding a new element to the end of the document body—you might also need to add a new or existing element to the start of the target element’s contents.
When such a need arises, the prepend() method will do the trick.
| Method syntax: prepend | |
|---|---|
| prepend(content[, content, …, content]) | |
| Prepends the passed argument(s) to the content of all matched elements. This method accepts an arbitrary number of arguments with a minimum of one. | |
| Parameters | |
| content | Same as the content parameter of append() except the argument(s) are prepended to the content of each element in the set of matched elements. |
| Returns | |
| The jQuery collection. | |
Sometimes you might wish to place elements somewhere other than at the beginning or end of an element’s content. jQuery allows you to place new or existing elements anywhere in the DOM by identifying a target element that the source elements are to be placed before or after.
Not surprisingly, the methods are named before() and after(). Their syntax should seem familiar by now.
| Method syntax: before | |
|---|---|
| before(content[, content, …, content]) | |
| Inserts the passed argument(s) into the DOM as siblings of the target elements, positioned before the targets. The target elements in the set must already be part of the DOM. This method accepts an arbitrary number of arguments with a minimum of one. | |
| Parameters | |
| content | Same as the content parameter of append() except the argument(s) is inserted before each element in the set of matched elements. |
| Returns | |
| The jQuery collection. | |
| Method syntax: after | |
|---|---|
| after(content[, content, …, content]) | |
| Inserts the passed argument(s) into the DOM as siblings of the target elements positioned after the targets. The target elements in the set must already be part of the DOM. This method accepts an arbitrary number of arguments with a minimum of one. | |
| Parameters | |
| content | Same as the content parameter of append() except the argument(s) is inserted after each element in the set of matched elements. |
| Returns | |
| The jQuery collection. | |
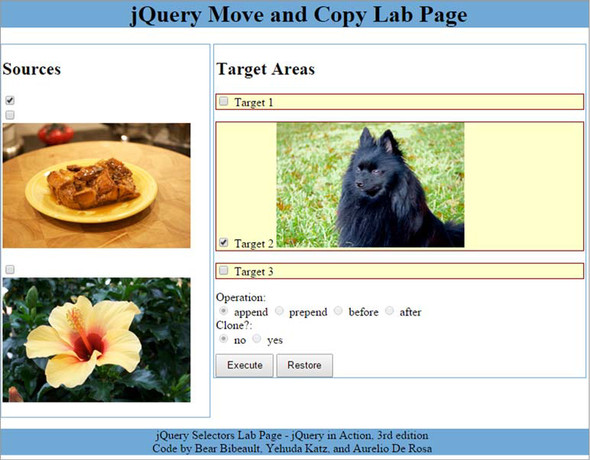
These operations are crucial to manipulating the DOM effectively in your pages, so we’ve provided a Move and Copy Lab Page so that you can play around with these operations until you thoroughly understand them. This lab is available at lesson-5/lab.move.and.copy.html, and its initial display is as shown in figure 5.3.
Figure 5.3. The Move and Copy Lab Page will let you inspect the operation of the DOM manipulation methods.


The left pane of this Lab contains three images that can serve as sources for your move/copy experiments. Select one or more of the images by checking their corresponding check boxes.
Targets for the move/copy operations are in the right pane and are also selected via check boxes. Controls at the bottom of the pane allow you to select one of the four operations to apply: append, prepend, before, or after. (Ignore “clone” for now; we’ll attend to that later.)
The Execute button causes any source images you’ve selected to be applied to a set of the selected targets using the specified operation. When you want to put everything back into place so you can run another experiment, use the Restore button.

Let’s run an append experiment. Select the dog image and then select Target 2. Leaving the append operation selected, click Execute. The result of this operation is shown in figure 5.4.
Figure 5.4. Cozmo has been added to the end of Target 2 as a result of the append operation.
Use the Move and Copy Lab Page to try various combinations of sources, targets, and the four operations until you have a good feel for how they operate.
Sometimes it might make the code more readable if you could reverse the order of the elements passed to these operations. If you want to move or copy an element from one place to another, a possible approach would be to wrap the source elements (rather than the target elements) and to specify the targets in the parameters of the method. Well, jQuery lets you do that by providing analogous operations to the four that we just examined, reversing the order in which sources and targets are specified. They are appendTo(), prependTo(), insertBefore(), and insertAfter(), and are described in table 5.3.
Table 5.3. Additional methods to move elements in the DOM
| Method | Description |
|---|---|
| appendTo(target) | Inserts every element in the set of matched elements to the end of the content of the specified target(s). The argument provided (target) can be a string containing a selector, an HTML string, a DOM element, an array of DOM elements, or a jQuery object. The method returns the jQuery object it was called upon. |
| prependTo(target) | Same as appendTo(target) except the elements in the set of matched elements are inserted at the beginning of the content of the specified target(s). |
| insertBefore(target) | Same as appendTo(target) except the elements in the set of matched elements are inserted before the specified target(s). |
| insertAfter(target) | Same as appendTo(target) except the elements in the set of matched elements are inserted after the specified target(s). |
Wow, that’s a lot of stuff to learn all at once. To help you digest this bunch of new methods, we’ll show you a couple of examples.
Example #1 – Moving elements
Let’s say you have the following HTML code in a page:
<div id="box">
<p id="description">jQuery is so awesome!</p>
<button id="first-btn">I'm a button</button>
<p id="adv">jQuery in Action rocks!</p>
<button id="second-btn">Click me</button>
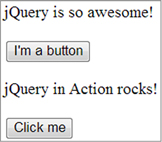
</div>This code will be rendered by Chrome as shown in figure 5.5a.
Figure 5.5a. The HTML code rendered by Chrome
Your first goal will be to move all the buttons before the first paragraph, the one having description as its ID. To perform this task you can use the insertBefore() method:
$('button').insertBefore('#description');Because you’re a good and observant reader, you’re thinking “Hey, I can do that using the before() method by just switching the selectors and wrapping the target one with the $() function!” Congratulations, you’re right! The previous statement can be equivalently turned into this:
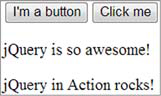
$('#description').before($('button'));Once executed, regardless of which of the two previous statements you run, the page will be updated as shown in figure 5.5b.
Figure 5.5b. The HTML snippet rendered by Chrome after the execution of the statement
You can see this code in action accessing the related JS Bin or the file lesson-5/moving.buttons.html (as soon as the page is loaded, the buttons will be moved). Now let’s see a slightly more complex example.
Example #2 – Copying and merging content
Imagine you have the same markup as the previous example and you want to create a new paragraph having the content equal to the union of the two paragraphs inside the div and put it right after the div itself. The content of this newly created paragraph will be “jQuery is so awesome! jQuery in Action rocks!” You can do that by combining two of the methods we explained in this lesson: text() and after(). The code that implements this request is listed here:
var $newParagraph = $('<p></p>').text(
   $('#description').text() + ' ' + $('#adv').text()
);
$('#box').after($newParagraph);
These two examples should prove how the more methods you discover, the more power you have in your hands. And we’re not finished yet! There’s one more thing we need to address before we move on. Sometimes, rather than inserting elements into other elements, you want to do the opposite. Let’s see what jQuery offers for that.
Leave a Reply