As you’ve seen, Backbone.js allows developers to break their code into small pieces. Let’s take a brief look at its components.
Model
Models are the objects representing the data of your application. Models have as properties the attributes that feature the objects. Here you usually add the methods to validate the data, initialize the properties, and notify the server about changes in the model.
To explore the idea of what a model is, think for a moment about the Todos manager you’re going to build. One of the models of your application (actually the only one you’ll have) is the Todo entry, which is a single activity to perform. Each of these Todos will have a title, a position inside the list, and a property to indicate if it has been completed or not. These three attributes of the object are the properties of the model.
Models are completely agnostic about how the information they contain will be displayed, and each of them can be connected with one or more views that listen for changes. In this way, you ensure that what is displayed is in sync with the data described by the model. In Backbone.js, models are created by extending the Backbone.Model object. You can also group models into a unique entity, called a collection, which is the subject of the next section.
Here’s an example of a Todo model having the properties just described:
var todo = Backbone.Model.extend({
   position: 1,
   title: '',
   done: false
});
As you can see from the code, in its basic form a model is just a set of properties declared into an object passed to the Backbone.Model.extend method.
Collection
A collection is a set of models and it’s used to organize and perform operations on the models included in it. When you define a collection, you need to set a property that specifies the type of the collection you’re creating.
Collections help you avoid the need to manually observe single model instances. In the Todos manager application, you’ll need a way to group the Todos because you’ll want to represent them as a unique list. Therefore, you’ll use a collection.
In Backbone.js, you create a collection by extending the Backbone.Collection object. A collection can have one or more views listening for changes.
The following example shows how you can create a collection of Todos using the model shown in the previous section:
var todoList = Backbone.Collection.extend({
   model: todo
});
As you can see, a collection can be as simple as an object containing as its only property the specification of the models it contains.
View
The view is the component that responds to DOM events by executing one or more methods based on your needs. It’s usually tied to a specific model. Views help you keep the DOM in sync with the data, and they’re the components where you write the logic behind the presentation of the data.
This component doesn’t contain the HTML code. The HTML code is written in templates managed with other JavaScript libraries like Mustache.js or Underscore.js. Because Backbone.js relies on Underscore.js, in our demo project we’ll stick with the latter.
Recalling our example of the Todos manager, the view represents the object that will allow you to listen for DOM events and run one or more methods accordingly. To give you a concrete idea, you can think of a DOM event as the click on the Add Todo button or the addition of a new model in your list of Todos.
The most important property of a view is el. It’s a reference to a DOM element that all views must have, and it ties the View object to a DOM element. Often you’ll use jQuery and its methods on el, so Backbone.js defines a convenient $el property, which is nothing but a jQuery object that wraps the el property.
The el property can be associated with a DOM element in two ways. The first way is to create a new element for the view and then add it to the DOM. In this case, the new element is created by the framework and the reference is assigned automatically. In addition, you can use some other properties to set common attributes of a DOM element. The properties discussed are tagName, which is the name of the tag (as div, p, li), id, and className, which is the CSS class name to assign. The second way is to reference to an element that already exists in the page.
Another important although optional feature of a view is the render() method. In it you define the logic behind the render of a template—the statements that will actually render the HTML representing the model. In the render() method you’ll usually have a JSON object of the model associated with the view that’s passed to the template to populate it with this data and show the HTML to the user. To be precise, you’ll compile a template into a function using Underscore’s _.template() method and pass the JSON object to this function. For example, you’ll have code like the following:
var TodoView = Backbone.View.extend({
   render: function() {
      this.$el.html(this.template(this.model.toJSON()));

      return this;
   }
});
The following example creates a li element using the first approach discussed to associate the el property to a DOM element and also defines a template:
var TodoView = Backbone.View.extend({
   tagName: 'li',
   className: 'todo',
   template: _.template($('#todo-template').html())
});
A template is a piece of HTML containing some template tags that will be replaced by the data store in a model. For example, let’s say that you want to show the title of a Todo; you might create a template like the following:
<script type="text/template" id="todo-template">
   <span class="todo-title><%- title %></span>
</script>
To sum up, users interact with the HTML markup contained in templates that are managed by views. Views are responsible for notifying the model and, eventually, for modifying part of the HTML.
Views are also responsible for passing the models to the templates. The templates contain placeholders where you can show the attributes’ values. These placeholders are replaced on the fly with the actual values of the models. You can also employ other structures like conditional statements that use the data passed to decide if a given HTML element or attribute has to be shown or not.
As you’ve seen from the template snippet, templates are created by inserting their content into a <script>. They usually have a type="text/template" attribute and an ID so you can easily retrieve them using jQuery or similar libraries. An example of the template tags cited previously is <%- title %>, where <%- %> is used to interpolate the value of the variable and HTML-escape it, and title is the name of the property you expect to be sent from the view.
Router
A router provides a way to tie parts of your project to a given URL and to keep track of states in the application. A router maps a path to a function. It usually works with one or more models and then updates a view. Figure 15.4 shows an abstraction of how the router component fits into the general Backbone.js architecture.
Figure 15.4. A schema of how a router interacts with other components of Backbone.js
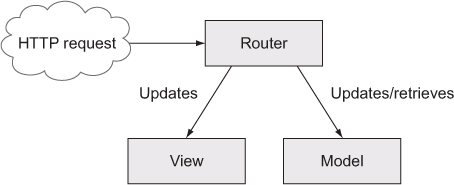
Routers translate a URL or hash fragments of the URL into an application state. This means that they’re needed if you want to make a given state of your application sharable or bookmarkable. Once one of the paths defined in the router matches the current URL, the relative function is executed.
To illustrate the idea, let’s recall our Todos manager and imagine that you want to enable the user to ask for a specific Todo in order to see its details. This is where a router comes into play. You can create a router and associate a URL—for example, todo/MY-TODO-ID—with a function to execute that updates the page, removing the list of Todos and showing just the details of the one required.
Routers are defined by extending the Backbone.Router object, and you usually will have only one router per application, although you can have as many routers as you need. An example router definition is shown in the following listing.
Listing 15.2. A simple router in Backbone.js
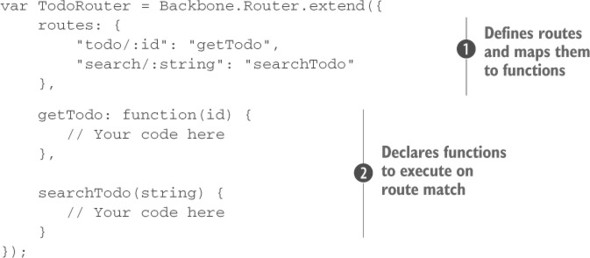
In the router example shown, you define two routes ![]() , todo/:id and search/:string, assigning an object to the routes property. The object has as keys the pattern of the routes and as values the function to execute when the route matches the URL (for instance, “todo/2” matches the first route defined). In this example, todo/:id and search/:string are mapped to the getTodo and searchTodo functions respectively, whose bodies are defined in the remainder of the object literal
, todo/:id and search/:string, assigning an object to the routes property. The object has as keys the pattern of the routes and as values the function to execute when the route matches the URL (for instance, “todo/2” matches the first route defined). In this example, todo/:id and search/:string are mapped to the getTodo and searchTodo functions respectively, whose bodies are defined in the remainder of the object literal ![]() .
.
As explained earlier, once one of the paths defined in the router matches the current URL, the relative function is executed, passing as its arguments the variable(s) defined in the path. Variables are the parts of the path you defined starting with the colon, like :id.
With this explanation, we’ve completed the analysis of the framework’s components. It’s time to get your hands dirty with the development of the Todos manager.
Creating a Todos manager application using Backbone.js
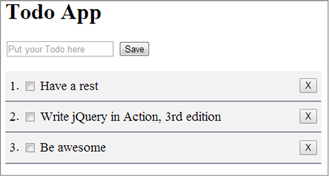
When learning a new framework, most people agree that one of the most effective ways to solidify the idea is to develop a small project. The goal of this section is to guide you through the creation of a simple Todos manager (figure 15.5) that allows you to perform the typical CRUD (Create Read Update Delete) operations. To keep the project as simple as possible, instead of using a web service to send and store your data, you’ll use the Web Storage API, relying on a Backbone.js adapter called Backbone .localStorage. The complete code can be found in the source code provided with this app in the folder lesson-15/todos-manager.
Figure 15.5. Layout of the Todos manager application
Your Todos manager will have only one model that represents a Todo. Every Todo item will have a title property, where you’ll save the task that has to be done, its position inside the list in a property called position, and a Boolean that specifies if the Todo has been completed or not in a property called done. You’ll also employ one collection to help you keep the models sorted. Finally, differently from what you might expect, you’ll have two views. You’ll adopt the Element controller pattern that consists of two views: the first controls a collection of items, whereas instances of the second deal with each individual item.
The structure of the project, shown in figure 15.6, is quite straightforward. It has an index.html page that contains the HTML markup and the templates used by the application. It also has a css folder containing the basic CSS file that gives the application a better look and feel, a js folder containing all the libraries included (such as jQuery and Backbone.js) inside a subfolder named vendor, and a file called app.js containing the project’s specific code. To keep things as easy as possible, you’ll put all the code in the same file, but when dealing with large projects a better choice is to have a different file for every object stored in a subfolder named like the components you’ve seen so far: models, collections, and views.
Figure 15.6. Folder and file structure of the Todo application

Now that you’ve seen the features of the project, let’s start developing it.
Creating the HTML
No web app that interacts with users can be developed without an interface, so the first step is to create the HTML markup. All of the HTML markup and the templates will reside in the index.html file. The interface is simple because you only need two components. The first is the place where the user can type the new activity to perform (the title of the Todo) and add it to the list, while the second is the list of Todos.
When developing a web application it’s a good practice to provide feedback to the user in case of failure of any of the operations performed. For this reason, you’ll also add a DOM element to show error messages in case they’re needed.
The HTML implementing these needs is shown here:
<div id="todo-sheet">
   <input id="new-todo" type="text" placeholder="Put your Todo here" />
   <button id="new-todo-save">Save</button>
   <span class="error-message"></span>
   <ul class="todos">
   </ul>
</div>
In this code you create the element (ul) where the Todos will be injected, but you haven’t decided how you want to display them. You need to create the template for the <li>s containing the information of a Todo. How you do that depends on your design choices, but we’ll still give you a suggestion. As we said in the introduction, the Todos have title, position, and done properties. The first two can be represented using a simple span element, whereas for the last one a check box would be a better choice because it enables users to check it and mark the Todo as completed.
Tip
In the markup shown we omitted a label element associated with the input field to let you focus on the code related to the project. However, when dealing with form elements, it’s always a good practice to provide such labels because they improve the accessibility of your elements.
The <span> showing the title of the Todo will be editable in place thanks to the contenteditable attribute. In addition, you’ll allow users to delete the Todo using a button element having as its text a big X. To provide feedback to the user for completed Todos, you’ll assign to the element a class that styles it as stroked.
Earlier, in the section titled “View,” we pointed out that templates contain placeholders where you can show the model’s values and other structures like conditional statements. The template for the Todo is shown below:
<script type="text/template" id="todo-template">
   <span class="todo-position"><%- position %></span>.
   <input class="todo-done" type="checkbox"
          <%= done ? checked="checked" : '' %> title="Completed" />
   <span class="todo-title <%= done ? 'todo-stroked' : '' %>"
         contenteditable="true"><%- title %></span>
   <button class="todo-delete" title="Delete">X</button>
</script>
Apart from the placeholders, you use a condition to test if the Todo is completed.
With all the HTML code in place, you need to include the libraries that will allow you to kick off the application and your code.
Installing Backbone.js
Backbone.js has as its unique hard dependency a library called Underscore.js (version >= 1.7.0). This means that you must include the latter before Backbone.js; otherwise, the framework won’t work. Including the framework and its dependency is as easy as including jQuery. All you have to do is add them to your page using the <script> tag.
The libraries your project will rely on are jQuery (this is still a app on jQuery, isn’t it?), Backbone.js and its dependency Underscore.js, and the Backbone.localStorage adapter. To include them, you’ll add the <script> tags having the reference to them at the end of the index.html page but before the closing <body> tag, as shown in the next listing.
Listing 15.3. Including libraries in a web page
<!DOCTYPE html>
<html>
   <head>
      ...
   </head>
   <body>
      ...
      <script src="js/vendor/jquery-1.11.3.min.js"></script>
      <script src="js/vendor/underscore-min.js"></script>
      <script src="js/vendor/backbone-min.js"></script>
      <script src="js/vendor/backbone.localStorage-min.js"></script>
      <script src="js/app.js"></script>
   </body>
</html>
The code shows how simple it is to include the framework.
Note
If you want to improve this demo project, you can download all the libraries with Bower and manage the order of inclusion with RequireJS.
For the sake of precision, the homepage of the framework specifies the following:
[…] for RESTful persistence, history support via Backbone.Router and DOM manipulation with Backbone.View, include jQuery, and json2.js for older Internet Explorer support.
The markup looks good, but at the moment your application isn’t able to do anything. Let’s fix this by developing the model of your project.
The Todo model
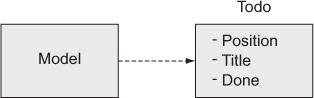
The only model of the Todos manager is the one representing a single Todo, which is the activity to complete (figure 15.7). Each instance of this object has title, position, and done properties. Instead of adding them directly, as shown in the snippet in the section “Model,” you’ll wrap them with an object assigned to a property called defaults. By doing so, when an instance of the model is created, any unspecified property will be set to the respective default value. This approach isn’t mandatory, but the advantage is that you ensure a default value for each property of the model.
Figure 15.7. A representation of a Todo object, the only model of the Todos manager
In your model you’ll also create two methods: initialize() and validate(). Both are optional but you’ll find yourself using them often in your projects. The former, present also in collections and views, is executed whenever a new instance of a model is created. Here you’ll add the listeners for one or more events so that a handler can be executed once an event is triggered.
The validate() method is, by default, called before storing the object. This method should return an error, which can be a string or an object, in case of failure and nothing on success. In case of failure, the model won’t be updated on the storage used, whether it resides on a server or locally (as your project does). This method is important because when it returns an error, it also fires an event called invalid that you can listen to in order to perform one or more specific actions.
In your project, inside the initialize() method you’ll listen for this and other events to log some information on the console. By doing so you can keep an eye on what’s going on in your application.
Before delving into the code, you need to perform a simple preliminary step. Throughout the app you’ve learned how important it is to not pollute the global scope. All the models, views, and collections you’ll develop will live inside a single namespace that you’ll name app. Your first line of code will be this:
window.app = {};With your namespace in place, take a look at the code of the Todo model shown in the following listing.
Listing 15.4. The Todo model
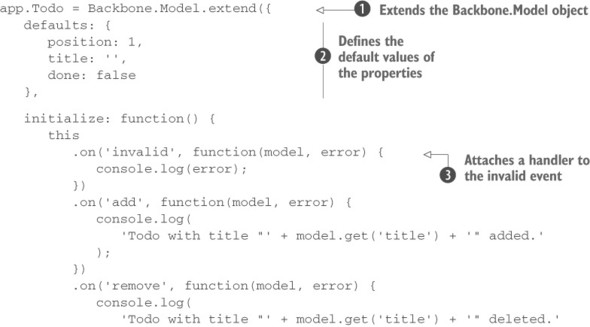
At the beginning of the listing you create a new object by extending Backbone .Model ![]() . You assign the result to a property called Todo, which is stored as a property of the window.app object you previously created (not shown in the listing). You also define an object literal having as keys the names of the attributes you want to create and as values the default values of the properties
. You assign the result to a property called Todo, which is stored as a property of the window.app object you previously created (not shown in the listing). You also define an object literal having as keys the names of the attributes you want to create and as values the default values of the properties ![]() .
.
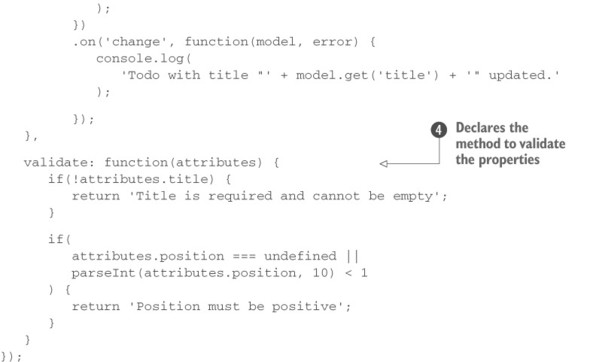
As mentioned before, you also create the initialize() method, where you add the handlers for several events such as invalid ![]() . Finally, you override the validate() method
. Finally, you override the validate() method ![]() , where you check that the title isn’t falsy (empty string, null, undefined, and so on), make sure the position is greater than zero, and return an error message if needed.
, where you check that the title isn’t falsy (empty string, null, undefined, and so on), make sure the position is greater than zero, and return an error message if needed.
In this section you built the model to represent the Todos for your application, but you want to group them into a collection. Let’s see how.
The Todos collection
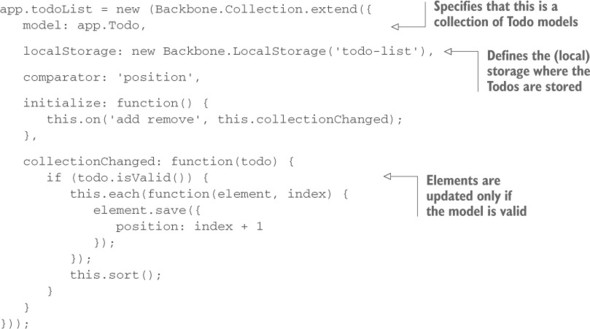
You want to group the models together to represent them as a unique list. To do so you’ll employ a collection that’s created by extending the Backbone.Collection object and specify its type by setting the value for the model property. You also have to force the list to be an ordered list because you want it to be sorted by the position specified in each Todo. Therefore, you need to define a comparator to sort the models by setting the comparator property inside the collection. The latter can be a method defined by the developer as well as a string that specifies the name of the attribute to use to sort objects. As we said, you want to sort the Todos based on the position attribute; hence you’ll specify position as the value of the comparator property.
When a new Todo is added or deleted by the user, you want to keep your list correctly sorted and with sequential position numbers. For this reason, you need to listen for the add and remove events to execute a function that you’ll call collectionChanged, which is responsible for restoring the correct numbering sequence. Backbone.js passes the model added or deleted to the handler as an argument. This is important because you’ll test if it’s valid or not, using the isValid() method, and only if the test is passed will the other model’s position be updated. The code that implements the Todo collection is shown in the next listing.
Listing 15.5. The collection of Todos
With this section we’ve covered the objects used to store the data and group the Todos, but nothing can be presented to the user yet. It’s time to fill the gap by developing the views.
The Todo views
The Todos manager has two views, one that deals with each individual Todo and another that deals with the collection of Todos. In this section we’ll discuss the former; the latter is covered in the next section.
The Todos (as a group) are represented as a list, whereas a single Todo is created as an item of the list. In terms of HTML this means you’ll have a ul element and many li elements. Inside the <li>s you’ll display the data associated with the model: title, position, and done. To create the li element, you’ll set the tagName property of the view and, although not mandatory, the className property to easily associate a style to the element. To display the data of the model, you’ll use the template described in the “Creating the HTML” section and override the render() method.
This view is also responsible for reacting to events of interest for a single Todo, like the deletion or addition of a single activity (a Todo). To achieve this goal, you’ll use the Backbone events hash. It’s nothing but an object, assigned to the events property of the view, made up of key-value pairs. A key is in the form of “eventName selector” and a value is the name of a callback function to execute.
The code implementing this view is shown in the listing that follows.
Listing 15.6. The Todo view
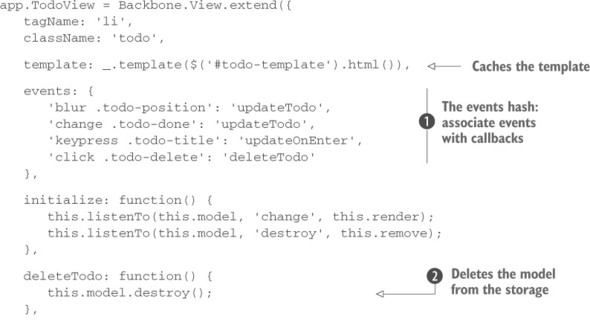
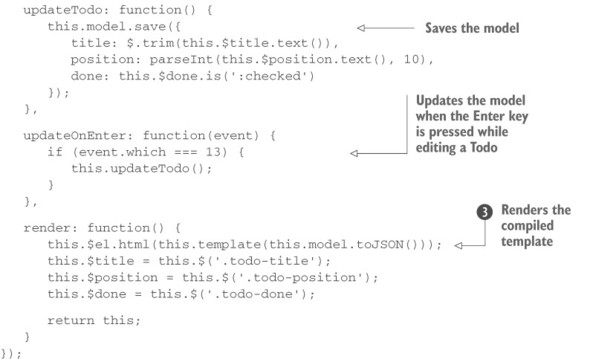
In the first lines of the listing you define this view’s tag element, define a class name for the element, and cache its template. Then you create the events hash ![]() associating some events to a set of callbacks you’ll create in the view. For example, you want to know when a user clicks the Delete button to delete the model from the list
associating some events to a set of callbacks you’ll create in the view. For example, you want to know when a user clicks the Delete button to delete the model from the list ![]() . Finally, in the render() function you display the previously compiled template
. Finally, in the render() function you display the previously compiled template ![]() and return the HTML snippet that replaces the content of the view’s element.
and return the HTML snippet that replaces the content of the view’s element.
Let’s now discuss the second view of the application.
The application view
The application view, called appView, is responsible for the creation of new Todos and the display of the Todo list.
Unlike the Todo view, in your HTML you already have a DOM element this view can refer to, so you won’t set the tagName and the className. The element is the <div> having todo-sheet as its ID. You’ll set it as the value of the el property of the appView. When the view is initialized, you also want to fetch the list of Todos stored so that you can show them to the user. For this reason you’ll call the fetch() method on the list in the initialize() method.
Based on its responsibilities, the only DOM event you’re interested in for this view is the click on the Save button. Once it’s fired, you can execute the function create-Todo() to create and store the new Todo written by the user. This situation is a perfect fit for the events hash. In addition to this DOM event, this view needs to listen for changes in the Todos list in order to update the HTML representing the list. The next listing shows the code that implements what we’ve discussed in this section.
Listing 15.7. The application view
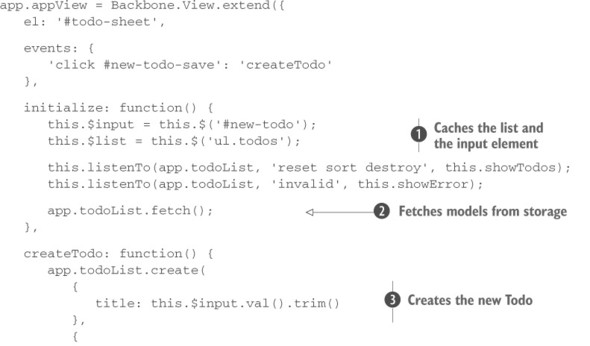
In the initialize() method you cache the ul and the input element where the user can write the activity to perform (the title of the Todo) ![]() . Then you attach a handler for the events of interest. Finally, you fetch the models from local storage
. Then you attach a handler for the events of interest. Finally, you fetch the models from local storage ![]() .
.
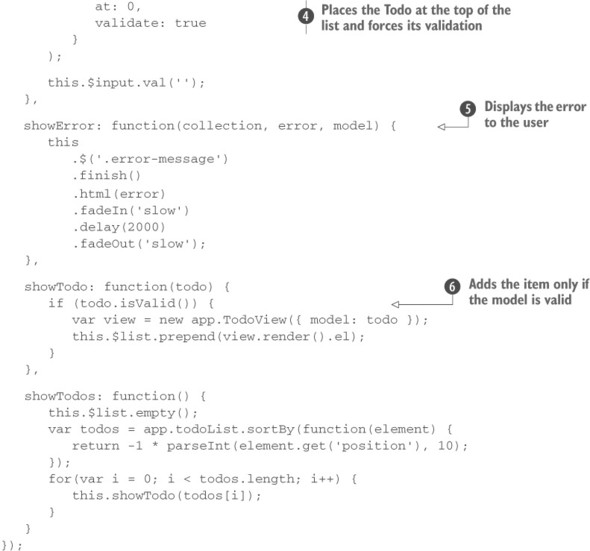
In the createTodo() method you create the instance of a Todo model, passing only the title and relying on the default values for the other properties ![]() . Then you put it in your list of Todos, placing it at the beginning of the list using the at option and forcing its validation via the validate option
. Then you put it in your list of Todos, placing it at the beginning of the list using the at option and forcing its validation via the validate option ![]() .
.
In case an error occurs, a message is shown inside the element having the class error-message by executing the showError() method ![]() .
.
To render the list of Todos you create a showTodos() method and a support method, showTodo(), that’s responsible for rendering a single Todo. Inside show-Todos(), you first ensure there’s nothing inside the ul element that contains the Todos, using jQuery’s empty() method. Then you sort the list in reverse order because you want the last stored element, the head of the list, to be shown as the first list item. The last Todo should be displayed at the top of the list, shouldn’t it?
Finally, you loop over the reverse-sorted list, calling the showTodo() method and passing as an argument the current Todo. The showTodo() method tests if the given Todo is valid ![]() and, in case of success, a view associated with it is created and prepended to the ul.
and, in case of success, a view associated with it is created and prepended to the ul.
At this point all the code is in place and you need to kick off your application. This is done by writing at the end of the file the following statement:
new app.appView();With this last statement, the project is completed and you’re allowed to celebrate this event by drinking champagne. The final and complete code can be found in the source provided with this app in the folder lesson-15/todos-manager. To execute the application, open the index.html file in your browser.
This section dedicated to Backbone.js is just an introduction to the framework, and the application you built is very basic. But you should have noticed how closely jQuery was integrated within it and how jQuery was used extensively inside the functions that Backbone.js allowed you to construct. This is a true testament to the widespread usefulness and flexibility of jQuery. We hope that thanks to this introduction you’re more aware of the potentiality of Backbone.js and intrigued enough to go further. As a final challenge to test your knowledge, we invite you to modify the project to employ Bower, RequireJS, and QUnit. Have fun!
Leave a Reply