Before delving into the development of your project, we’ll discuss its requirements. The demo needs only two pages: one that contains the form (that we’ll call index.html) and another for the backend business logic (that we’ll name contact.php). You can play with this example by accessing the lesson-11 folder of this app’s sources.
To keep things as simple as possible but still interesting, you’ll create a form that contains four fields: full name, email, subject of the message, and the message itself. You want all of these fields to be mandatory. Finally, you want the email address to be well formatted and all the other fields to have at least four characters.
The form will be highly interactive and will check that the fields conform to the constraints established without the need to reload the page. To achieve this goal, you’ll employ some of the techniques you learned in the previous lessons, and in particular the concepts discussed in the lesson dedicated to Ajax, to send requests to the server.
The tests to validate the input of the user will be performed for all the fields each time the user clicks the Submit button. In addition, you’ll perform them on a single field every time that field loses the focus. If a value isn’t valid, you’ll warn the user with an informative message placed beneath the field.
Why server-side validation?
Some of you might wonder why we decided to employ server-side validation for the data instead of performing the task on the client using only JavaScript. The reason is that every validation you perform with JavaScript is unreliable and unsafe because a user could easily disable JavaScript. Thus, you’d end up allowing your users to send invalid or potentially dangerous data or duplicate the same validations on the server. To avoid these issues you’ll employ server-side validation while keeping the page interactive through Ajax.
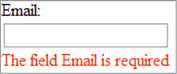
Figure 11.1 shows an example of the feature described.
Figure 11.1. An example of an invalid field and the error message shown
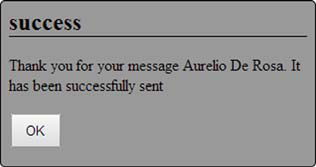
In addition to this feedback, when the user submits the form you’ll show a dialog box with either an error message, shown in figure 11.2a, or a success message, shown in figure 11.2b.
Figure 11.2a. The dialog box displayed in case the form contains one or more errors.
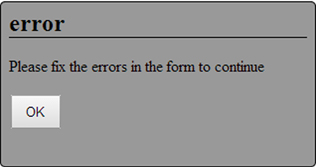
Figure 11.2b. The dialog box displayed in case all the form’s fields are valid and the message is successfully sent. In the success message the name of the sender (in this case, Aurelio De Rosa) is included.
The messages shown will be returned by the PHP page using a JSON object and injected into the dialog using jQuery. The structure of the JSON returned is shown in figure 11.3.
Figure 11.3. The structure of the JSON object returned by the PHP page that validates the user’s inputs and sends the email
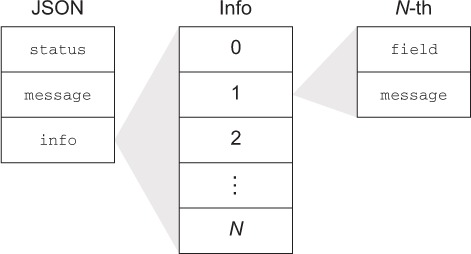
The structure of the JSON object is straightforward. It’s made up of three properties: status, message, and info. status is a string used to specify whether the values written by the user are all correct. If so, the value will be success; otherwise, the value is error. The message property contains a string meant to be shown in the dialog box. In the case of the validation of a single field, if the value of the latter is valid, message will be an empty string. The info property provides an array containing objects related to the fields of the form that are invalid. Each of these objects exposes two properties: field and message. The aim of field is to specify the name of the field that contains the error. message has the same role described before, but this time it’s used to provide the specific error of the invalid field.
Leave a Reply