Event handlers are designed to be invoked when browser or user activity triggers the propagation of their associated events through the DOM hierarchy. But there may be times when you want to trigger the execution of a handler under script control. You could define such event handlers as top-level functions so that you can invoke them by name, but as you’ve seen, defining event handlers as inline anonymous functions is much more common and so darned convenient! Moreover, calling an event handler as a function doesn’t cause semantic actions or bubbling to occur.
For this need, jQuery has provided methods that will automatically trigger event handlers on your behalf under script control. The most general of these methods is trigger(), whose syntax is as follows.
| Method syntax: trigger | |
|---|---|
| trigger(eventType[, data]) | |
| Invokes any event handlers and behaviors established for the passed event type for all matched elements. | |
| Parameters | |
| event | (String|jQuery.Event) Specifies the name of the event type for which handlers are to be invoked, including namespaced events. Alternatively a jQuery.Event can be passed. |
| data | (Any) Data to be passed to the handlers. If an array is provided, the elements are passed to the handler as different parameters. |
| Returns | |
| The jQuery collection. | |
The trigger() method, as well as the convenience methods that we’ll introduce in a moment, do their best to simulate the event to be triggered, including propagation through the DOM hierarchy and the execution of semantic actions.
Each handler called is passed a populated instance of jQuery.Event. Because there’s no real event, properties that report event-specific values, such as the location of a mouse event or the key of a keyboard event, aren’t passed (the properties don’t exist at all, which is different from having their value as undefined). The target property is set to reference the element of the matched set to which the handler was bound.
Just as with actual events, triggered event propagation can be halted via a call to the jQuery.Event instance’s stopPropagation() method, or a false value can be returned from any of the invoked handlers.
The data parameter passed to the trigger() method isn’t the same as the one passed when a handler is established. The latter is placed into the jQuery.Event instance as the data property; the value passed to trigger() (and, as you’re about to see, triggerHandler()) is passed as a parameter to the listeners. This allows both data values to be used without conflicting with each other.
Before moving to triggerHandler(), let’s discuss in detail the data parameter of the trigger() method and how passing an array differs from passing any other data type. For the sake of the discussion, consider the following snippet, which adds an event handler on a hypothetical element having foo as its ID that’s executed when the click event is fired:
$('#foo').on('click', function(event, par1, par2, par3){
   console.log(par1, par2, par3);
});
As you can see, you define the event parameter as usual but also three new parameters: par1, par2, and par3. Inside the handler you print on the console the value of these three new parameters. Now imagine that you employ jQuery’s trigger() method to execute this handler as shown here, passing three numbers (1, 2, and 3) in addition to the event to trigger:
$('#foo').trigger('click', 1, 2, 3);As a result, you’ll see the following logged on the console:
1 undefined undefined
This happens because the trigger method accepts only one argument to pass data to the handler, so all the others (2 and 3 in this case) are ignored. If you want to provide more than one argument, you can employ an array as shown here:
$('#foo').trigger('click', [1, 2, 3]);Once the handler attached to the element is executed, the following line will be printed on the console, proving that all the elements of the array have been passed as separated parameters (par2 and par3 aren’t undefined anymore):
1 2 3In case you want to play further with the data parameter, we’ve set up a demo for you that you can find in the file lesson-6/trigger.data.parameter.html and also as a JS Bin.
For cases where you want to trigger a handler but not cause propagation of the event and execution of semantic actions, jQuery provides the triggerHandler() method, which looks and acts just like trigger() except that no bubbling or semantic actions will occur.
| Method syntax: triggerHandler | |
|---|---|
| triggerHandler(eventType[, data]) | |
| Invokes any event handlers established for the passed event type for all matched elements without bubbling, semantic actions, or live events. This method returns whatever value was returned by the last handler it caused to be executed, or undefined. | |
| Parameters | |
| eventType | (String) Specifies the name of the event type for which handlers are to be invoked. |
| data | (Any) Data to be passed to the handlers. If an array is provided, the elements are passed to the handler as different parameters. |
| Returns | |
| Any. If no handler is triggered or the handler doesn’t return a value, undefined is returned. | |
The triggerHandler() method has the data parameter in common with trigger(), so the previous demo works with triggerHandler() as well, but they also have some important differences that are worth discussing. The first one is that trigger() acts on all the elements in the jQuery collection, whereas triggerHandler()operates on only the first one. In addition, triggerHandler() doesn’t allow for chaining because it returns as its value the same value returned by the handler executed (if no handler is triggered or the handler doesn’t return a value, it returns undefined), whereas trigger() returns the set of matched elements. Finally, events fired with trigger-Handler() don’t bubble up the DOM hierarchy.
No words can replace a good example, so before moving to the next section, it’s time to see both trigger() and triggerHandler() in action (this book is still called jQuery in Action, isn’t it?). The code of the example is shown in the following listing and can be found in the downloadable code in the file lesson-6/jquery.triggering .events.html and as a JS Bin.
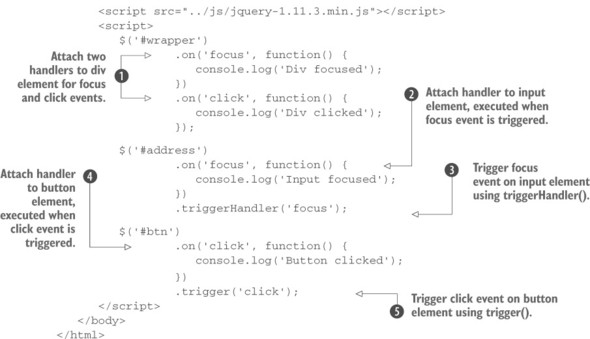
Listing 6.6. Triggering events in jQuery
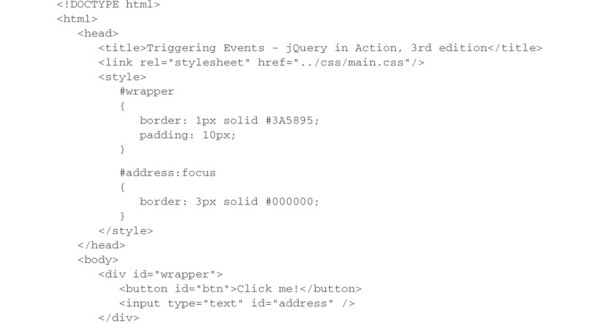
The code in this listing allows you to see the behavior of trigger() and trigger-Handler() discussed previously. Opening the page, you should see a layout, as shown by figure 6.7.
Figure 6.7. Layout of the page jquery.triggering.events.html

In listing 6.6 you create a <div> acting as a wrapper of the other two elements of the page: a button and an input box. In the usual script element, you first select the wrapper element, attaching two listeners to it using the on() method: one for the focus event and one for the click event ![]() . Inside them, you print a message on the console to explain what element and event have been called. Then you attach a handler for the focus event on the input element that has address as its ID
. Inside them, you print a message on the console to explain what element and event have been called. Then you attach a handler for the focus event on the input element that has address as its ID ![]() . Thanks to chaining, before closing the statement with the semicolon, you also call the triggerHandler() method, passing the string focus as its argument
. Thanks to chaining, before closing the statement with the semicolon, you also call the triggerHandler() method, passing the string focus as its argument ![]() . By calling triggerHandler(), you cause the execution of the function that you’ve just attached in
. By calling triggerHandler(), you cause the execution of the function that you’ve just attached in ![]() . As we said, triggerHandler() doesn’t bubble up, so the handler attached to the element, having wrapper as its ID for the same event, won’t be executed.
. As we said, triggerHandler() doesn’t bubble up, so the handler attached to the element, having wrapper as its ID for the same event, won’t be executed.
Finally, you select the button element, attaching to it a handler for the click event ![]() . As for the input element, before closing the statement, you trigger an event but this time using trigger()
. As for the input element, before closing the statement, you trigger an event but this time using trigger() ![]() . Therefore, after printing on the console the message set in its handler, the event bubbles up so that the handler attached to the click event of the div is executed as well.
. Therefore, after printing on the console the message set in its handler, the event bubbles up so that the handler attached to the click event of the div is executed as well.
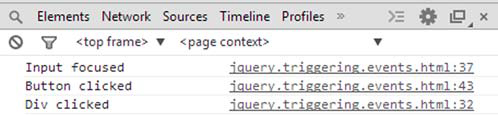
Based on the discussion of this example, as soon as you load the page, the output of the console should be as shown in figure 6.8.
Figure 6.8. Output of the page jquery.triggering.events.html
Methods like on() and trigger() are frequently used, so writing their full syntax each time rapidly becomes annoying. The jQuery team knows it, so they introduced a set of shortcut methods.
Shortcut methods
jQuery provides a handful of shortcut methods to establish specific event handlers as well as trigger events. Because the syntax of each of these methods is identical except for the name of the method, we’ll save some space and present them all in the following single syntax descriptor.
| Method syntax: specific event binding | |||
|---|---|---|---|
| eventName([data,] handler) | |||
| Establishes the specified function as the event handler for the event named by the method’s name. The supported methods are as follows: | |||
| blur change click dblclick focus focusin | focusout keydown keypress keyup mousedown mouseenter | mouseleave mousemove mouseout mouseover mouseup ready | resize scroll select submit |
| Parameters | |||
| data | (Any) Data to be passed to the Event instance as a property named data and made available to the handler function. | ||
| handler | (Function) The function that’s to be established as the event handler. | ||
| Returns | |||
| The jQuery collection. | |||
In addition to the ability to attach a handler, these methods can act as the trigger() method. The syntax for all these methods is exactly the same except for the method name, and that syntax is as follows.
| Method syntax: Specific event triggering | |||
|---|---|---|---|
| eventName() | |||
| Invokes any event handler and behavior established for the named event type for all matched elements. The supported methods are as follows: | |||
| blur change click dblclick focus focusin | focusout keydown keypress keyup mousedown mouseenter | mouseleave mousemove mouseout mouseover mouseup resize | scroll select submit |
| Parameters | |||
| none | |||
| Returns | |||
| The jQuery collection. | |||
jQuery 3: Methods removed
jQuery 3 gets rid of the already deprecated load(), unload(), and error() shortcut methods. These methods weren’t listed in the previous descriptions because they were deprecated a long time ago (since jQuery 1.8). If you’re still using them in your projects or you’re employing a plugin that relies on one or more of them, upgrading to jQuery 3 will break your code.
To give you an idea of what a shortcut looks like, let’s change the last statement of listing 6.6 so that it employs them. For ease of reading we report the statement here:
$('#btn')
   .on('click', function() {
      console.log('Button clicked');
   })
   .trigger('click');
Using the shortcuts just discussed, you can change it as follows:
$('#btn')
   .click(function() {
      console.log('Button clicked');
   })
   .click();
In addition to these shortcuts, there’s another one in jQuery that’s a bit different.
Hovering over elements
A common multi-event scenario that’s frequently employed in interactive applications involves mousing into and out of elements. Events that inform you when the mouse pointer has entered an area, as well as when it has left that area, are essential to building many of the user interface elements that are commonly presented to users on your pages. Among these element types, cascading menus used as navigation systems are a common example.
A vexing behavior of the mouseover and mouseout event types often hinders the easy creation of such elements: a mouseout event fires as the mouse is moved over an area that is covered by its children. Consider the display in figure 6.9 that shows the layout of the file lesson-6/hover.html, which is also available as a JS Bin.
Figure 6.9. This page helps demonstrate when mouse events fire as the mouse pointer is moved over an area and its children.
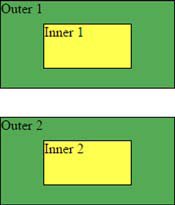
This page displays two identical (except for naming) sets of areas: an outer area and an inner area. Load this page into your browser as you follow the rest of this section.
For the top set of rectangles on the page, the following statements establish handlers for the mouseover and mouseout events:
$('#outer1').on('mouseover mouseout', report);
$('#inner1').on('mouseover mouseout', report);
These statements establish a function named report as the event handler for both the mouseover and mouseout events defined as follows:
function report(event) {
   event.stopPropagation();
   console.log(event.type + ' on ' + event.target.id);
}
This listener first stops the event from bubbling up and then prints some text on the console containing the name of the event and the ID of the element it was fired.
Now move the mouse pointer into the area labeled “Outer 1” (being careful not to enter “Inner 1”). You’ll see on the console that a mouseover event has fired. Move the pointer back out of the area and, as expected, you’ll see that a mouseout event has fired.
Now move the mouse pointer into “Outer 1” but this time continue inward until the pointer enters “Inner 1”. As the mouse enters “Inner 1”, a mouseover event is fired for it and a mouseout event fires for “Outer 1”. If you wave your pointer back and forth over the boundary between “Outer 1” and “Inner 1”, you’ll see a flurry of mouseout and mouseover events. This is the defined behavior, even if it’s rather unintuitive. Even though the pointer is still within the bounds of “Outer 1”, when the pointer enters a contained element, the event model considers the transition to be leaving the outer area.
Expected or not, you don’t always want that behavior. Often you want to be informed when the pointer leaves the bounds of the outer area and don’t care whether the pointer is over a contained area or not.
Luckily, major browsers support a pair of mouse events, mouseenter and mouseleave, first introduced by Microsoft in Internet Explorer. This event pair acts slightly more intuitively, not firing a mouseleave event when moving from an element to a descendant of that element.
Using jQuery you could establish handlers for this set of events using the following code:
$(element).mouseenter(function1).mouseleave(function2);But jQuery also provides a single method that makes it even easier: hover(). The syntax of this method is as follows.
Use the following script to establish mouse event handlers for the second set of areas (“Outer 2” and its “Inner 2” child) of the example page:
$('#outer2').hover(report);
$('#inner2').hover(report);
As with the first set of areas, the report() function is established as both the mouseenter and mouseleave handlers for “Outer 2” and “Inner 2”. But unlike the first set of areas, when you pass the mouse pointer over the boundary between “Outer 2” and “Inner 2”, neither of these handlers (for “Outer 2”) is invoked. This is useful for those situations where you have no need for parent handlers to react when the mouse pointer passes over child elements.
Let’s now see how it’s possible to create custom events in jQuery.
How to create custom events
Creating custom events in jQuery is straightforward and requires the use of the methods we’ve discussed so far. Custom events are a convenient way to execute one or more statements based on a given condition that may happen in different parts of your code. Let’s say that you have a set of statements to execute that are logically related. You can group them to create a handler and then trigger your custom event when needed. To be honest, the event doesn’t need to be created in any formal way but only listened to and triggered. This means that you can attach a handler for a custom event using the on() method, passing as its first argument the name of the new event. Then you can fire it using trigger() and passing the same name.
A basic example of creating and using a custom event is shown here:
$('#btn').on('customEvent', function(){
    alert('customEvent');
});
$('#anotherBtn').click(function() {
    $('#btn').trigger('customEvent');
});
In this code you attach a handler for a custom event called customEvent to the element having ID of btn. Then you attach a handler to the element having ID of anotherBtn that, once clicked, triggers the customEvent event. Because you fired the customEvent event on the element having ID of btn, the alert will be shown.
Keep in mind that jQuery won’t create at runtime a shortcut with the same name of a custom event, so writing
$('#btn').customEvent();will throw an error.
In addition to custom events, jQuery allows you to namespace events. We introduced this feature in the previous sections without covering it in detail. It’s time to fill in the gap.
Namespacing events
Another nifty little event-handling extra that jQuery provides is the ability to group event handlers by assigning them to a namespace. Unlike conventional namespacing (which assigns namespaces via a prefix), the event names are namespaced by adding a suffix to the event name separated by a period character. If you’d like, you can use multiple suffixes to place the event into multiple namespaces, as we cited in the description of the on() method. By grouping event bindings in this way, you can easily act upon them later as a unit.
Take, for example, a page that has two modes: a display mode and an edit mode. When in edit mode, event listeners are placed on many elements of the page, but these listeners aren’t appropriate for display mode and need to be removed when the page transitions out of edit mode. You could namespace the edit mode events with code such as this:
$('.my-class').on('click.editMode', myFunction);By grouping all these bindings into a namespace called editMode, you can later operate upon them as a whole. For example, you can remove all the events namespaced under editMode from all the elements of the page with the following statement:
$('*').off('.editMode');As we said, jQuery also allows you to use multiple namespaces for a given event. In the following example you can see this feature:
$('.elements').on('click.myApp.myName', myFunction);Namespaces are case sensitive, so if you have the previous statement and execute the following
$('.elements').trigger('click.myapp');the handler attached to the event won’t be executed (note the lowercase a).
There’s another important concept to highlight. Imagine you have the following code:
$('.elements').on('click.myApp.myName', myFunction);
$('.other-elements').on('click.myApp', myOtherFunction);
You want to execute all the event handlers attached to a click event that has the namespace myApp. This means that you want to execute both myFunction() and myOtherFunction(). To do so you don’t have to execute two different statements like these:
$('.elements').trigger('click.myApp');
$('.other-elements').trigger('click.myApp.myName');
You can select all the elements of both the sets and fire the click event, specifying only the myApp namespace:
$('.elements, .other-elements').trigger('click.myApp');If a comparison will help you, you can consider multiple namespaces acting as the OR logical operator. If a namespaced event is fired, all the handlers attached to events having as one of their namespaces the one specified will be executed.
With all these event-handling tools under your belt, you’ll employ what you’ve learned so far in the next lesson and look at an example page that makes use of them, as well as some of the other jQuery techniques that you’ve learned from previous lessons.
Leave a Reply