Another type of DOM manipulation that you’ll often need to perform is to wrap an element (or a set of elements) in some markup. You might want to wrap all links of a certain class inside a <div>. You can accomplish such DOM modifications by using jQuery’s wrap() method.
| Method syntax: wrap | |
|---|---|
| wrap(wrapper) | |
| Wraps the elements in the jQuery object with the argument provided. | |
| Parameters | |
| wrapper | (String|Element|jQuery|Function) A string containing the opening tag (and optionally the closing tag) of the element with which to wrap each element of the matched set. The argument can also be an element, a jQuery object, or a selector specifying the elements to be cloned and serve as the wrapper. If a selector matching more than one element or a jQuery object is passed, only the first element is used as the wrapper. If a function is provided, the function is invoked for each element in the set, passing that element as the function context (this) and passing one parameter to the function that’s the element index. The function’s returned value, which can be an HTML fragment or a jQuery object, is used to wrap the current element of the set. |
| Returns | |
| The jQuery collection. | |
To understand what this method does, let’s say that you have the following markup:
<a class="surprise">A text</a>
<a>Hi there!</a>

<a class="surprise">Another text</a>
To wrap each link with class surprise with a <div> having class hello, you could write
$('a.surprise').wrap('<div class="hello"></div>');The result of running such a statement would be the following:
<div class="hello"><a class="surprise">A text</a></div>
<a>Hi there!</a>
<div class="hello"><a class="surprise">Another text</a></div>
If you wanted to wrap the link in a clone of a hypothetical first div element on the page, you could write
$('a.surprise').wrap($('div:first'));or alternatively
$('a.surprise').wrap('div:first');Remember that in this case the content of the div will also be cloned and used to surround the a elements.
When multiple elements are collected in a jQuery object, the wrap() method operates on each one individually. If you’d rather wrap all the elements in the jQuery object as a unit, you could use the wrapAll() method instead.
| Method syntax: wrapAll | |
|---|---|
| wrapAll(wrapper) | |
| Wraps the elements of the matched set, as a unit, with the argument provided | |
| Parameters | |
| wrapper | Same as the wrapper parameter of wrap() |
| Returns | |
| The jQuery collection | |
jQuery 3: Bug fixed
jQuery 3 fixes a bug of the wrapAll() method that occurred when passing a function to it. Prior to jQuery 3, when passing a function to wrapAll(), it wrapped the elements of the matched set individually instead of wrapping them as a unit. Its behavior was the same as passing a function to wrap().
In addition to fixing this issue, because in jQuery 3 the function is called only once, it isn’t passed the index of the element within the jQuery object. Finally, the function context (this) now refers to the first element in the matched set.
Sometimes you may not want to wrap the elements in a matched set but rather their contents. For just such cases, the wrapInner() method is available.
| Method syntax: wrapInner | |
|---|---|
| wrapInner(wrapper) | |
| Wraps the contents, including text nodes, of the elements in the matched set with the argument provided | |
| Parameters | |
| wrapper | Same as the wrapper parameter of wrap() |
| Returns | |
| The jQuery collection | |
The converse operation of wrap(), which is removing the parent of a child element, is possible with the unwrap() method.
| Method syntax: unwrap | |
|---|---|
| unwrap() | |
| Removes the parent element of the elements in the set. The child element, along with any siblings, replaces the parent element in the DOM. | |
| Parameters | |
| none | |
| Returns | |
| The jQuery collection. | |
jQuery 3: Parameter added
jQuery 3 adds an optional selector parameter to unwrap(). You can pass a string containing a selector expression to match the parent element against. In case there is a match, the child elements are unwrapped; otherwise, the operation isn’t performed.
Before moving on, let’s see an example of the use of these methods.
How to wrap label-input and label-textarea pairs of a form
Imagine that you have the following contact form:
<form id="contact" method="post">
   <label for="name">Name:</label>
   <input name="name" id="name" />
   <label for="email">Email:</label>
   <input name="email" id="email" />
   <label for="subject">Subject:</label>
   <input name="subject" id="subject" />
   <label for="message">Message:</label>

   <textarea name="message" id="message"></textarea>
   <input type="submit" value="Submit" />
</form>
You want to wrap every label-input or label-textarea pair in a <div> having the class field. You define this class as follows:
.field
{
   border: 1px solid black;
   margin: 5px 0;
}
Wrapping the pairs means that you don’t want to wrap each element inside the form individually. To achieve this goal, you’ll need to use some of the knowledge you’ve acquired throughout the first lessons of the app. But don’t worry! This can be a good test to see if you’ve digested the concepts explained so far or if you need a quick refresher. One of the possible solutions is the following:
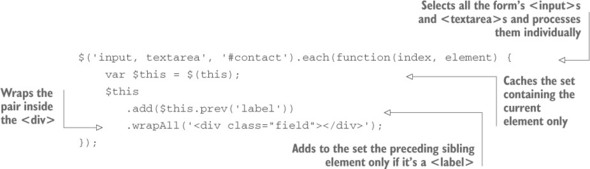
To perform the exercise, you need to select all the <input>s and the <textarea>s inside the <form> (for the sake of brevity we’re ignoring other tags such as <select>) and find a way to tie them with the related <label>. Then you have to process each pair individually. To do that, after selecting the elements you need, use the each() method we covered in lesson 3. Inside the anonymous function passed to it, wrap the current element using $() and then store it in a variable because you’re going to use it twice. Then add to the element in the set the preceding sibling element only if it’s a label element. At this point, you have a set with the two elements you need, so you wrap this set with the <div> as required. Yeah, mission accomplished!
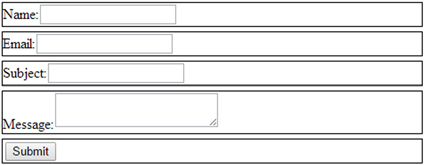
Figure 5.6a shows the <form> before running the code and figure 5.6b shows it after.
Figure 5.6a. The form before executing the code

Figure 5.6b. The form after executing the code. Note how each label-input or label-textarea pair is surrounded by a black border, proving that they’ve been wrapped by the <div> as required.
In case you want to play further with this example, it’s available as a JS Bin and in the file lesson-5/wrapping .form.elements.html.
So far you’ve learned how to perform many operations. It’s now time to learn how to remove elements from the DOM.
Leave a Reply