jQuery’s motto is “Write less, do more.” If you’ve spent any time at all trying to add dynamic functionality to your pages, you’ve found that performing simple tasks using raw JavaScript can result in dozens of lines of code (LoC). The creator of jQuery specifically created this library to make common tasks trivial and easy to learn, solving issues caused by browser incompatibilities.
For example, anyone who has dealt with radio groups in JavaScript knows that it’s a lesson in tedium to discover which radio element of a radio group is currently checked and to obtain its value attribute. The radio group needs to be located, and the resulting set of radio elements must be inspected, one by one, to find out which element has its checked attribute set. This element’s value attribute can then be obtained.
To be compatible with Internet Explorer 6 and above (if you ignore some older browsers, a better approach exists), such code might be implemented as follows:
var checkedValue;
var elements = document.getElementsByTagName('input');
for (var i = 0; i < elements.length; i++) {
  if (elements[i].type === 'radio' &&
      elements[i].name === 'some-radio-group' &&
      elements[i].checked) {
    checkedValue = elements[i].value;
    break;
  }
}
Contrast that with how it can be done using jQuery:
var checkedValue =
  jQuery('input:radio[name="some-radio-group"]:checked').val();
Don’t worry if that looks a bit cryptic right now. In short order, you’ll understand how it works, and you’ll be whipping up your own terse—but powerful—jQuery statements to make your pages come alive. The point we want to show here is how the library can turn a lot of lines of code into just one.
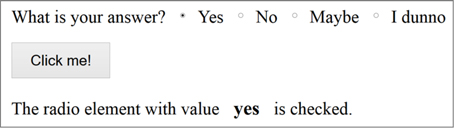
What makes the previous jQuery statement so short is the power of the selector, an expression used to identify target elements on a page. It allows you to easily locate and grab the elements that you need; in this case, the checked element in the radio group. If you haven’t downloaded the example code yet, now would be a great time to do so. Unpack the code and load into your browser the HTML page that you find in the file lesson-1/radio.group.html. This page, shown in figure 1.1, uses the jQuery statement that we just examined to determine which radio button has been checked.
Figure 1.1. Determining which radio button is checked is easy to accomplish in one statement with jQuery!
This example shows you how simple and concise code written using jQuery can be. This isn’t the only real power of jQuery; otherwise we could have thrown it out the window a long time ago. Nonetheless, one of its great strengths is the ability to retrieve elements using complex selectors without worrying about cross-browser compatibility, especially in older browsers.
When you perform a selection, you’re relying on two things: a method and a selector. Today the latest versions of all major browsers support native methods for element selection like document.querySelector() and document.querySelectorAll(). They allow you to use more complex selectors instead of the usual selection by ID or class. In addition, the new CSS3 selectors are widely supported among modern browsers. If you aimed to support only modern browsers, and the capabilities of jQuery lay only in selecting elements, you would have enough power to avoid the overhead introduced by the library in your website. The fact that a lot of people still rely on older browsers, which you may have to support, can be a real pain because you have to deal with all the inconsistencies. This is one of the main reasons to employ jQuery. It allows you to reliably use its selectors without the worry of code not working in browsers that don’t support them natively.
Note
If you’re wondering what browsers are considered modern today, they are Internet Explorer 10 and above and the latest versions of Chrome, Opera, Firefox, and Safari.
Still not convinced? Here’s a list of issues that you’ll have to tackle on your own if you don’t use jQuery. In addition, as we outlined, the library is much more than that, as you’ll discover in the rest of the app.
Let’s now examine how JavaScript should be used on your pages.
1.2. Unobtrusive JavaScript
You may recall the bad-old days before CSS, when you were forced to mix stylistic markup with the document structure markup in your HTML pages. Anyone who’s been authoring pages for any amount of time surely does, most likely with less than fondness.
The addition of CSS to your web development toolkits allows you to separate stylistic information from the document structure and gives travesties like the <font> tag the well-deserved boot. Not only does the separation of style from structure make your documents easier to manage, but it also gives you the versatility to completely change the stylistic rendering of a page by swapping out different style sheets.
Few of you would voluntarily regress to the days of applying styles with HTML elements, yet markup such as the following is still all too common:
<button onclick="document.getElementById('xyz').style.color='red';">
  Click Me
</button>
You can easily see that the style of this button element isn’t applied via the use of the <font> tag and other deprecated style-oriented markup. It’s determined by whatever, if any, CSS rules (not shown here) that are in effect on the page. Although this declaration doesn’t mix style markup with structure, it does mix behavior with structure. It includes the JavaScript to be executed when the button is clicked as part of the markup of the button element via the onclick attribute (which, in this case, changes the color of a DOM element with the ID value of xyz into red). Let’s examine how you might improve this situation.
Leave a Reply